Nutrition Facts
Servings 10
- Iron 0.0 mg
* Percent Daily Values are based on a 2,000 calorie diet. Your daily value may be higher or lower depending on your calorie needs.

This 4th of July tie-dye cake is my low-stress way to make a plain vanilla cake look festive without needing serious decorating skills. I start with a 1-layer sprinkle cake batter, leave out the sprinkles, divide the batter, color two bowls red and blue, and let spoonfuls of batter make the pattern for me.
The best part is that the pan does not need to look tidy before it bakes. In fact, the messier spoonfuls usually make better swirls. I have tried to over-plan the colors before, and the cake looked less fun than the one I scooped in quickly.
This is a technique more than a new batter recipe, so I keep the ingredients simple: cake batter, food coloring, buttercream, and sprinkles. The numbers matter, though — one 9-inch pan, 350°F (177°C), 20 minutes uncovered, then 13-17 minutes covered loosely with foil.
Preheat the oven to 350°F (177°C). Grease one 9-inch round cake pan or 9-inch springform pan, line the bottom with a parchment round, and grease the parchment.
Make the 1-layer sprinkle cake batter, leaving out the sprinkles. Divide the white batter evenly into three separate bowls.
Dye one bowl red with 10 drops of red food coloring, dye one bowl blue with 10 drops of blue food coloring, and leave the third bowl plain. I use a separate spoon for each color.
Drop large spoonfuls of each batter into the prepared pan, layering colors randomly. I do not swirl with a knife; the scooping creates the tie-dye effect on its own.
Bake for 20 minutes. Cover loosely with aluminum foil so the top does not stick, then bake 13-17 more minutes, or until a toothpick inserted in the center comes out clean.
Let the cake cool completely. Make the vanilla buttercream, frost the cooled cake, and decorate with sprinkles as desired.
The source lists a 45-minute cook time, and the active baking instructions split that into 20 minutes uncovered plus 13-17 minutes under foil. I keep the full window in mind because ovens and pans vary. The cake is done when the center passes the toothpick test, not when the colors look bright on top.
Cake stays fresh covered at room temperature or in the refrigerator for 5 days. I refrigerate it if the kitchen is warm, then let slices sit at room temperature for 20 minutes before serving so the buttercream softens.
I freeze unfrosted cake well wrapped for up to 2 months. I thaw it overnight in the refrigerator, then frost and decorate the day I plan to serve it.
I serve this after grilled food, fruit salad, and anything salty from the cookout table. The bright slices do most of the decorating work, so I keep the plate simple and let the colors show.
The color of the unbaked batter will mellow slightly in the oven, so I make the red and blue a touch stronger than I want the final slice to look. I still stop before the batter tastes like food coloring. Gel color is helpful for that reason, but the listed 10 drops of red and 10 drops of blue work with regular liquid color.
I cool the cake in the pan until it feels stable, then turn it out carefully. Because this is a single layer, any crack is more visible than it would be inside a stacked cake. If the top domes, I do not worry; a modest layer of buttercream and sprinkles hides normal homemade unevenness.
When I slice the cake, I wipe the knife between cuts because the colored crumb and buttercream can smear together. Clean cuts show the tie-dye center better. If I am transporting it, I chill the frosted cake first so the buttercream firms up, then let it sit out at the party long enough to soften before serving. That keeps the decorations safer without making the cake taste cold.
I keep the frosting color separate from the cake color decision. The inside already has a lot going on, so plain vanilla buttercream gives the slices a clean frame. If I want more color, I use sprinkles or a small border instead of tinting the whole outside. That keeps the first cut dramatic rather than busy.
Yes. Gel color is concentrated, so I start with a small amount and add more until the batter looks red or blue enough.
No. A regular 9-inch round cake pan works as long as it is greased and lined with parchment.
I usually do not. Spooned layers create the tie-dye look without risking muddy colors.
Yes. Use the same color method in cupcake liners and bake until the centers test clean.
A toothpick inserted in the center should come out clean after the foil-covered baking time.
If you try another color combination, tell me what you used — this method is fun beyond July 4th.
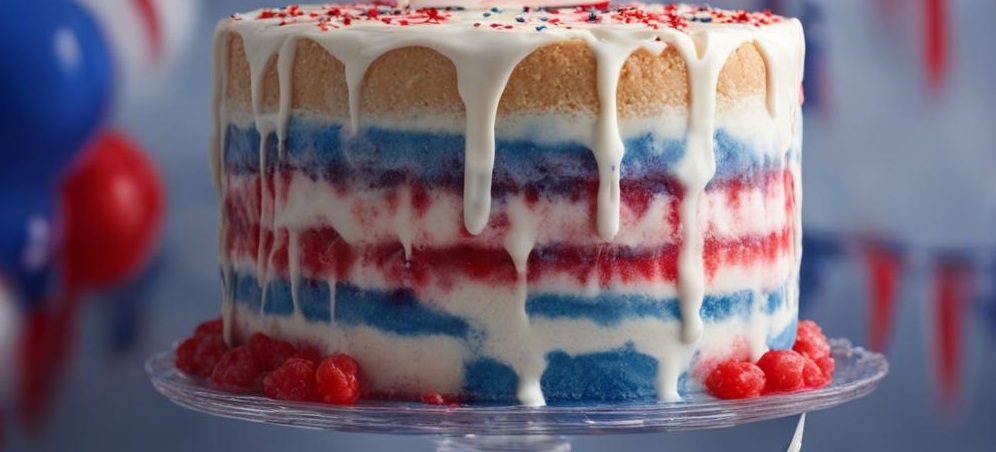
A festive 4th of July tie-dye cake made from 1-layer vanilla cake batter colored red, white, and blue, baked in a 9-inch pan, frosted with vanilla buttercream, and finished with sprinkles.
Servings 10
* Percent Daily Values are based on a 2,000 calorie diet. Your daily value may be higher or lower depending on your calorie needs.
Leave sprinkles out of the batter. The color swirls show better without them.
Use separate spoons. This keeps red, blue, and white batter from turning muddy.
Cover loosely with foil. It protects the top while the center finishes baking.
Cool completely. Buttercream slides on warm cake.


