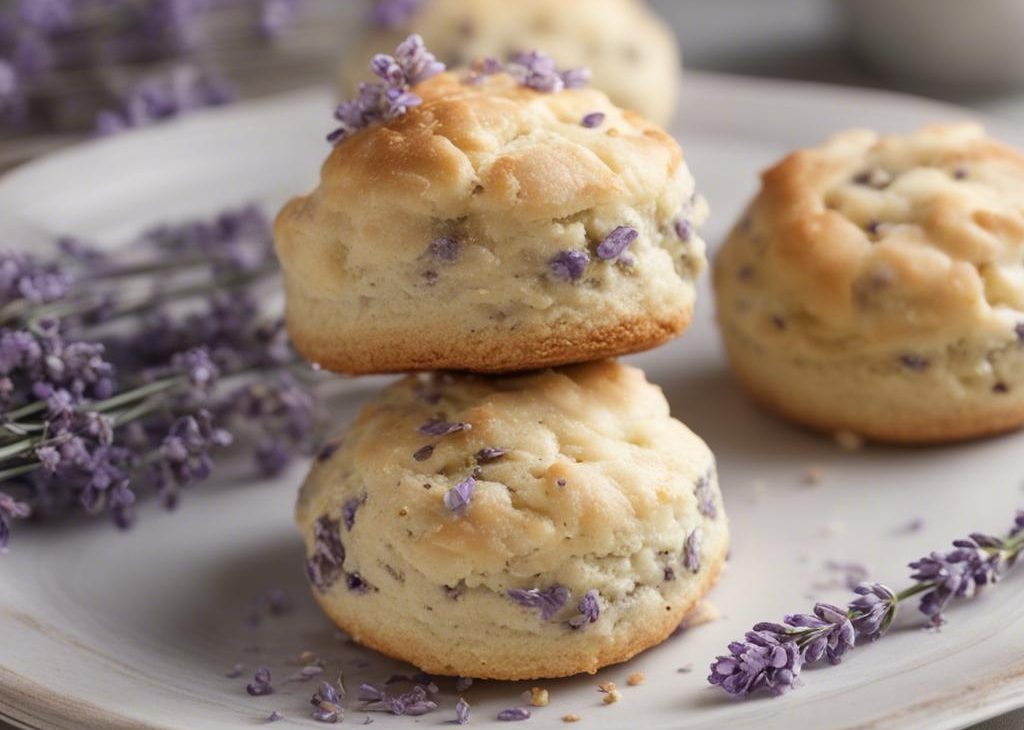
These buttermilk lavender scones are floral in a gentle way, with lemon zest keeping the lavender from taking over. I want bakery-style edges and soft centers, not perfume.
Frozen grated butter is my favorite scone trick. It gives little cold flakes throughout the dough without making me overwork it.
The icing steeps lavender in milk, then gets lemon juice and confectioners sugar. It is simple, but it makes the scones feel finished.
Why I keep coming back to this
- I can make the scones with familiar ingredients and a clear order of steps.
- The recipe has enough flavor that I do not need to hide it under extra toppings.
- Most of the work is simple measuring, stirring, chilling, simmering, or baking.
- The leftovers are useful, which matters in my kitchen.
- The ingredient list leaves room for small swaps without losing the point of the dish.
- It feels homemade without requiring restaurant equipment.
What you need (and what each one is doing)
- 2 cups all-purpose flour.250g; plus more. It gives the recipe structure, so I keep the amount steady.
- 1/2 cup granulated sugar.100g.
- 2 1/2 teaspoons baking powder.
- 2 teaspoons dried culinary lavender.
- 2 teaspoons lemon zest.
- 1/2 teaspoon salt.
- 1/2 cup unsalted butter.8 Tbsp; 113g; frozen.
- 1/2 cup buttermilk.120ml.
- 1 large egg.It binds the mixture and helps the finished dish slice or bake cleanly.
- 1 1/2 teaspoons pure vanilla extract.
- coarse sugar.optional topping.
- 3 Tablespoons milk.45ml; for icing.
- 1 teaspoon dried culinary lavender.for icing.
- 1 Tablespoon lemon juice.15ml.
- 1 1/4 cups confectioners' sugar.150g.
How I make it
Step 1 — Prep
I whisk the flour, sugar, baking powder, lavender, lemon zest, and salt, then grate in the frozen butter and work it into pea-sized crumbs. I chill the bowl while mixing the wet ingredients.
Step 2 — I whisk 1/2 cup buttermilk,
I whisk 1/2 cup buttermilk, the egg, and vanilla, then drizzle it over the flour mixture and mix until moistened.
Step 3 — I turn the dough onto
I turn the dough onto the counter, work it into a ball with floured hands, press it into an 8-inch disc, and cut 8 wedges.
Step 4 — I brush with buttermilk, sprinkle coarse
I brush with buttermilk, sprinkle coarse sugar if using, and refrigerate the scones at least 15 minutes.
Step 5 — I preheat the oven to 400
I preheat the oven to 400°F (204°C), line a baking sheet, arrange the scones 2-3 inches apart, and bake 18-26 minutes until golden.
Step 6 — For the icing, I simmer
For the icing, I simmer the milk, steep the lavender 15 minutes, strain, cool 5 minutes, and whisk with lemon juice and confectioners' sugar.
Step 7 — Finish
I drizzle the icing over warm scones and let it set before serving.
Tips from my kitchen
- I measure everything before heat is involved; it keeps me from rushing a sauce, dough, or filling.
- I trust visual cues as much as the timer, especially with browning, thickening, and chilling.
- I taste where it is safe to taste, then adjust salt, sweetness, or heat in small amounts.
- I let hot food rest when the recipe calls for it; that short pause usually gives cleaner slices and better texture.
Variations I have actually tried
- Use orange zest instead of lemon.
- Make mini wedges.
- Scoop drop scones.
- Skip icing for a less sweet batch.
- Add a few blueberries gently.
Storing and serving
I store Buttermilk Lavender Scones according to its texture. If it is creamy, cooked, or fruit-based, I refrigerate it in a covered container. If it is a dry cookie or snack, I keep it airtight at room temperature once completely cool.
For reheating, I go gently. Ovens and skillets bring back edges and crusts better than the microwave, while soups and pastas usually need a splash of liquid before warming.
What I watch while making it
With Buttermilk Lavender Scones, I pay attention to the small physical cues instead of cooking on autopilot. If something should be cold, I keep it cold; if something should thicken, I give it the full time; if something should brown, I wait for color instead of stopping at the first good smell.
I also set out serving pieces before the last step. That sounds fussy, but it keeps me from letting hot food overcook, cold food warm up, or a drink dilute while I hunt for plates, glasses, or a storage container.
The final check is always texture. I want clean slices, crisp edges, creamy sauce, tender beans, or a properly chilled pour depending on the recipe, and that last look tells me more than the timer alone.
I write a small note the first time I make a recipe like this: what brand I used, how my oven or pot behaved, and whether I wanted more salt, sweetness, or heat. That note makes the second batch easier.
I leave myself a little margin, too. If I am serving guests, I finish the messy prep early, wipe the counter, and give the recipe a few quiet minutes before it goes out. Food almost always tastes better when I am not racing it to the table.
That little pause is also when I check seasoning, garnish, and serving temperature one last time.
Frequently asked questions
Can I make Buttermilk Lavender Scones ahead?
Yes. I prep the parts that hold well and keep the final texture in mind. For baked items, I cool before covering; for cold dishes and drinks, I chill and add crunchy garnishes close to serving.
How should I store leftovers?
I use a covered container and keep the storage practical for the dish: baked goods at room temperature if dry, creamy or cooked foods in the refrigerator, and cocktails mixed fresh.
Can I change the main ingredient?
Usually, yes, but I keep the same total amount and choose something with similar moisture or richness. Big swaps work best when the texture is similar.
What is the biggest mistake to avoid?
Rushing the step that controls texture. That might be chilling dough, cooling cake syrup, simmering beans, drying grapes, or keeping puff pastry cold.
Can I double the recipe?
Yes, but I use wider pans or multiple batches instead of crowding. Crowding traps steam and changes browning, thickening, or chilling time.
If you make this Buttermilk Lavender Scones, leave a comment with the small change that made it work best in your kitchen — I always like those details.