Cookie Monster cake is a project cake, and I like being honest about that before I start. It has two vanilla chocolate chip cake layers, a big batch of blue buttercream, a black frosting mouth, white chocolate-coated cake eyes, and a lot of piping.
I break the work into pieces so it stays fun: bake and cool the layers, make the frosting, chill the crumb coat, shape the eyes, then pipe the fur. The grass tip does most of the decorating work once the frosting is the right consistency.
I keep the method practical: prep the pieces, follow the heat and timing, and do not rush the cooling or resting step when the recipe asks for it. That small bit of patience is usually the difference between a blue-frosted layer cake with cookies-and-cream personality and a batch that feels hurried.
Why I keep coming back to this
- The cake layers are sturdy enough for decorating but still tender.
- Mini chocolate chips give a cookie feel without making slicing difficult.
- A crumb coat traps crumbs before the fur piping starts.
- Gel color gives the blue frosting strong color without thinning it.
- The eyes use cake scraps, so leveling pieces do not go to waste.
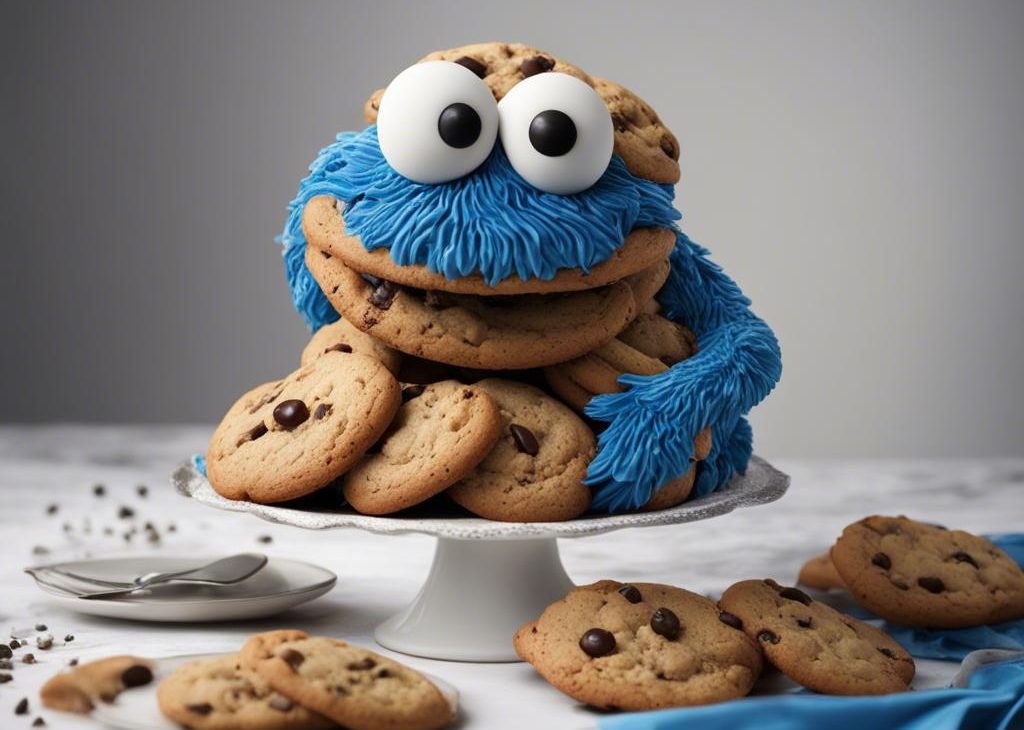
- It is a memorable birthday cake without fondant.
What you need (and what each one is doing)
- 2 1/2 cups cake flour.The note I keep with it is: 285g.
- 2 teaspoons baking powder.
- 1/2 teaspoon baking soda.
- 1 teaspoon salt.
- 3/4 cup unsalted butter.The note I keep with it is: 12 Tbsp; 170g.
- 1 3/4 cups granulated sugar.The note I keep with it is: 350g.
- 5 large egg whites, at room temperature.It helps bind the batter or dough so the center sets instead of crumbling.
- 1/2 cup sour cream.The note I keep with it is: 120g.
- 1 tablespoon pure vanilla extract.The note I keep with it is: yes, Tbsp.
- 3/4 cup whole milk.The note I keep with it is: 180ml.
- 1 cup mini chocolate chips.The note I keep with it is: 180g.
- 1 tablespoon cake flour.The note I keep with it is: 7g, for coating chips.
- 1 1/2 cups unsalted butter.The note I keep with it is: 340g, for frosting.
- 6 1/4 cups confectioners' sugar.The note I keep with it is: 750g.
- 1/3 cup whole milk or heavy cream.The note I keep with it is: 80ml.
- 2 teaspoons pure vanilla extract.The note I keep with it is: for frosting.
- 1/8 teaspoon salt.
- blue and black gel food coloring.Gel color gives me a stronger color without thinning the dough or frosting.
- 4 ounces white chocolate bar.The note I keep with it is: 113g.
- 1/2 teaspoon vegetable oil or coconut oil.It keeps the crumb soft and makes the dough easy to mix by hand.
How I make it
Step 1 — Prep pans and dry ingredients
I preheat the oven to 350°F (177°C), grease two 9-inch cake pans, line them with parchment rounds, and grease the parchment. Then I whisk cake flour, baking powder, baking soda, and salt.
Step 2 — Mix the cake batter
I beat butter and sugar on high for about 2 minutes, then add egg whites, sour cream, and vanilla. I mix in the dry ingredients, slowly pour in the milk on low, and finish by hand if I see lumps at the bottom.
Step 3 — Fold chips, bake, and cool
I toss the mini chocolate chips with 1 tablespoon cake flour, fold them into the batter, and divide the batter between pans. The layers bake 25-26 minutes, then cool 30 minutes in the pans before I turn them out to cool completely.
Step 4 — Make and tint frosting
I beat frosting butter until creamy, add confectioners' sugar, milk or cream, vanilla, and salt, then beat 3 full minutes. I reserve white frosting for the filling and eyes, tint a small bowl black, and tint the rest blue.
Step 5 — Fill and crumb coat
I level the cooled cakes and save the scraps. One layer goes on the stand, I spread white frosting on top, add the second layer, and cover the cake with a thin blue crumb coat. Then I chill it at least 30 minutes.
Step 6 — Shape the eyes
I crumble the leveled cake scraps with a spoonful of white frosting, form two 2-inch discs, and chill them at least 30 minutes. Once firm, I coat them in melted white chocolate mixed with oil and chill until set.
Step 7 — Pipe the face
I spread black frosting into the mouth area, then use a Wilton #233 grass tip to pipe blue fur over the top and sides. I pipe off-center black pupils on the white eyes and press them onto the cake.
Step 8 — Store covered
I move the cake carefully to a stand or carrier and refrigerate leftovers tightly covered for up to 5 days. A cake carrier is my favorite because it protects the piping.
Tips from my kitchen
- Cool completely.Warm layers make the crumb coat slide.
- Do not overfill the piping bag.A smaller amount is easier to control.
- Chill the crumb coat.The fur pipes cleaner on a cold surface.
- Use gel color.Liquid color can loosen the buttercream.
- Save the scraps.They become the eyes.
Variations I have actually tried
- Cookie border:I press mini chocolate chip cookies around the base.
- Extra cookies:I tuck broken cookies into the mouth before serving.
- Chocolate layers:I use chocolate cake layers and keep the same decorating plan.
- Cupcake version:I pipe blue fur on cupcakes and add candy eyes.
- Less piping:I pipe fur only on the top and smooth the sides.
Storing and reheating
I refrigerate the decorated cake in a covered carrier for up to 5 days. I let slices sit at room temperature for 20-30 minutes before serving so the buttercream softens.
What I serve with it
This cake is rich, so I cut modest slices. I like it with cold milk, coffee, or a scoop of vanilla ice cream if it is a birthday table.
Frequently asked questions
Can I make the cake layers ahead?
Yes. I bake and cool the layers a day ahead, wrap them well, and decorate the next day.
Do I need the grass piping tip?
For the fur look, yes, I use a Wilton #233 style tip. Without it, I would make a smoother blue cake.
Can I use liquid food coloring?
I prefer gel because it gives stronger color without thinning the frosting.
Why is my frosting hard to pipe?
It may be too stiff or the bag may be overfilled. I add a tiny splash of cream and work with less frosting at a time.
How do I move the cake safely?
I use thin spatulas and, if possible, a helper. The piped sides are easy to bump.
If you make this cake, tell me whether you added cookies around the mouth.