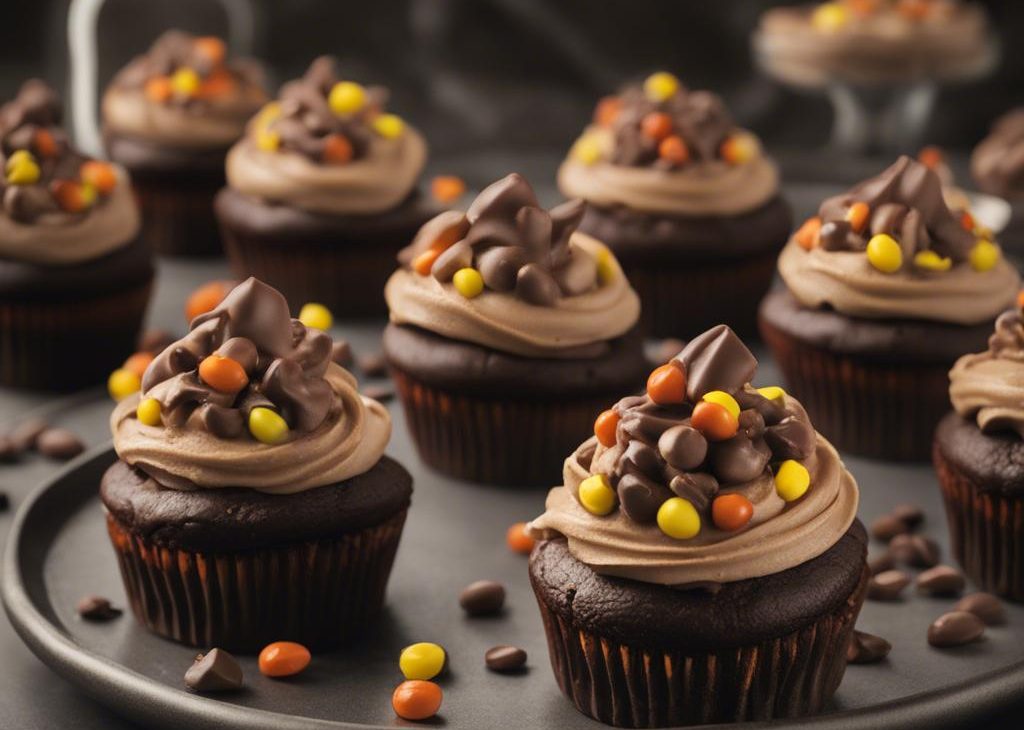
I make dark chocolate cupcakes with creamy peanut butter frosting when I want something that feels homemade without pretending the little details do not matter.
What keeps me coming back is how all-purpose flour, unsweetened cocoa powder, baking soda carry the flavor. I measure first, clear space, and then work through the steps without trying to rush the part that needs patience.
Why I keep coming back to this
- I can taste the main ingredients clearly.
- The steps give me visual checkpoints instead of guesswork.
- The leftovers still feel like something I meant to make.
- I can measure everything before I start and then work calmly.
- Small swaps work without changing the whole personality of the recipe.
- The smell while it cooks is the nudge that brings people into the kitchen.
What you need (and what each one is doing)
- 1 cup all-purpose flour (125g).
- 1/2 cup unsweetened cocoa powder (42g).
- 1 teaspoon baking soda.
- 1/2 teaspoon baking powder.
- 1/2 teaspoon salt.
- 1/3 cup vegetable oil (80ml).
- 1 cup granulated sugar (200g).
- 1 large egg, at room temperature.
- 1 teaspoon pure vanilla extract.
- 1/2 cup buttermilk (120ml).
- 1/2 cup hot water or coffee (120ml).
- 5 Tablespoons unsalted butter, softened (71g).
- 1 cup creamy peanut butter (250g).
- 1 cup confectioners sugar (120g).
- 1/3 cup heavy cream (80ml).
- 1 teaspoon pure vanilla extract.
- 1/4 teaspoon salt.
- crushed Reese's Pieces (optional topping).
How I make it
Step 1 — Set up the pan and oven
I follow this part carefully: Preheat the oven to 350°F (177°C). Line a 12-count muffin pan with cupcake liners. This recipe yields about 14 to 16 cupcakes, so line a second muffin pan with a few more liners or bake in batches. Whisk the flour, cocoa powder, baking soda, baking powder, and salt together in a medium bowl. Set aside. In a large bowl, preferably with a pour spout, whisk the oil, sugar, egg, vanilla, and buttermilk together until combined.
Step 2 — Cook to the visual cues
I follow this part carefully: Pour the batter into the liners, filling only 2/3 full to avoid spilling over the sides. Bake for 20-22 minutes, or until a toothpick inserted in the center comes out clean.
Step 3 — Mix with attention
I follow this part carefully: Allow cupcakes to cool in the pan for 10 minutes, and then transfer to a cooling rack to cool completely. Cupcakes must be completely cooled before decorating. With a handheld or stand mixer fitted with a paddle or whisk attachment, beat the butter on medium speed until creamy, about 2 minutes. Add the peanut butter, confectioners' sugar, heavy cream, vanilla extract, and salt. Beat on low speed until combined, then increase to high speed and.
Step 4 — Give it the time it needs
I follow this part carefully: Frost cooled cupcakes. I used a Wilton 1M piping tip. Top with crushed Reese's Pieces, if desired. Store leftovers, covered, in the refrigerator for up to 3 days. I recommend a cupcake carrier for storing decorated cupcakes.
Tips from my kitchen
- Measure flour carefully.Packed flour makes the finished batch heavy.
- Use parchment when you can.I would rather lift cleanly than pry at corners.
- Cool before judging.Many baked goods finish setting after they leave the oven.
- Watch the edges.My oven shows doneness there before the center looks dramatic.
Variations I have actually tried
- Change only the garnish for the easiest variation.
- Use dark chocolate where semi-sweet is listed.
- Add citrus zest when vanilla is already in the batter.
- Swap similar nuts in the same amount.
- Serve rich pieces with barely sweetened cream or yogurt.
Storing and reheating
I cool dark chocolate cupcakes with creamy peanut butter frosting completely before covering it because trapped steam softens the top. Frosted, creamy, or mousse-filled pieces go in the refrigerator; plainer bakes can usually sit airtight at room temperature. For longer storage, I wrap individual portions so I can thaw only what I need.
What I serve it with
I keep the plate simple and let the main texture do the talking.
Frequently asked questions
Can I make this ahead?
Yes. I prep the parts the recipe allows ahead, then finish the final cook or garnish close to serving.
How do I know it is done?
I use the listed cook time of 20 minutes as a guide, then trust the visual cues in the steps.
Can I change the main ingredient?
Usually, but I change one thing at a time so I know what affected the texture.
Why did mine turn out too soft?
Most often it needed more time, more cooling, or a little less crowding in the pan.
Can I freeze leftovers?
Most baked items freeze well wrapped tightly. Crisp or sauced dishes are better refrigerated and reheated uncovered.
What I watch for after a few batches
The detail I pay attention to most is texture. I do not walk away during the moment when the recipe changes from mixed ingredients into something cooked, baked, set, or glossy. That is when a minute or two can matter more than a long list of instructions.
I also write down any change I make, even if it is only a different pan or a different brand of chocolate. The next batch is easier when I know exactly what caused a softer center, a darker edge, or a sauce that thickened faster than expected.
If you make this dark chocolate cupcakes with creamy peanut butter frosting, leave a comment with what you changed or what you served with it — I like hearing the practical kitchen notes.