I make these seasoned pretzels when I want something that tastes like I paid attention, even if the day has been a little scattered. The ingredient list is straightforward, but the result has enough character that I still feel proud setting it on the table.
The first time I tested my way through this style of recipe, I learned that the small details matter: the right heat, the right rest, and not rushing the finish. That is still how I handle it.
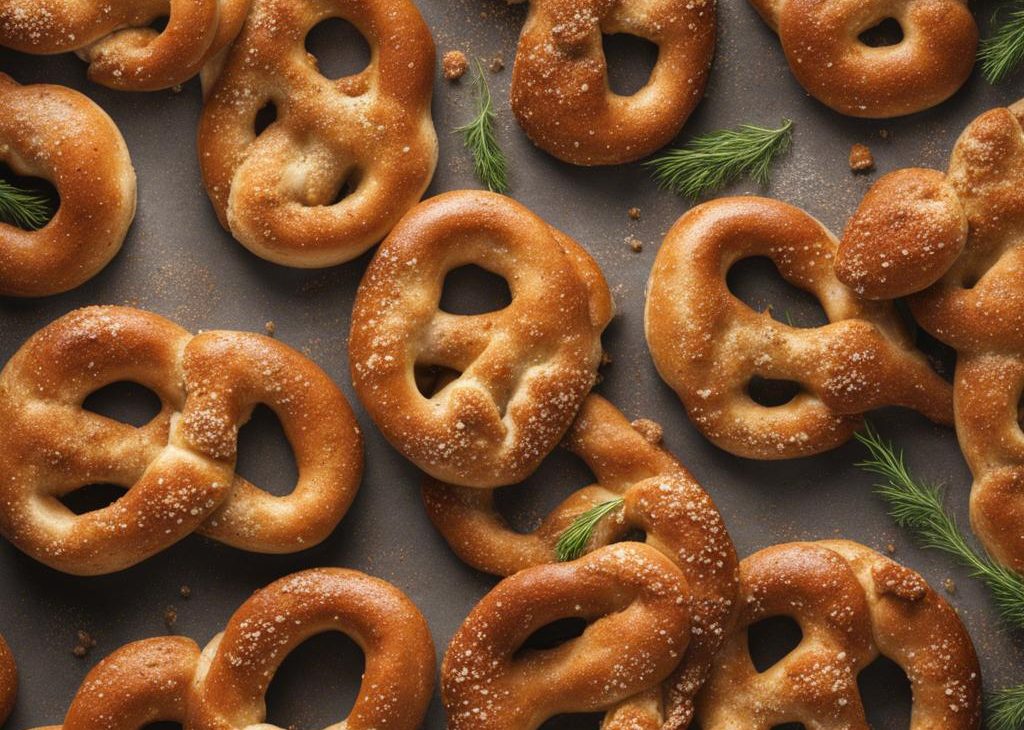
This version uses hard pretzels, vegetable oil, lemon pepper, garlic powder and serves 8. Prep is 5 minutes and cook time is 50 minutes, so I can plan it without hovering over the clock all afternoon.
Why I keep coming back to this
- I can get the main work done in 5 minutes, which keeps this from feeling like a project.
- The flavor is built from hard pretzels, vegetable oil, lemon pepper, not from fussy extras.
- The method has a clear doneness point, so I am not guessing at the finish line.
- Leftovers are useful, which is the first thing I ask of any recipe I make on a busy week.
- It is flexible enough for small swaps, but the original amounts still matter.
- I can serve it without explaining it, and that usually means the recipe is doing its job.
What you need and what each one is doing
- 12-16 ounces hard pretzels (1 bag).
- 3/4 cup vegetable oil (180ml).This is where richness and tenderness come from.
- 1 1/2 Tablespoons lemon pepper.A few cracks at the end wake up the other flavors.
- 2 teaspoons garlic powder.I mince it fine so it distributes evenly through the dish.
- 2 teaspoons dried dill weed.
- optional: additional spices, see notes.I toast it briefly in the dry pan to wake up the oils before adding liquid.
How I make it
Step 1 — Prep the base
I follow this part without wandering away: Preheat oven to 200°F (93°C). Line a large baking sheet with parchment paper or a silicone baking mat. Set aside.
Step 2 — Build the flavor
I follow this part without wandering away: Break the pretzels into pieces. Place them in a large zipped-top bag or in a large bowl. Add the oil and the spices. Shake/stir together very well. Sometimes I shake or it, let it sit for a minute, and shake or stir it again. You want every piece coated very well. If you find there aren't enough spices coating the pretzels, add more spices to your taste.
Step 3 — Shape or combine
I follow this part without wandering away: Spread the pretzels onto the prepared baking sheet. If they don't all fit in a single layer, use two sheets. Bake for 50 minutes, stirring every 15 minutes. Remove from the oven and cool completely.
Step 4 — Cook to the right cue
I follow this part without wandering away: Pretzels stay fresh covered tightly at room temperature for 3 weeks. They won't last that long!.
Tips from my kitchen
- Read the whole method once.I do this before I turn on heat because a few steps move quickly.
- Use the pan size in the recipe.A different pan changes thickness, timing, and browning.
- Trust the visual cues.I watch color, texture, and smell more than the timer alone.
- Let it rest when the recipe says to.That short pause usually fixes texture better than extra cooking.
- Chill if it needs body.Sauces and puddings thicken more once they are cold.
Variations I have actually tried
- Less sweet.I reduce the sweetener slightly and taste again before serving.
- Extra crunch.I add toasted nuts, seeds, crackers, or granola right at the end.
- Brighter flavor.I finish with citrus or a tiny pinch of salt.
- Make-ahead.I prep the base ahead and add the delicate toppings later.
- Double batch.I double it when the recipe stores well and keep half for later.
How I store and reheat it
I store these seasoned pretzels covered and cold unless I am serving it right away. The flavor usually settles after a rest, and the texture thickens once it has time to chill.
If it separates or firms more than I want, I stir it well or let it sit at room temperature for a few minutes. I do not add extra liquid until I see how it behaves after that short rest.
What I serve with it
I use these seasoned pretzels as the part of the meal that makes everything feel intentional: spooned over breakfast, tucked into a lunch box, or served cold when I want something already waiting in the fridge.
The little checks I do before serving
Before I call these seasoned pretzels done, I pause for one last look. I check whether the edges are the color I want, whether the center has settled, and whether the aroma matches the ingredients I put in. That sounds simple, but it has saved me from underbaked centers, thin sauces, and flat seasoning more than once.
I also taste or test a small piece when the recipe allows it. If it needs salt, acid, more cooling time, or a cleaner cut, I would rather know in the kitchen than at the table. That habit is what makes a home-cooked recipe feel steady instead of lucky.
Frequently asked questions
Can I make these seasoned pretzels ahead?
Yes. I usually make it ahead when the schedule is tight, then store it covered. For the best texture, I keep crunchy toppings, fresh herbs, or final drizzles separate until serving.
How do I know it is done?
I look for the cue in the method first: set center, thickened sauce, golden edges, or fully cooked protein. If I am unsure, I give it a few more minutes and check again instead of rushing it.
Can I change the sweetness or spice?
I do, but in small steps. Sweetness and heat are easier to add than remove, so I start with a tablespoon or a pinch, taste, and adjust from there.
What is the most common mistake?
For me, it is usually hurrying the rest time or using ingredients that are too cold. A short pause and properly softened butter, cream cheese, or eggs make a bigger difference than people expect.
How should I store leftovers?
I cool leftovers first, then cover them tightly. Most baked items and cooked dishes keep well in the refrigerator for several days; sauces and frostings need airtight containers so they do not pick up fridge smells.
If you make these seasoned pretzels, leave a comment with what worked for you. I always like hearing the small tweaks that happen in real kitchens.