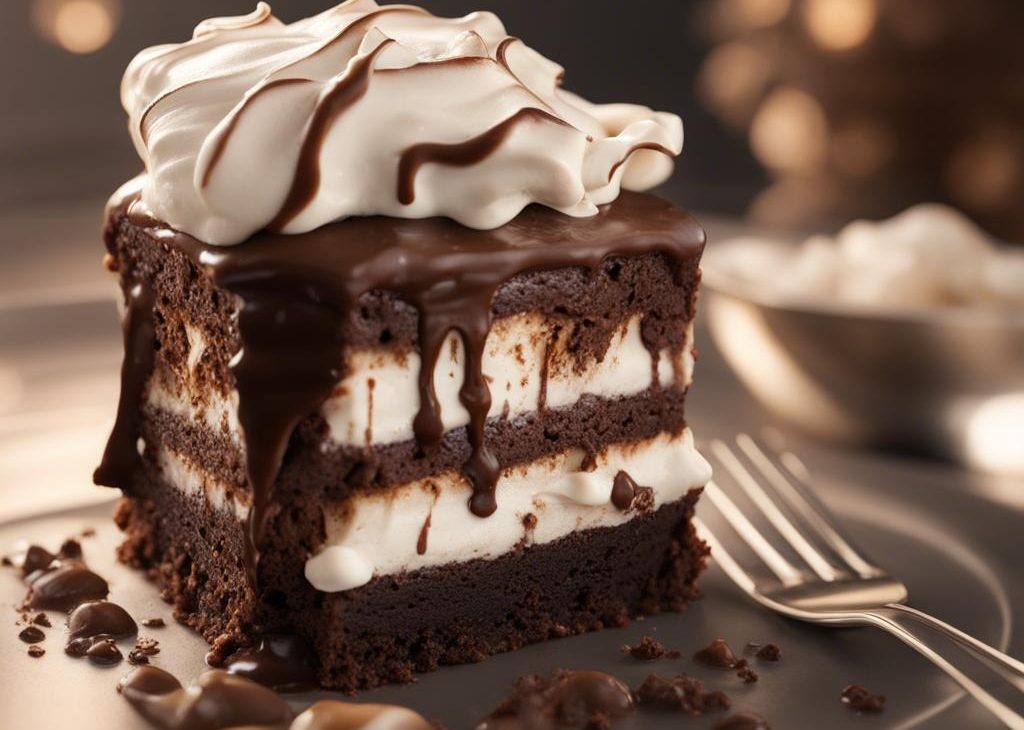

This brownie baked Alaska combines homemade brownies with your favorite ice cream flavor (like mint chocolate chip) and is topped with toasted marshmallow meringue for a truly memorable and impressive treat.
After receiving many requests for the recipe, as well as my own desire to tackle this “difficult” retro dessert, I devoted some time recipe testing baked Alaskas. 3,845 quarts of ice cream later, let me present you with baked Alaska and baked Alaska cupcakes. Let’s get one thing straight, though…
Better with Brownie
This isn’t your typical baked Alaska with sponge cake at the base. This is brownie baked Alaska and after testing both versions, I say with 100% certainty that brownie baked Alaska is both tastier AND easier..
Ingredients
- Two 1.5 quarts any flavor ice cream*
- enough brownie batter for 9-inch pan
Meringue
- 4 large egg whites, at room temperature
- 1 cup (200g) granulated sugar
- 1/2 teaspoon cream of tartar
- 1/2 teaspoon pure vanilla extract
What is Baked Alaska?
Traditional baked Alaska combines 3 layers:
The meringue topping, applied in decorative peaks and swirls, completely encloses the ice cream underneath. The entire thing is baked or torched until the meringue is toasted. Baked Alaska can even be served flambéed, but I definitely don’t trust myself doing that. The ice cream doesn’t initially melt under the protective meringue shell, but will begin to deliciously drip down into the brownie once served. Baked Alaska is an impressive dessert and, like I said above, so darn good with a brownie base.
Ice Cream for Baked Alaska
To make the big baked Alaska, soften some ice cream and spread it into a 9-inch 2.5 quart bowl (I recommend the one in this set) and freeze it. I chose mint chocolate chip ice cream for the big baked Alaska and coffee ice cream for the baked Alaska cupcakes. Like when making an ice cream cake, you can choose whichever flavor that you love most.
The bowl molds the ice cream into the dome shape for the baked Alaska dessert..
Brownie Baked Alaska
Bake brownies in a 9-inch round cake pan, the perfect size for your 9-inch dome-shaped ice cream. You can use your favorite brownie batter, just make sure it’s the appropriate amount for a 9-inch round cake pan. I tested and suggest:
- Homemade Chewy Fudgy Frosted Brownies (without the frosting)
- Nutella Brownies from Shelly’s cookbook
Both brownie recipes are perfect for the brownie baked Alaska cupcakes, too. Cupcake baking time is similar for both recipes and included in the written recipe below.
How to Make Marshmallow Meringue
This marshmallow meringue is essentially my homemade marshmallow creme. The toasted meringue exterior cracks as you take a bite and soft marshmallow melts down into the ice cream. For this reason, we’re applying a thick layer of that glorious marshmallow meringue.
The marshmallow meringue is pretty much Swiss Meringue Buttercream, just without the butter.. Whisk egg whites, sugar, and cream of tartar together constantly over a pot of simmering water. The egg whites will gently heat and the sugar will dissolve. The cream of tartar stabilizes and shapes the egg whites, just like it does in these chocolate swirled meringue cookies, chocolate soufflé, French macarons, and these angel food cupcakes.
Baker’s Tip: When gently cooking these 3 ingredients together, simply use a large pot and bowl. You can use the stainless steel bowl that comes with your stand mixer or a glass bowl (I used one from the set). You’ll need your stand mixer in the next step anyway.
Once the egg whites, sugar, and cream of tartar are gently heated, begin whipping. This step incorporates air into the meringue and after a few minutes, you’ll have stiff glossy peaks. Go ahead and taste it. It tastes like homemade marshmallow creme.
You Can Use a Kitchen Torch for Baked Alaska
Spread that marshmallow goodness all over the ice cream and begin torching. I suppose this should be called “torched Alaska” instead? I know many don’t own a kitchen torch, so oven instructions are included in the recipe below. Baking is the more traditional step anyway. (But I will say one thing! Kitchen torches are surprisingly inexpensive for what you get and when my mom offered me hers, I thought to myself… will I ever use this thing? and the couple times a year that I need it, I’m glad I have one. It really makes a difference!)
You’ll use a torch again when you make no bake s’mores cake and chai pumpkin meringue pie.
Baked Alaska Cupcakes
The mini baked Alaskas are so much fun and, conveniently enough, much quicker and easier.
- No special size bowls required
- No extra freezing
- No extra assembling
Simply scoop any flavor ice cream on top of the baked and cooled brownie cupcakes, then cover with marshmallow meringue topping. I know many of you will appreciate the simpler cupcake version.
Want to make the brownie baked Alaska cupcakes even more exciting? Use different flavor ice creams so it’s a surprise which flavor you’ll get!
Baked Alaska, the big guy or the smaller cupcake version, is wildly fun. If you’re looking for a unique dessert with a mega wow factor, this one’s it. Everyone… and I mean everyone… will be impressed. You can begin preparing it a few days ahead and the meringue-covered Alaska holds up well in the freezer before torching/baking. And using your favorite ice cream flavor is an awesome way to customize it for your crowd.
See Your Brownie Baked Alaskas!
Brownie Baked Alaska Recipe
Description
Brownie baked Alaska combines fudgy homemade brownies with your favorite ice cream flavor and is topped with toasted marshmallow meringue for a truly memorable and impressive treat.
Ingredients You’ll Need
Instructions
- . Read the recipe in full before beginning as the ice cream is time sensitive.
- Remove ice cream from the freezer and allow to soften on the counter for 10 minutes. As it softens, line a 9-inch 2.5 quart bowl (I recommend the one in this set) with plastic wrap with enough overhang to easily remove the ice cream as a whole once it’s frozen.
- Scoop softened ice cream into another large bowl and using a handheld or stand mixer fitted with a paddle attachment, beat until creamy. Spread ice cream into prepared lined bowl. Cover with plastic wrap and freeze for 8 hours and up to 3 days. I freeze it overnight. The longer it’s frozen, the sturdier the cake and neater the slices.
- Preheat oven to 350°F (177°C). Grease a 9-inch round cake pan, line with a parchment paper round, then grease the parchment paper. Parchment paper helps the brownie seamlessly release from the pan..)
- Pour brownie batter into prepared cake pan and bake for 32-38 minutes or until a toothpick inserted in the center comes out mostly clean without any wet batter. (This chewy fudgy frosted brownies recipe is thick and could take a little longer in your oven.) Allow to cool completely in the pan. Once cool, run a knife around the brownie edges, then invert the pan to fully release the brownie as a whole.
- Remove bowl of ice cream from the freezer. Peel back the plastic wrap and place the brownie layer on top (which will be the base of the baked Alaska). Cover back up with plastic wrap and freeze for 30 minutes. (Make the meringue while you wait.)
- Place egg whites, sugar, and cream of tartar in a heatproof bowl. Set bowl over a saucepan filled with two inches of simmering water. Do not let it touch the water. (You can use a double boiler if you have one.) Whisk constantly until sugar is dissolved, about 4 minutes. Transfer the mixing bowl to an electric mixer fitted with a whisk attachment. Add the vanilla..
- If using the oven in step 10, preheat oven to 450°F (232°C) now.
- Remove ice cream/brownie from the freezer. Carefully remove from the bowl and peel off the plastic wrap. If using a kitchen torch, invert onto a heatproof serving plate or cake stand. If using the oven, invert onto a baking sheet lined with aluminum foil.
- Spread meringue all over the ice cream, completely enclosing it. Use a spoon to create big peaks and swirls. Make sure there is absolutely no ice cream peeking out. If using the kitchen torch, toast the entire meringue topping. If using the oven, bake in preheated oven for 4-5 minutes until toasted.
- Use a sharp knife (I suggest a serrated knife) to cut thin slices and serve immediately. Store leftovers in the freezer.
You may also like...