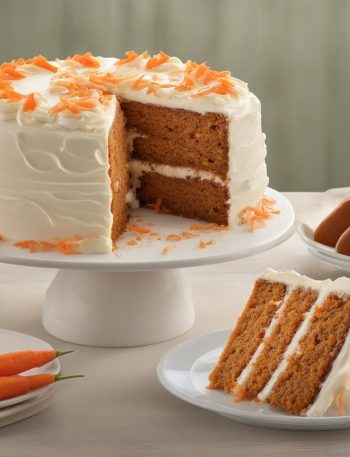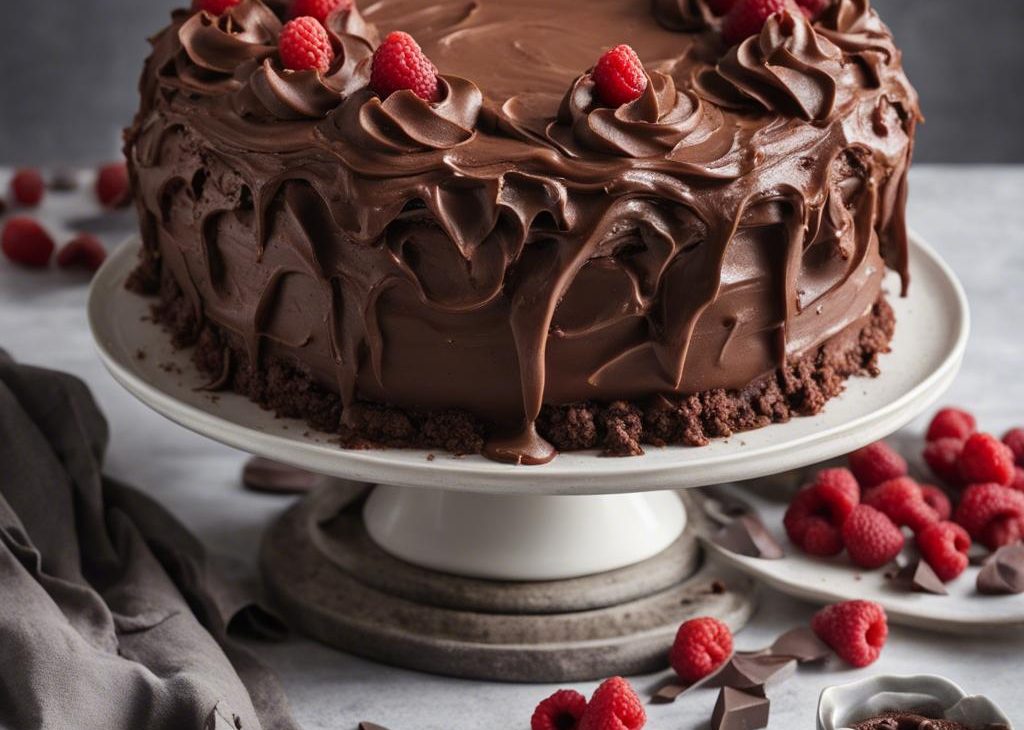

With a super moist crumb and fudgy, yet light texture, this chocolate cake recipe will soon be your favorite too. Top with chocolate buttercream and chocolate chips for 3x the chocolate flavor. You can also prepare this chocolate layer cake as a sheet cake, too. See recipe note.
. I hope you enjoy all the new features in this recipe post!
Devil’s Food Chocolate Cake… But Better
. You know the Devil’s Food chocolate cake you get at a restaurant or even from a box mix? This is that exact cake, only completely homemade. Notice the reddish tint? That’s where the name Devil’s Food comes from. The baking soda in this recipe reacts with the natural cocoa powder, which results in the reddish color. More on the science behind using dutch-process vs. natural cocoa powder here, if you’re interested.
This is, without a doubt, the best chocolate cake I’ve ever had. And judging by your feedback in the reviews, I’m confident you’d say the same thing!
This Chocolate Cake Is:
- Extra moist
- 2 layers, but can be made as 3 layers or as a sheet cake
- Soft with a velvety crumb
- Deeply flavorful
- Unapologetically rich, just like my flourless chocolate cake
- Covered with creamy chocolate buttercream
Key Chocolate Cake Ingredients & Why
Each ingredient serves an important role. For best results, do not make substitutions.
What an Easy Cake!
No mixer required for the batter, simply whisk the dry ingredients in one bowl and the wet ingredients in another bowl. Pour the wet ingredients into the dry ingredients (or vice versa, it doesn’t make any difference), add the hot coffee, then whisk everything together. The cake batter is thin. Divide between 2 9-inch cake pans. You can easily stretch it to 3 or 4 8-inch or 9-inch cakes if needed. Or make a quarter sheet cake using a 9×13-inch cake pan..
Need a 1 layer cake? Use this mint chocolate cake recipe for 1 9-inch round cake.
Need cupcakes? Use either my super moist chocolate cupcakes, chocolate cupcakes with vanilla frosting, or cream-filled chocolate cupcakes recipe.
Lately I’ve Been Using Sour Cream
. You can follow the recipe as written using buttermilk and hot coffee/water. Or you can add sour cream. Whichever way you make it, the process is the same. (Just reduce the liquids and add sour cream!)
Both cakes are equally moist and chocolatey with the same flavor and ease of preparation. It just depends if you want a spongier cake or not. 🙂
Silky Chocolate Buttercream
Like my yellow cake, I use my favorite chocolate buttercream. I slightly increase the amount of each ingredient to produce extra frosting. If you prefer a thinner layer of frosting, use the chocolate buttercream recipe. But if you crave extra buttercream, follow the frosting measurements below. You need 6 ingredients total:
Because there is no leavening occurring, you can use either dutch-process or natural cocoa powder in the buttercream. Heavy cream provides an extra creamy frosting, but milk can be substituted if needed.
While I love chocolate frosting here the most, this cake is also wonderful with vanilla buttercream or strawberry buttercream frosting instead!
So, why do I call it triple chocolate layer cake when it only has 2 layers? Well, chocolate is used three times: chocolate cake, chocolate frosting, chocolate chips. Press a handful on top like we do with warm chocolate chip cookies, or go with “the more the better” motto like we did. Let’s eat!
Chocolate Layer Cake Recipe
Description
This is my favorite homemade chocolate cake recipe. With a super moist crumb and fudgy, yet light texture, this chocolate cake recipe will be your favorite too. Top with chocolate buttercream and chocolate chips for 3x the chocolate flavor. You can also prepare this chocolate layer cake as a sheet cake. See recipe Note.
Ingredients You’ll Need
Instructions
- Preheat oven to 350°F (177°C). Grease two 9-inch cake pans, line with parchment paper rounds, then grease the parchment paper. Parchment paper helps the cakes seamlessly release from the pans..)
- Whisk the flour, cocoa powder, sugar, baking soda, baking powder, salt, and espresso powder (if using) together in a large bowl. Set aside. Using a handheld or stand mixer fitted with a whisk attachment (or you can use a whisk) mix the oil, eggs, and vanilla together on medium-high speed until combined. Add the buttermilk and mix until combined. Pour the wet ingredients into the dry ingredients, add the hot water/coffee, and whisk or beat on low speed until the batter is completely combined. Batter is thin.
- Divide batter evenly between pans. Bake for 23-26 minutes or until a toothpick inserted in the center comes out clean. Baking times vary, so keep an eye on yours. The cakes are done when a toothpick inserted in the center comes out clean. (Note: Even if they’re completely done, the cooled cakes may *slightly* sink in the center. Cocoa powder is simply not as structurally strong as all-purpose flour and can’t hold up to all the moisture necessary to make a moist tasting chocolate cake. It’s normal!)
- Remove the cakes from the oven and set on a wire rack. Allow to cool completely in the pan.
- With a handheld or stand mixer fitted with a paddle attachment, beat the butter on medium speed until creamy—about 2 minutes. Add confectioners’ sugar, cocoa powder, 3 Tablespoons heavy cream, salt, and vanilla extract. Beat on low speed for 30 seconds, then increase to high speed and beat for 1 full minute. Do not over-whip. Add 1/4 cup more confectioners’ sugar or cocoa powder if frosting is too thin or 1-2 more Tablespoons of cream if frosting is too thick. (I usually add 1 more.) Taste. Add another pinch of salt if desired.
- If cooled cakes are domed on top, use a large serrated knife to slice a thin layer off the tops to create a flat surface. This is called “leveling” the cakes. Discard or crumble over finished cake. Place 1 cake layer on your cake stand or serving plate. Evenly cover the top with frosting. Top with 2nd layer and spread remaining frosting all over the top and sides. I always use an icing spatula and bench scraper for the frosting. Garnish with chocolate chips, if desired.
- Refrigerate uncovered cake for at least 30-60 minutes before slicing to help set the shape. After that, you can serve the cake or continue refrigerating for up to 4–6 hours before serving. Cake can be served at room temperature or chilled.
- Cover leftover cake tightly and store in the refrigerator for 5 days. I like using a cake carrier for storing and transporting.
You may also like...