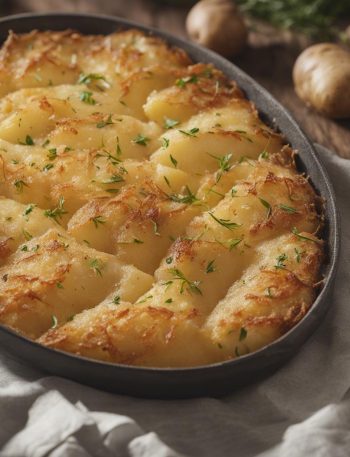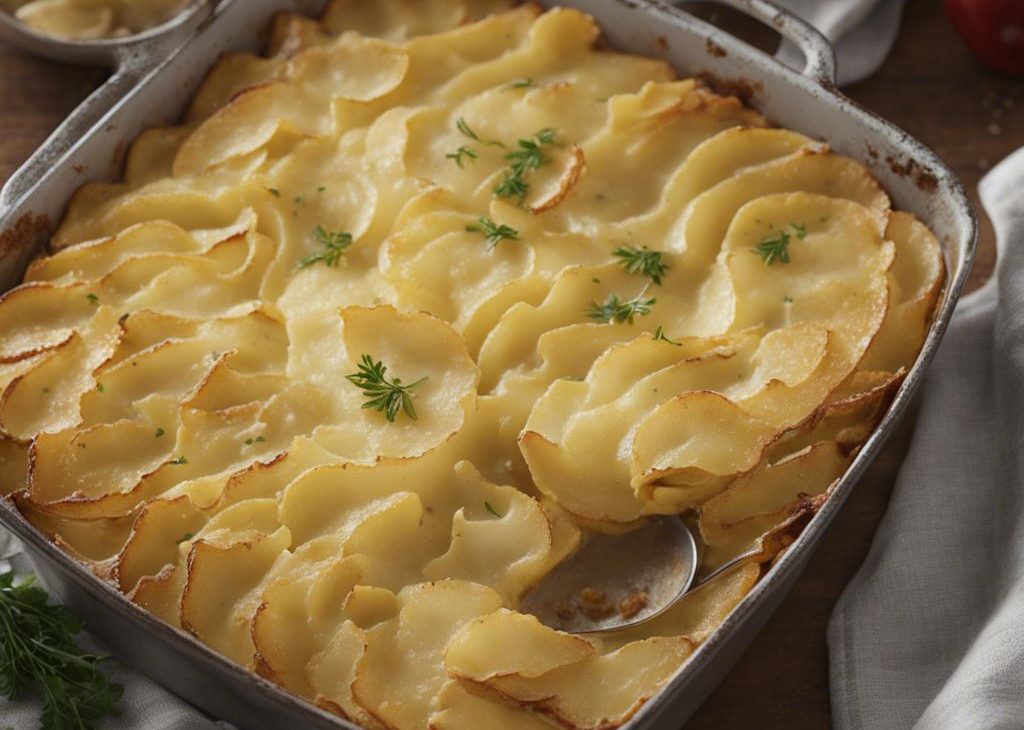

Scalloped potatoes are the side dish I make when I want the table to go quiet for a minute. This Costco-style version is creamy, garlicky, and generous, with thick slices of white potatoes baked under a buttery flour mixture.
The recipe is simple, but the potatoes need enough time. I have learned not to trust the golden top alone. A casserole can look finished while the center slices still have too much bite.
I use milk and chicken broth together because milk brings creaminess and broth brings savory depth. The result is not as heavy as an all-cream gratin, but it still feels like comfort food.
Why I keep coming back to this
- It makes a large pan, which is useful for holidays, potlucks, and big family dinners.
- The ingredient list is basic and budget-friendly.
- Chicken broth keeps the sauce savory instead of just milky.
- Thick potato slices hold their shape and give the casserole a hearty texture.
- The butter-flour mixture helps the liquid bake into a creamy sauce.
- Leftovers reheat well and taste even more seasoned the next day.
What I use and why it matters
- White potatoes, 6 pounds. I slice them evenly so the pan cooks at the same pace.
- Milk, 4 cups. Milk forms the creamy base around the potatoes.
- Chicken broth, 2 cups. Broth adds savory flavor and keeps the sauce from tasting bland.
- Large onions, 2 diced. Onion softens into the sauce and adds sweetness.
- Salt, 1 teaspoon, plus more to taste. Potatoes need salt, so I season the mixture and taste again later.
- Garlic, 4 cloves minced. Garlic gives the casserole depth without needing cheese.
- Pepper, 1/2 teaspoon. Pepper cuts through the richness.
- Butter, 1/2 cup. Butter combines with flour and helps brown the top.
- Flour, 1/2 cup. Flour thickens the milk and broth as the casserole bakes.
Small prep details that help
Before I start costco scalloped potatoes, I read through the steps once and set out the pieces that usually slow me down: a sharp knife, a clean board, measuring spoons, the right pan, and a towel for quick cleanup. That small pause keeps me from making rushed choices once heat or dressing or dough is involved. I also check the ingredient temperatures. Cold dairy, wet greens, damp seafood, or a chilled roast can all change timing, so I would rather notice that at the counter than halfway through cooking.
I measure the seasonings into small piles or bowls when the recipe moves quickly. It feels fussy for about thirty seconds, then it pays me back when I am not trying to open a spice jar with messy hands. I also decide where the finished food will land before I begin. A wire rack, serving platter, clean jar, or cooling space may sound minor, but I have learned that good food gets clumsy fast when I am hunting for a place to put a hot pan.
How I make it
Step 1 — Heat and grease
I preheat the oven to 375°F and grease a large baking dish with butter. A deep 9×13-inch dish works best because this is a generous amount of potatoes.
Step 2 — Mix the potatoes
In a very large bowl, I combine the sliced potatoes, milk, chicken broth, diced onion, salt, pepper, and minced garlic. I toss with clean hands so the slices separate and get coated.
Step 3 — Make the butter paste
In a small saucepan over medium heat, I melt the butter and stir in the flour until it forms a smooth paste. I cook it briefly so the flour loses its raw smell.
Step 4 — Bake uncovered
I pour the potato mixture into the prepared baking dish and spread it evenly. Then I drizzle the butter-flour mixture over the top, nudging some of it between the potato layers.
Step 5 — Cover and finish
I bake for 45-50 minutes, until the top is golden. Then I cover the dish with foil and bake for an additional 15 minutes, or until a knife slides through the center potatoes easily.
Step 6 — Rest before serving
I let the pan stand for 10 minutes before serving. The sauce thickens as it rests, and the scoops come out cleaner.
What I watch for
The clock gives me a starting point for costco scalloped potatoes, but I do not let it make the final decision. I watch the texture, the smell, and the way the food sits in the pan. If something is browning before the center is ready, I lower the heat, cover loosely, or move the pan. If something looks pale or watery, I give it more space, more time, or a few minutes uncovered. That kind of small adjustment is usually what separates a dependable batch from one that tastes rushed.
I also taste or check seasoning at the point where it can still be fixed. For salads and dressings, I taste on a leaf, cracker, or piece of vegetable instead of a plain spoon. For casseroles and baked dishes, I taste the sauce or filling before it is covered. For meat and fish, I trust temperature first and appearance second. I have ruined more food by guessing than by taking ten seconds to check.
If a batch does not behave exactly the way I expected, I try to make one calm correction instead of three panicked ones. A splash of liquid can loosen a thick sauce. A few uncovered minutes can dry a wet top. A pinch of salt can wake up a flat filling. A short rest can turn a messy scoop into a clean serving. I build those little fixes into my cooking now because real kitchens are never as tidy as written instructions.
Tips from my kitchen
- Slice evenly. A mandoline helps, but a sharp knife and patience also work.
- Check the center. The middle potatoes are always the last to soften.
- Use a big bowl. Tossing in a cramped bowl breaks slices and splashes milk.
- Rest the casserole. Straight from the oven, the sauce is looser than it will be after 10 minutes.
- Season boldly. Potatoes absorb salt, so I taste the liquid before it goes into the pan.
Variations I have actually tried
- Cheesy top: I add shredded cheddar during the last 15 minutes of baking.
- Herb version: I stir in thyme or chopped parsley with the garlic.
- Ham and potato: I add diced ham between layers when I want a main dish.
- Vegetable broth: I use vegetable broth for a meatless side.
- Extra garlic: I roast the garlic first, then mash it into the milk mixture.
Storing and making it ahead
I cool leftovers, cover the dish, and refrigerate for up to 4 days. The sauce firms up when cold, which makes portions easy to cut.
To reheat, I cover the potatoes with foil and warm them at 325°F until hot. For a single serving, I microwave at half power and add a splash of milk if the sauce looks tight.
What I serve with it
I serve scalloped potatoes with roast chicken, ham, prime rib, turkey, or a big green salad. Something crisp or acidic on the plate helps balance the creamy potatoes.
Frequently asked questions
Can I make these ahead?
Yes. I bake them, cool them, refrigerate them, and reheat covered. The texture is better than assembling raw potatoes too far ahead.
Why are my potatoes still firm?
They were likely sliced too thick or the pan was very deep. I cover and bake longer until a knife slides through the center.
Can I use a different potato?
Yes. Yukon Gold potatoes work especially well because they stay creamy and hold their shape.
Can I make it gluten-free?
I would replace the flour with a gluten-free all-purpose blend or use cornstarch slurry in the liquid. The texture changes slightly.
Do I need cheese?
No. This version is creamy from milk, broth, butter, and flour. Cheese is optional, not required.
If you make this pan, I would love to know whether you added cheese or kept it classic.
Costco Scalloped Potatoes
Description
Creamy scalloped potatoes with thick-sliced white potatoes, milk, broth, onion, garlic, butter, and flour. I bake them until the top is golden and the potatoes are tender all the way through.
Ingredients You’ll Need
Instructions
- I preheat the oven to 375°F and grease a large baking dish with butter. A deep 9x13-inch dish works best because this is a generous amount of potatoes.
- In a very large bowl, I combine the sliced potatoes, milk, chicken broth, diced onion, salt, pepper, and minced garlic. I toss with clean hands so the slices separate and get coated.
- In a small saucepan over medium heat, I melt the butter and stir in the flour until it forms a smooth paste. I cook it briefly so the flour loses its raw smell.
- I pour the potato mixture into the prepared baking dish and spread it evenly. Then I drizzle the butter-flour mixture over the top, nudging some of it between the potato layers.
- I bake for 45-50 minutes, until the top is golden. Then I cover the dish with foil and bake for an additional 15 minutes, or until a knife slides through the center potatoes easily.
- I let the pan stand for 10 minutes before serving. The sauce thickens as it rests, and the scoops come out cleaner.
Nutrition Facts
Servings 12
- Amount Per Serving
- Calories 136kcal
- % Daily Value *
- Total Fat 10 gg16%
- Saturated Fat 6 gg30%
- Trans Fat 0.4 gg
- Cholesterol 28 mgmg10%
- Sodium 195 mgmg9%
- Potassium 116 mgmg4%
- Total Carbohydrate 8 gg3%
- Dietary Fiber 0 gg0%
- Sugars 4 gg
- Protein 3 gg6%
- Calcium 94 mg mg
- Iron 0.3 mg mg
* Percent Daily Values are based on a 2,000 calorie diet. Your daily value may be higher or lower depending on your calorie needs.
Note
Slice evenly. A mandoline helps, but a sharp knife and patience also work.
Check the center. The middle potatoes are always the last to soften.
Use a big bowl. Tossing in a cramped bowl breaks slices and splashes milk.
Rest the casserole. Straight from the oven, the sauce is looser than it will be after 10 minutes.
Frequently Asked Questions
Yes. I bake them, cool them, refrigerate them, and reheat covered. The texture is better than assembling raw potatoes too far ahead.
They were likely sliced too thick or the pan was very deep. I cover and bake longer until a knife slides through the center.
Yes. Yukon Gold potatoes work especially well because they stay creamy and hold their shape.
I would replace the flour with a gluten-free all-purpose blend or use cornstarch slurry in the liquid. The texture changes slightly.
No. This version is creamy from milk, broth, butter, and flour. Cheese is optional, not required.
You may also like...