
Homemade Caramel Apples is the version I make when I want the idea of the original recipe, but with enough real kitchen detail that I can repeat it without second-guessing myself.
I have learned to slow down at the small moments: scraping the blender jar, letting dough puff, waiting for caramel to cool, or tasting a sauce after it sits for a minute. Those details are not fussy. They are the difference between a recipe I make once and a recipe I keep in my notes.
This recipe serves 8 and takes 10 min prep, 15 min cook. I wrote the method the way I talk myself through it at the counter: what I look for, where I adjust, and what I avoid when I am tired or in a hurry.
Why I keep coming back to this
- The sugar cues are clear if I pay attention.
- It keeps well once fully cool.
- The sweet-salty balance makes a small serving satisfying.
- I can package it ahead instead of rushing later.
- A heavy pan and a calm counter make the process manageable.
- It feels homemade in a way store-bought sweets do not.
What you need and what each ingredient is doing
- 8 cold apples (8-9 apples).I look for good color and freshness because this is the flavor that comes through first.
- 1 3/4 cups heavy cream (420ml).I use it to control body, and I add a splash more only when the mixture looks too stiff.
- 1 cup light corn syrup (240ml).
- 2 cups packed light or dark brown sugar (400g).
- 1/4 cup unsalted butter (4 Tbsp; 56g).I use it for richness and tenderness, then watch heat so it does not taste scorched.
- 1/2 teaspoon salt.I measure the small amount because it is what keeps the flavor from tasting flat.
- 1/2 teaspoon pure vanilla extract.
How I make it
Step 1 — Set up the recipe so nothing gets missed
I rinse the apples with water, then wipe completely dry. Removing the slippery waxy coating will help the caramel seal to the apple. Remove the apple stem and insert a caramel apple stick about 3/4 down into the apple. I line a large baking sheet with a silicone baking mat (preferred) or grease the pan with butter. Caramel usually sticks to parchment or wax paper.
Step 2 — Build the main mixture patiently
I combine the heavy cream, corn syrup, brown sugar, butter, and salt in a 3-quart heavy-duty saucepan over medium heat. Do not turn the temperature up or down—keep at medium the entire time the caramel cooks. Stir constantly with a wooden spoon until the butter is melted. Once melted, brush down the sides of the pan with a water-moistened pastry brush and attach a candy thermometer to the pan, making sure the bulb is not touching the bottom of the pan (as I’ll get an inaccurate reading). I without stirring, let the mixture cook and bubble until it reaches 235°F (113°C). Some readers have been cooking to 240°F (116°C) and saying the caramel sticks much better to the apples that way. Stick with anywhere between 235°F – 240°F. Reaching this temperature should take about 15. I keep the full card steps close and use this stage as my checkpoint before moving on.
Step 3 — Build the main mixture patiently
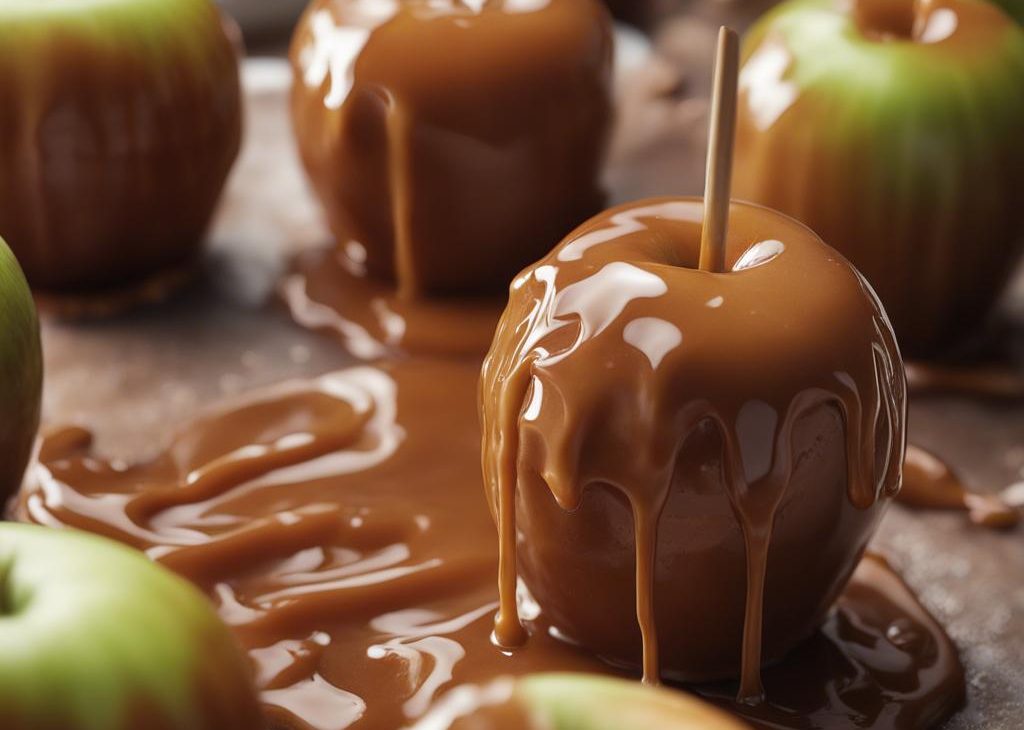
I holding the caramel apple stick, dip the apple into the warm caramel, tilting the pot as needed to coat all sides of the apple. Lift the apple up and swirl it around or gently tap it against the side of the pot to let excess caramel drip off. Place coated apple on prepared pan. Repeat with remaining apples. Enjoy immediately or allow caramel to set, about 45-60 minutes. If I want to wrap the caramel apples in cellophane treat bags for travel/gifting, wait until the caramel has completely set. I if desired, I can add toppings. Immediately after coating in caramel and before the caramel sets, roll the caramel dipped apples in finely chopped nuts, toffee pieces, mini M&Ms, sprinkles, or coconut. I can even drizzle with melted chocolate or white chocolate, too.
Step 4 — Finish, check texture, and serve
I for displaying or serving, I recommend placing on wax paper or another nonstick surface. Even when the caramel has completely set, caramel apples may slightly stick to a serving dish. To eat a caramel apple, I can bite right into it or sit it upright on a cutting board and cut slices around the stick. (Or pull out the stick and slice.) These are great for sharing! I loosely cover and store the leftover dipped apples in the refrigerator for up to 1 week.
Tips from my kitchen
- Measure first.I set out every small amount before I start so I do not lose my place.
- Watch texture.I treat the timer as a guide and the mixture as the real answer.
- Change one thing at a time.I make a note before adjusting sweetness, liquid, or heat.
- Use a heavy pan.Thin pans scorch sugar quickly.
- Clear the counter.Hot sugar waits for no one.
Variations I have actually tried
- Nutty:I add pecans, almonds, or peanuts where the coating can hold them.
- Chocolate finish:I drizzle melted chocolate after cooling.
- Warm spice:I add cinnamon or ginger to the sugar mixture.
- Salted:I finish with flaky salt while the coating is tacky.
- Gift bags:I portion the cooled batch before it disappears from the bowl.
How I serve and store it
I let homemade caramel apples cool completely before packing it. Warm sugar traps steam, and steam is the enemy of crunch.
For leftovers, I use an airtight container once everything is fully cool. If the recipe is tender, glazed, or frosted, I separate layers with parchment so the top stays neat.
Frequently asked questions
Do I need a candy thermometer?
I strongly prefer one because sugar changes quickly and visual cues can be tricky.
Why is my caramel grainy?
Sugar crystals may have formed on the pan sides or the mixture may have been stirred at the wrong time.
Can I make it ahead?
Yes. It holds well once fully cooled and stored airtight.
How do I keep it from sticking?
I use parchment, silicone, or a lightly greased surface and cool it before packing.
Can I add chocolate?
Yes. I drizzle it after cooling so it sets on the surface.
If you make this homemade caramel apples, I would love to hear what small adjustment made it work best in your kitchen.
Homemade Caramel Apples
Description
Homemade Caramel Apples is my practical first-person rewrite with the source amounts preserved and the kitchen cues made clear. I explain the texture, timing, serving, and storage details that help the recipe repeat well.
Ingredients You’ll Need
Instructions
- I rinse the apples with water, then wipe completely dry. Removing the slippery waxy coating will help the caramel seal to the apple. Remove the apple stem and insert a caramel apple stick about 3/4 down into the apple.
- I line a large baking sheet with a silicone baking mat (preferred) or grease the pan with butter. Caramel usually sticks to parchment or wax paper.
- I combine the heavy cream, corn syrup, brown sugar, butter, and salt in a 3-quart heavy-duty saucepan over medium heat. Do not turn the temperature up or down—keep at medium the entire time the caramel cooks. Stir constantly with a wooden spoon until the butter is melted. Once melted, brush down the sides of the pan with a water-moistened pastry brush and attach a candy thermometer to the pan, making sure the bulb is not touching the bottom of the pan (as I'll get an inaccurate reading).
- I without stirring, let the mixture cook and bubble until it reaches 235°F (113°C). Some readers have been cooking to 240°F (116°C) and saying the caramel sticks much better to the apples that way. Stick with anywhere between 235°F - 240°F. Reaching this temperature should take about 15 - 20 minutes, though don't use time as the guide because it depends on the stove. Don't be alarmed if the caramel is taking longer, just use the candy thermometer as the guide. The temperature will heat up slowly, then move quickly, so keep the eye on the pot. Once at 235°F - 240°F, remove caramel from heat and stir in the vanilla. Avoid over-stirring which can create air bubbles in the caramel (and then on the apple). Allow caramel to cool for 10-15 minutes until slightly thickened. If caramel is too thin to coat apples, let it cool and thicken for 5-10 minutes longer.
- I holding the caramel apple stick, dip the apple into the warm caramel, tilting the pot as needed to coat all sides of the apple. Lift the apple up and swirl it around or gently tap it against the side of the pot to let excess caramel drip off. Place coated apple on prepared pan. Repeat with remaining apples. Enjoy immediately or allow caramel to set, about 45-60 minutes. If I want to wrap the caramel apples in cellophane treat bags for travel/gifting, wait until the caramel has completely set.
- I if desired, I can add toppings. Immediately after coating in caramel and before the caramel sets, roll the caramel dipped apples in finely chopped nuts, toffee pieces, mini M&Ms, sprinkles, or coconut. I can even drizzle with melted chocolate or white chocolate, too.
- I for displaying or serving, I recommend placing on wax paper or another nonstick surface. Even when the caramel has completely set, caramel apples may slightly stick to a serving dish. To eat a caramel apple, I can bite right into it or sit it upright on a cutting board and cut slices around the stick. (Or pull out the stick and slice.) These are great for sharing!
- I loosely cover and store the leftover dipped apples in the refrigerator for up to 1 week.
Nutrition Facts
Servings 8
- Amount Per Serving
- Calories 346kcal
- % Daily Value *
- Total Fat 25g39%
- Saturated Fat 16g80%
- Trans Fat 0.8g
- Cholesterol 74mg25%
- Sodium 165mg7%
- Potassium 52mg2%
- Total Carbohydrate 33g11%
- Sugars 14g
- Protein 2g4%
- Calcium 40 mg
- Iron 0.0 mg
* Percent Daily Values are based on a 2,000 calorie diet. Your daily value may be higher or lower depending on your calorie needs.
Note
Measure first. I set out every small amount before I start so I do not lose my place.
Watch texture. I treat the timer as a guide and the mixture as the real answer.
Change one thing at a time. I make a note before adjusting sweetness, liquid, or heat.
Use a heavy pan. Thin pans scorch sugar quickly.
Frequently Asked Questions
I strongly prefer one because sugar changes quickly and visual cues can be tricky.
Sugar crystals may have formed on the pan sides or the mixture may have been stirred at the wrong time.
Yes. It holds well once fully cooled and stored airtight.
I use parchment, silicone, or a lightly greased surface and cool it before packing.
Yes. I drizzle it after cooling so it sets on the surface.
You may also like...