
I make Homemade Ciabatta Bread when I want something homemade that feels worth the dishes but still fits into a normal day. The first time I worked through this one, I learned that the quiet details matter: the temperature of the ingredients, the way the mixture looks before it cooks, and the patience to let it cool before I start cutting or tasting.
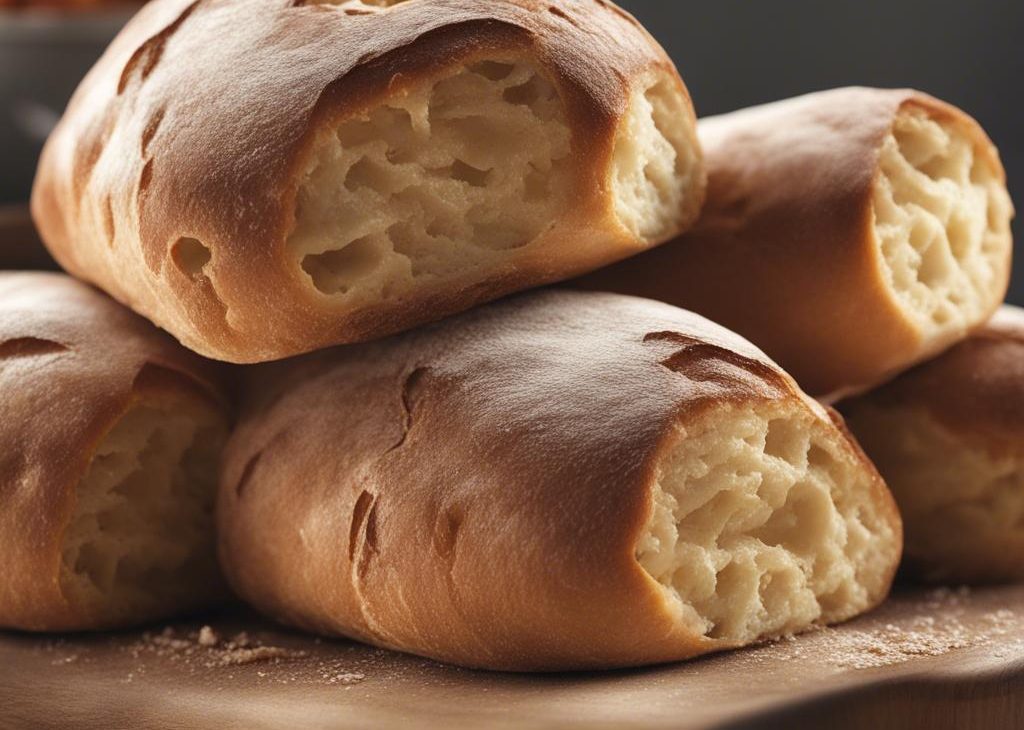
What keeps me coming back is the contrast: the crust or edges toast up while the inside stays soft. It is not a fussy recipe, but it does ask me to pay attention for a few minutes at the right moments. I like that kind of cooking because it feels calm instead of showy.
I kept the original timing and amounts here, including the 13 minute prep time and the 25 minute cook time when the source gives one. My job in the kitchen is to make those numbers work by setting up the pan, bowl, or mixer before I begin.
I measure everything before I start, especially when butter, chocolate, yeast, or a cooked filling is involved. That small bit of order saves me from digging through a cabinet with sticky hands halfway through the recipe.
In a large mixing bowl, whisk together the bread flour and yeast. Add the water and mix with a silicone spatula until combined. Cover the bowl tightly with plastic wrap and let rest at room temperature for 8—24 hours.
I uncover the bowl with the biga. In a separate large mixing bowl, or the bowl of your stand mixer fitted with a dough hook attachment (do not use a handheld mixer for this), whisk together the yeast and warm water. Cover and let sit for 5 to 10 minutes until the yeast has dissolved. Add.
I cover the bowl and let the dough rest for 30 minutes at room temperature.
I visualize a clock on top of the dough. You'll be folding it at the 12 o'clock mark. With an olive oil-greased spatula or lightly oiled hands, lift up the dough at 12 o'clock and gently stretch it up and pull it toward the opposite side of the bowl (6 o'clock), folding it down.
I repeat step 4 three more times, allowing the dough to rest for 30 minutes between each. After the 4th stretch-and-fold, cover the bowl and place it in the refrigerator for at least 1 hour and up to 24 hours.
I very generously flour your counter or work surface. Using lightly oiled hands or a lightly oiled spatula, gently scrape the dough out of the bowl and onto the floured surface. Generously sprinkle flour on top of the dough. Using floured hands, gently stretch and shape the dough into a rough rectangle shape, about 10x7 inches.
I lightly flour a piece of parchment paper. With floured hands, and using the floured bench scraper to help, lift the sticky dough pieces up and transfer them to the floured parchment, arranging them at least 2 inches apart to make room for expanding. Take care to be extra gentle because you don't want to deflate.
I finish the remaining shaping, baking, cooling, or garnishing while keeping the same times and visual cues from the method.
I store leftovers loosely covered at room temperature for up to 5 days or in the refrigerator for up to 1 week.
I cool it completely, then keep it wrapped at room temperature for a day or two, or freeze portions for longer storage. To bring back the fresh-baked feel, I warm slices or pieces at 300°F (149°C) until they smell good again.
I label leftovers when I freeze them because future me never remembers what is wrapped in foil. For anything crisp, I avoid sealing it while warm; trapped steam steals the texture faster than time does.
I usually serve it warm with butter, cream cheese, jam, eggs, or a bowl of soup if the flavor leans savory. The leftovers make breakfast feel planned instead of improvised.
Yes. I usually make at least one component ahead when the recipe has chilling, rising, or cooling time. I store it covered and finish the freshest step close to serving.
Rushing the rest or cool time causes the most trouble in my kitchen. Warm dough tears, hot filling runs, and just-baked pieces can taste underdone before they settle.
Yes. I knead until the dough feels smoother and springs back slowly when poked. I add flour sparingly because too much makes the finished bread dry.
I look for browning, aroma, and the texture described in the steps. If the outside browns too quickly, I tent loosely with foil and give the center time.
I cool them first, then store according to the texture I want to keep: airtight for soft items, loosely covered at first for crisp ones, and chilled for anything creamy.
If I make Homemade Ciabatta Bread again this week, I will probably tweak one small thing and write it on the margin of my printed copy. Tell me what you changed if you try it.
I make homemade ciabatta bread with the original amounts and a practical, kitchen-tested rhythm. The steps keep the focus on texture, timing, and the little visual cues that make a homemade batch taste cared for.
Measure first. I set out every ingredient before starting so I do not miss a small but important amount.
Watch the texture. I use the time as a guide, then trust the visual cue in the method.
Cool with patience. The flavor and structure settle as the recipe rests.
Write down changes. If I adjust a spice, topping, or chill time, I note it before I forget.


