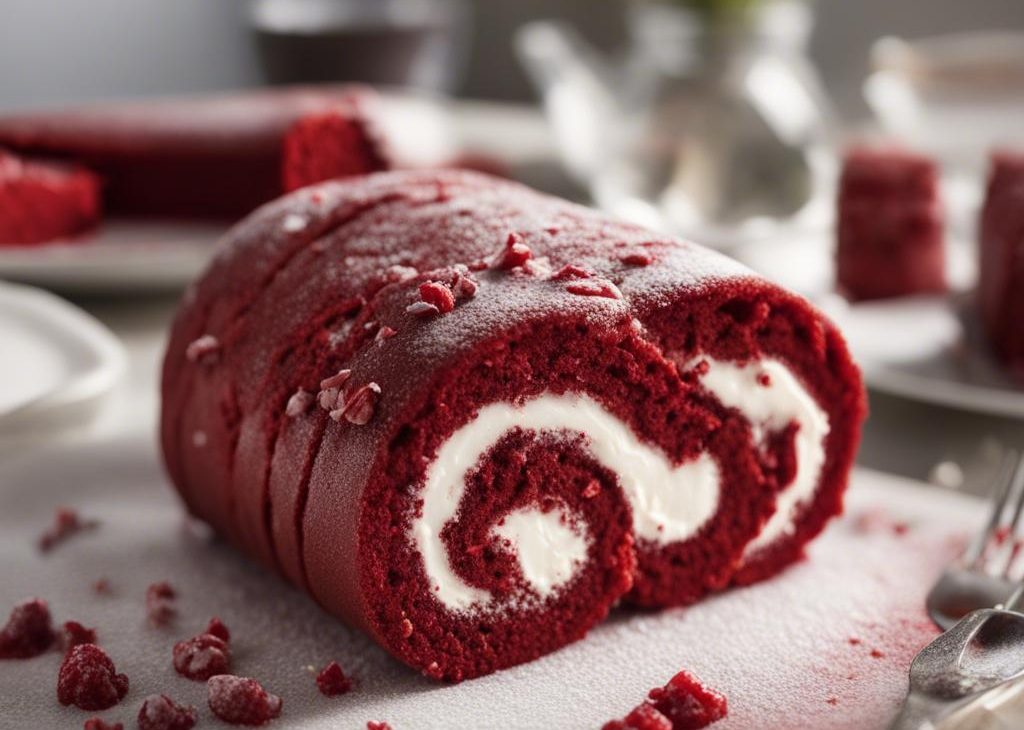

I make Red Velvet Cake Roll when I want a dessert that feels planned but does not require me to hover nervously over the counter all afternoon/p>
The first time I tested this style of recipe, I rushed the cooling step and paid for it with messy slices. Now I build in a little breathing room. I prep for about 25 minutes, keep the oven work steady, and let the dessert settle before I cut or frost it/p>
Why I keep coming back to this
- I can do the prep in about 25 minutes, which makes the recipe realistic on an ordinary day/li>
- The leftovers hold up well when I store them properly instead of leaving them loosely covered.
- It is flexible enough for small swaps without losing the main character of the dish.
- The recipe gives clear texture cues, so I am not depending on the timer alone.
- It slices, scoops, or serves more neatly once I let it cool instead of rushing it.
What you need and what each ingredient does
- 1 cup all-purpose flour minus 1 Tablespoon (118g). I measure it carefully because it decides whether the base is tender or heavy.
- 3 Tablespoons unsweetened cocoa powder (15g). I add it for the main flavor note, so I use a brand I actually like eating plain.
- 1 teaspoon baking powder. so the recipe moves calmly. It provides the lift that keeps things from turning dense.
- 1/2 teaspoon salt. I treat it as seasoning, then taste near the end before deciding whether it needs more.
- 4 large eggs, room temperature.
- 1/2 cup granulated sugar (100g).
- 1/4 cup packed light or dark brown sugar (50g).
- 2 Tablespoons vegetable oil (30ml).
- 2 Tablespoons buttermilk (30ml).
- 1 teaspoon white vinegar (helps the red color stand out).
- 1 Tablespoon liquid red food coloring. so the recipe moves calmly.
- 2 teaspoons pure vanilla extract. so the recipe moves calmly.
- 1 cup confectioners sugar for rolling (120g).
- 6 ounces brick cream cheese, softened (170g).
- 1/4 cup unsalted butter, softened (4 Tbsp; 56g).
- 1 and 3/4 cups confectioners sugar (210g).
- 1 teaspoon pure vanilla extract. so the recipe moves calmly.
How I make it
Step 1 — Prep the ingredients
Heating the oven and preparing the pan or baking sheet so red velvet cake roll can go straight in once assembled. I keep the listed timing in mind: 350°F (177°C).
Step 2 — Combine the ingredients
I combine the ingredients in the order given, scraping the bowl and checking the edges so no dry pockets or streaks are hiding. I keep the listed timing in mind: 5 minutes.
Step 3 — Bake
I bake until the visual cues match the recipe, then I let carryover heat finish the center instead of pushing it too far. I keep the listed timing in mind: 17 minutes.
Step 4 — Assemble
I assemble the layers carefully and keep the edges tidy so the pieces slice or serve cleanly after cooking.
Step 5 — Chill
I give the mixture the chill or cooling time it needs before moving on; this is the step that keeps the final texture neat. I keep the listed timing in mind: 2 hours.
Step 6 — Assemble
Step 7 — Combine the ingredients
I combine the ingredients in the order given, scraping the bowl and checking the edges so no dry pockets or streaks are hiding.
Step 8 — Assemble
Step 9 — Chill
I give the mixture the chill or cooling time it needs before moving on; this is the step that keeps the final texture neat. I keep the listed timing in mind: 20 minutes, 1 day.
Tips from my kitchen
- Tip 1: I measure flour with a light hand; packed flour is the fastest route to a dry dessert.
- Tip 2: I scrape the bowl after every major addition because streaks hide under the paddle.
- Tip 4: I cool completely before frosting or cutting, even when the kitchen smells unfairly good.
Variations I have actually tried
- Variation 1: Swap part of the chocolate or candy for toasted nuts when I want more crunch.
- Variation 2: Add a pinch of espresso powder to chocolate batters for a deeper cocoa note without making it taste like coffee.
- Variation 3: Use vanilla bean paste in place of extract when I want a more bakery-style aroma.
- Variation 4: Chill the finished dessert and cut smaller pieces for a cleaner party tray.
- Variation 5: Add flaky salt on top when the recipe leans very sweet.
Storing and reheating
I store the cooled pieces in an airtight container. Most keep 3-5 days in the refrigerator, and I separate sticky layers with parchment so the tops stay neat.
When I know leftovers are coming, I portion them before anyone starts picking at the pan. Smaller containers cool faster, reheat more evenly, and make the next meal feel less like an afterthought.
What I serve with it
I usually serve it simply: coffee, cold milk, or a small scoop of vanilla ice cream if the dessert is warm. For a tray, I wipe the knife between cuts so every piece looks intentional.
Frequently asked questions
Can I make this ahead?
Yes. I often bake it the day before, then frost, slice, or serve once it is fully cool.
Can I freeze it?
Most unfrosted pieces freeze well for up to 2 months. I wrap tightly and thaw in the refrigerator.
Why did mine turn dry?
The usual causes are too much flour or a few extra minutes in the oven. I measure lightly and watch the center.
Can I reduce the sugar?
I would not reduce it much because sugar affects moisture and structure, not only sweetness.
Do I need room temperature ingredients?
For butter, eggs, and cream cheese, yes. I get a smoother batter or frosting when they are not cold.
If you make Red Velvet Cake Roll, I would love to hear what you changed and what you would keep exactly the same next time.
Red Velvet Cake Roll
Description
I wrote this red velvet cake roll rewrite the way I cook it: with the small timing cues, texture checks, and storage notes that matter once the recipe is in a real kitchen. It is practical, warm, and detailed enough to follow without guessing.
Ingredients You’ll Need
Instructions
- Step 1:.
- Step 2: Heating the oven and preparing the pan or baking sheet so red velvet cake roll can go straight in once assembled. I keep the listed timing in mind: 350°F (177°C).
- Step 3:.
- Step 4: I combine the ingredients in the order given, scraping the bowl and checking the edges so no dry pockets or streaks are hiding. I keep the listed timing in mind: 5 minutes.
- Step 5: I bake until the visual cues match the recipe, then I let carryover heat finish the center instead of pushing it too far. I keep the listed timing in mind: 17 minutes.
- Step 6: I assemble the layers carefully and keep the edges tidy so the pieces slice or serve cleanly after cooking.
- Step 7: I give the mixture the chill or cooling time it needs before moving on; this is the step that keeps the final texture neat. I keep the listed timing in mind: 2 hours.
- Step 8: I assemble the layers carefully and keep the edges tidy so the pieces slice or serve cleanly after cooking.
- Step 9: I combine the ingredients in the order given, scraping the bowl and checking the edges so no dry pockets or streaks are hiding.
- Step 10: I assemble the layers carefully and keep the edges tidy so the pieces slice or serve cleanly after cooking.
- Step 11: I give the mixture the chill or cooling time it needs before moving on; this is the step that keeps the final texture neat. I keep the listed timing in mind: 20 minutes, 1 day.
Nutrition Facts
Servings 10
- Amount Per Serving
- Calories 188kcal
- % Daily Value *
- Total Fat 13g20%
- Saturated Fat 7g35%
- Trans Fat 0.4g
- Cholesterol 31mg11%
- Sodium 207mg9%
- Potassium 55mg2%
- Total Carbohydrate 17g6%
- Dietary Fiber 1g4%
- Sugars 16g
- Protein 1g2%
- Calcium 53 mg
- Iron 0.4 mg
* Percent Daily Values are based on a 2,000 calorie diet. Your daily value may be higher or lower depending on your calorie needs.
Note
Timing. I measure flour with a light hand; packed flour is the fastest route to a dry dessert.
Texture. I scrape the bowl after every major addition because streaks hide under the paddle.
Seasoning. I pull baked sweets when the center still has a little softness, then let the pan finish setting on the rack.
Storage. I cool completely before frosting or cutting, even when the kitchen smells unfairly good.
Frequently Asked Questions
Yes. I often bake it the day before, then frost, slice, or serve once it is fully cool.
Most unfrosted pieces freeze well for up to 2 months. I wrap tightly and thaw in the refrigerator.
The usual causes are too much flour or a few extra minutes in the oven. I measure lightly and watch the center.
I would not reduce it much because sugar affects moisture and structure, not only sweetness.
For butter, eggs, and cream cheese, yes. I get a smoother batter or frosting when they are not cold.
1 Comment
Leave a Comment
You may also like...


Very well written article. It will be valuable to anyone who utilizes it, including me. Keep doing what you are doing – can’r wait to read more posts.