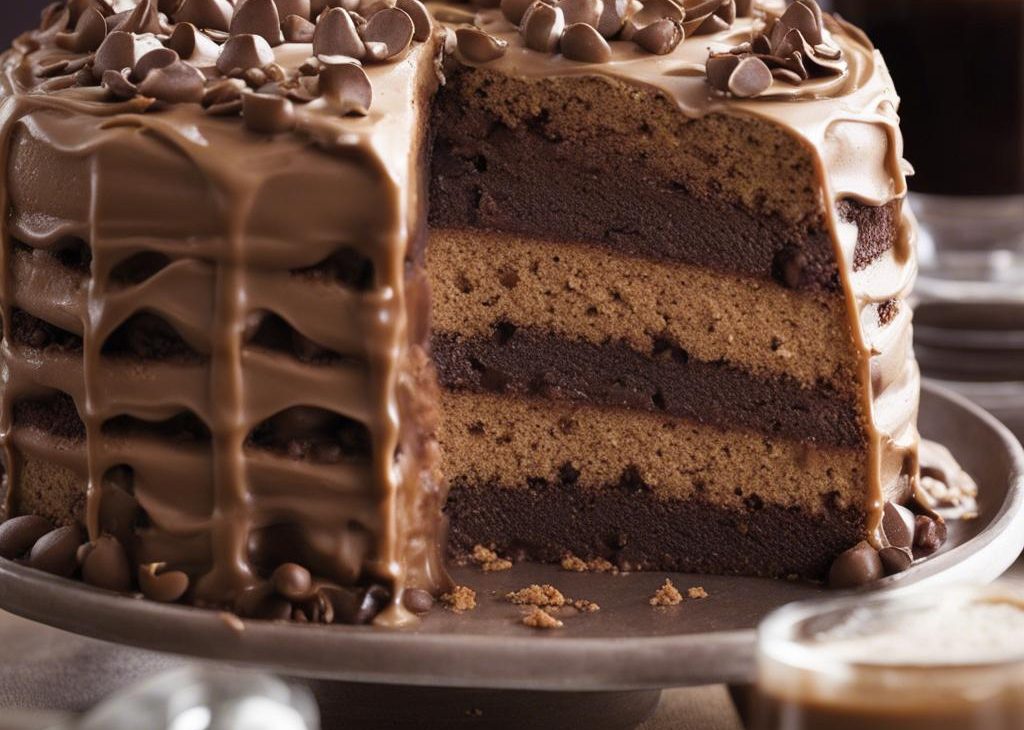

. You can drink your coffee and eat it too with a towering slice of this homemade beauty!
Giving a different meaning to coffee cake! It’s been a while since I developed a truly fabulous layer cake, but a dear friend’s birthday called for something special… and FLAVOR most certainly had to be on the dessert menu! Simply put, this coffee-infused layer cake is nothing short of exquisite and there’s a few other ways to make it including as a sheet cake, 2 layer cake, cupcakes, and more. However you bake it, coffee lovers everywhere will rejoice.
Espresso Chocolate Chip Cake Details:
Like many of my cake recipes, I adapted this cake batter from my basic white cake batter. The white cake is a very popular cake recipe, both a personal and reader favorite. Between its pristine crumb, fluffy texture, and stick-to-your-fork moisture, it’s impossible not to love. It’s my gold standard when it comes to soft cakes, so I’ve used it to produce many other flavors including pineapple coconut cake, pistachio cake, cookies & cream cake, burnt sugar caramel cake, coconut cake, strawberry cake, and today’s espresso variation. Here’s what you can expect:
- Texture: Thanks to a careful ratio of cake flour, leaveners, egg whites (no yolks), and sour cream, liquid, we have a balance of soft, springy, and moist in each bite. You’ll only achieve this texture perfection if you follow the recipe closely, which is my #1 piece of advice for baking cakes. Note that I slightly increased the flour and reduced the egg whites from the original batter because introducing a thinner liquid (coffee) threw things off.
- Flavor: Do you like chocolate and coffee together? For many coffee drinkers, it’s a match made in heaven! In fact, I was going to call this a mocha cake, but coffee is truly the main flavor and the chocolate chips are little extras.
- Ease: If you’ve baked layer cakes before, this shouldn’t be difficult. But if you’re new to layer cakes, don’t be nervous because stacking and frosting the cooled cakes isn’t anything fancy. I like to keep decoration simple.
- Time: Set aside at least 4 hours to complete this recipe which includes making the cake, cooling completely, and frosting/assembling. Don’t forget to bring your cold ingredients and hot coffee to room temperature before starting.
Espresso Powder & Strong Coffee
Most layer cake recipes require liquid and today’s uses 1/3 cup (80ml) strong black brewed coffee and 2/3 cup (160ml) milk. Brewed coffee alone did not provide enough flavor in this cake, so we’ll also use 5 teaspoons of espresso powder. (Yes 5! This is a lot of cake batter.) You could dissolve espresso powder IN the coffee, but I found its flavor came through better when creamed with the butter.
- Do I have to use both coffee and espresso powder? Yes, for the best results, I strongly recommend using both. The cake did not have nearly enough flavor otherwise.
- Can I just use brewed espresso instead of coffee and espresso powder? I don’t recommend it. To ensure there’s enough coffee flavor in the cake, you would need more than 1/3 cup (80ml) espresso and replacing more milk with fat free liquid creates a wet, spongey cake.
- Where to find espresso powder? Most major grocery stores carry it in the coffee aisle. Or you can find it online.
- Can I use instant coffee instead of espresso powder? You can, but you’ll need more instant coffee because it’s not nearly as concentrated. Instant coffee is dehydrated ground coffee, while espresso powder is brewed dark roast coffee that’s dried and ground very finely. Espresso powder is often used in baking and if you pick up a jar, you can use it in any of these recipes that call for espresso powder.
You will also use espresso powder in today’s frosting. For the most flavor AND to preserve a creamy consistency, use espresso powder in the coffee buttercream rather than brewed coffee. The buttercream is certainly sweet, but the espresso powder’s strong and bitter flavor helps offset the sweetness. Though you’ll see the espresso powder flecks and certainly taste the flavor, the powder’s granules are sufficiently broken down. So don’t worry… the frosting isn’t granular.
. That’s expected because compared to other cake recipes this size, there isn’t a ton of butter. (Sour cream makes up some of the fat!)
Success Tips: Espresso Chocolate Chip Cake
The full printable recipe is below.
- Use Room Temperature Ingredients: All refrigerated items should be at room temperature so the cake batter mixes together evenly. Simply put, cold ingredients won’t properly combine to produce a smooth, light cake crumb. Likewise, bring your brewed coffee to room temperature as well.. The finished cake was just fine, but for best results, I recommend ensuring everything is room temperature.
- Follow the recipe closely: Following a recipe as written sounds obvious, but it’s often ignored. We change recipes like reducing sugar, using all-purpose instead of cake flour, baking soda for powder, whole eggs instead of just whites, etc. Don’t sabotage your time, effort, and money by straying from the original recipe unless you’re after a different flavor and texture.
- Mini Chocolate Chips: Just as I recommend for chocolate chip loaf cake, chocolate chip scones, and even chocolate raspberry cake and this raspberry chocolate chip layer cake, use mini chocolate chips. Why? So you can enjoy tiny pockets of chocolate in every single bite! Mini = more.
- Prep Cake Pans: From one baker to another—I love the quality and performance of Fat Daddio’s cake pans. (I’m not working with this brand, just a fan!) You’ll need 8-inch round cake pans for this particular recipe. And when it comes to prepping round cake pans, I use parchment paper rounds. Trace the bottom of the cake pans on a large piece of parchment paper and then cut out the circles. Then, very lightly grease the cake pans with butter or nonstick spray, place the parchment round inside, and then grease the parchment round too. This promises an ultra non-stick environment for your cake..
Starbucks on a Cake Stand!
There’s no denying that the espresso chocolate chip cake is flavorful on its own, but pairing it with coffee buttercream transforms it into Starbucks on a Cake Stand. (LOL I couldn’t resist.) For a more subdued coffee flavor, you could certainly pair the cake with plain Swiss meringue buttercream and I suggest that over American-style vanilla buttercream because its mild sweetness will not overpower the coffee flavor.
If you love this frosting, you’ll probably enjoy it with coconut cake, chocolate cake, and vanilla cake too. And if you’re looking for more coffee-inspired desserts, try these Baileys & Coffee Cupcakes.
Filling & Frosting Espresso Chip Cake
The coffee buttercream yields just enough for filling the cake, lightly frosting the exterior, and simple piping around the top. Chocolate covered coffee beans are fun garnish, but feel free to skip them. You could even dress up the cake with chocolate curls, chocolate chips, or chocolate sprinkles instead.
PS: Custom printed forks are always so much fun. 🙂 Message that Etsy seller for custom sayings! She was super responsive and the Baking is Life fork turned out wonderfully!
Espresso Chocolate Chip Cake Recipe
Description
Coffee lovers will enjoy every slice of this soft, moist, and flavorful espresso chocolate chip layer cake. Review the recipe notes before beginning and make sure all ingredients (hot & cold) are brought to room temperature before starting.
Ingredients You’ll Need
Instructions
- Preheat oven to 350°F (177°C). Grease three 8-inch cake pans, line with parchment paper rounds, then grease the parchment paper. Parchment paper helps the cakes seamlessly release from the pans..)
- Whisk the cake flour, baking powder, baking soda, and salt together. Set aside.
- Using a handheld or stand mixer fitted with a paddle or whisk attachment, beat the butter, espresso powder, and sugar together on medium-high speed until combined and creamy, about 2 minutes. Scrape down the sides and up the bottom of the bowl with a silicone spatula as needed. Beat in the egg whites until combined, and then add the sour cream and vanilla extract. Beat until combined. Mixture may look curdled as a result of the varying textures and solid butter combining. Scrape down the sides and up the bottom of the bowl as needed. Pour in the dry ingredients, turn the mixer on low speed and with the mixer running, slowly pour in the milk and coffee. Beat on low speed until combined, and then beat in the chocolate chips just until combined. Whisk it all by hand to make sure there are no butter lumps at the bottom of the bowl. The batter will be slightly thick. Do not overmix.
- Pour batter evenly into cake pans. Bake for around 25-28 minutes or until the cakes are baked through. To test for doneness, insert a toothpick into the center of the cake. If it comes out clean, it’s done. Allow cakes to cool in the pans set on a wire rack for 30 minutes. Run a knife around the edges and then remove from pans. Allow cakes to cool completely set on a wire rack. The cakes must be completely cool before frosting and assembling.
- In a large bowl using a handheld mixer or stand mixer fitted with a whisk or paddle attachment, beat the butter and espresso powder together on medium speed until creamy, about 2 minutes. Add confectioners’ sugar, cream/milk, vanilla extract, and salt. Beat on low speed for 30 seconds and then switch to high speed and beat for 2 minutes. Taste and beat in more espresso powder to taste if desired. I usually add another 1/4 teaspoon for more flavor. Yields about 4 cups frosting.
- If your cakes are domed on top, very carefully use a large serrated knife to slice a thin layer off the tops to create a flat surface. Discard (or crumble over ice cream!). Place 1 cake layer on your cake stand, cake turntable, or serving plate. Evenly cover the top with about 3/4 cup frosting. I use and recommend an icing spatula to apply the frosting. Top with 2nd cake layer and spread about 3/4 cup frosting on top. Place 3rd layer on top and frost the sides and top with remaining frosting..
- Refrigerate cake for 10-20 minutes before slicing. This helps the cake hold its shape when cutting.
- Cover leftover cake tightly and store in the refrigerator for up to 5 days.
You may also like...