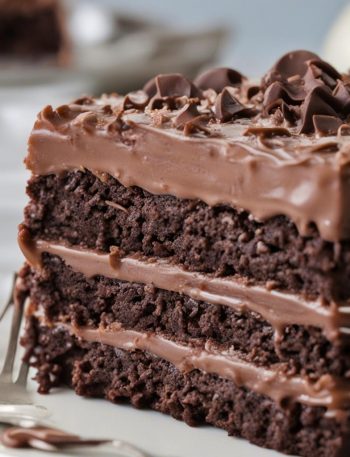

I make this espresso chocolate chip cake when I want something that tastes like I paid attention, even if the day has been a little scattered. The ingredient list is straightforward, but the result has enough character that I still feel proud setting it on the table.
The first time I tested my way through this style of recipe, I learned that the small details matter: the right heat, the right rest, and not rushing the finish. That is still how I handle it.
This version uses cake flour, baking powder, baking soda, salt and serves 10. Prep is 40 minutes and cook time is 26 minutes, so I can plan it without hovering over the clock all afternoon.
Why I keep coming back to this
- I can get the main work done in 40 minutes, which keeps this from feeling like a project.
- The flavor is built from cake flour, baking powder, baking soda, not from fussy extras.
- The method has a clear doneness point, so I am not guessing at the finish line.
- Leftovers are useful, which is the first thing I ask of any recipe I make on a busy week.
- It is flexible enough for small swaps, but the original amounts still matter.
- I can serve it without explaining it, and that usually means the recipe is doing its job.
What you need and what each one is doing
- 2 2/3 cups cake flour (315g).I count on it for structure, so I measure it instead of scooping wildly.
- 2 teaspoons baking powder.
- 1/2 teaspoon baking soda.
- 1 teaspoon salt.
- 3/4 cup unsalted butter, softened (12 Tbsp; 170g).
- 5 teaspoons espresso powder.
- 1 3/4 cups granulated sugar (350g).
- 4 large egg whites, at room temperature.
- 1/2 cup sour cream, at room temperature (120g).
- 2 teaspoons pure vanilla extract.
- 2/3 cup whole milk (160ml).
- 1/3 cup strong brewed coffee or espresso (80ml).
- 1 1/4 cups mini chocolate chips (225g).
- 1 1/4 cups unsalted butter, softened (282g).
- 2 1/2 teaspoons espresso powder, plus more to taste.
- 5 cups confectioners’ sugar (560g).
- 1/3 cup heavy cream or milk (80ml).
- 2 teaspoons pure vanilla extract.
- 1/8 teaspoon salt.
- optional: chocolate covered espresso beans for garnish.
How I make it
Step 1 — Prep the pans
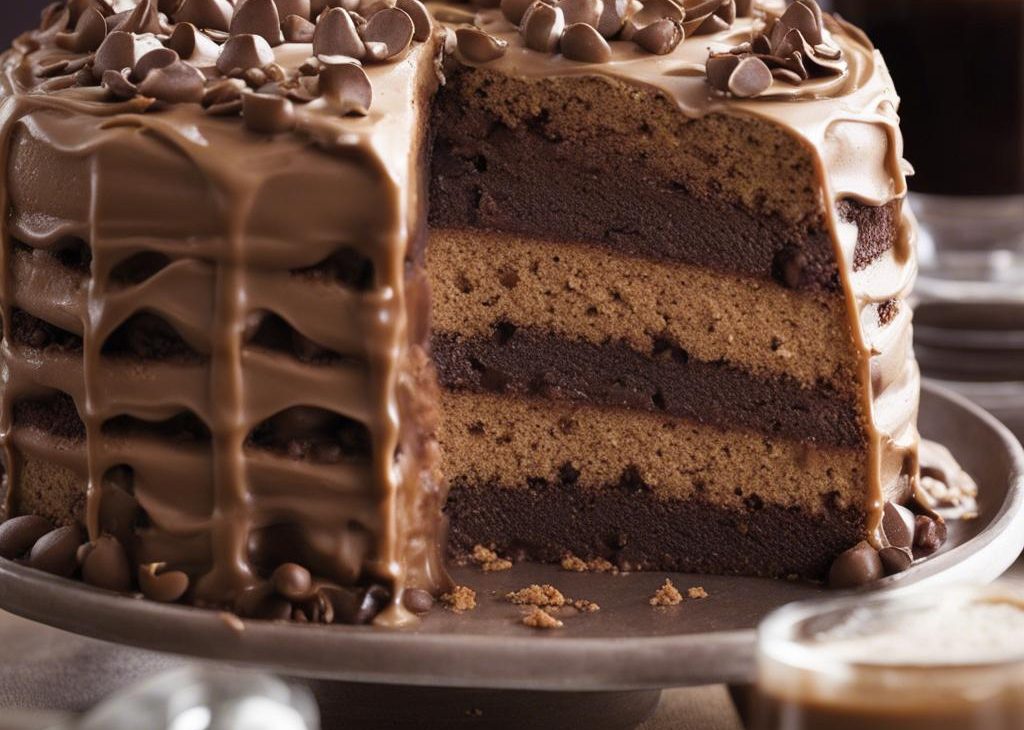
I follow this part without wandering away: Preheat oven to 350°F (177°C). Grease three 8-inch cake pans, line with parchment paper rounds, then grease the parchment paper. Parchment paper helps the cakes seamlessly release from the pans.) Whisk the cake flour, baking powder, baking soda, and salt together. Set aside.
Step 2 — Mix the batter or dough
I follow this part without wandering away: Using a handheld or stand mixer fitted with a paddle or whisk attachment, beat the butter, espresso powder, and sugar together on medium-high speed until combined and creamy, about 2 minutes. Scrape down the sides and up the bottom of the bowl with a silicone spatula as needed. Beat in the egg whites until combined, and then add the sour cream and vanilla extract. Beat until combined. Mixture may look curdled as a result of the varying textures and solid butter combining. Scrape down the.
Step 3 — Shape and fill
I follow this part without wandering away: In a large bowl using a handheld mixer or stand mixer fitted with a whisk or paddle attachment, beat the butter and espresso powder together on medium speed until creamy, about 2 minutes. Add confectioners’ sugar, cream/milk, vanilla extract, and salt. Beat on low speed for 30 seconds and then switch to high speed and beat for 2 minutes. Taste and beat in more espresso powder to taste if desired. I usually add another 1/4 teaspoon for more flavor. Yields about 4 cups frosting.
Step 4 — Bake until set
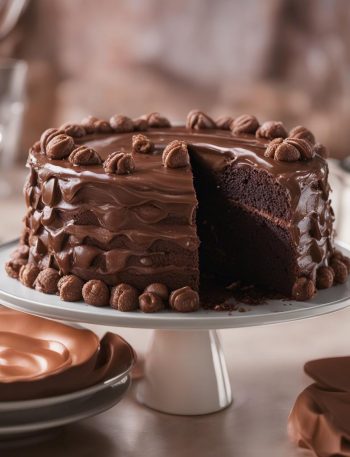
I follow this part without wandering away: If your cakes are domed on top, very carefully use a large serrated knife to slice a thin layer off the tops to create a flat surface. Discard (or crumble over ice cream!). Place 1 cake layer on your cake stand, cake turntable, or serving plate. Evenly cover the top with about 3/4 cup frosting. I use and recommend an icing spatula to apply the frosting. Top with 2nd cake layer and spread about 3/4 cup frosting on top. Place 3rd layer on top and.
Step 5 — Cool and finish
I follow this part without wandering away: Cover leftover cake tightly and store in the refrigerator for up to 5 days.
Tips from my kitchen
- Read the whole method once.I do this before I turn on heat because a few steps move quickly.
- Use the pan size in the recipe.A different pan changes thickness, timing, and browning.
- Trust the visual cues.I watch color, texture, and smell more than the timer alone.
- Let it rest when the recipe says to.That short pause usually fixes texture better than extra cooking.
- Cool before slicing or frosting.Warm baked goods tear, slump, or melt the finish.
Variations I have actually tried
- Brown butter.I brown the butter first when the recipe can handle melted butter and I want nuttier flavor.
- Citrus lift.I rub zest into the sugar before mixing for a brighter bite.
- Nutty crunch.I add toasted pecans, walnuts, or almonds when the texture can use contrast.
- Chocolate version.I fold in mini chips or drizzle melted chocolate after cooling.
- Fruit swap.I use the same amount of another fruit or jam with similar moisture.
How I store and reheat it
I let this espresso chocolate chip cake cool before I cover it. If it is a cake, bread, muffin, cookie, or bar, trapping steam too early softens the edges and can make frosting slide. Once cool, I use an airtight container and keep it at room temperature if the filling is stable, or in the refrigerator when dairy frosting, fruit, or custard is involved.
For reheating, I use short bursts rather than blasting it. Ten to twenty seconds in the microwave is plenty for a slice or roll; cookies and crackers come back better in a low oven. If I freeze a batch, I wrap portions individually so I can pull out only what I need.
What I serve with it
I like this espresso chocolate chip cake with coffee, cold milk, or a scoop of plain yogurt if it is breakfast-leaning. For dessert, I keep the plate simple so the crumb, filling, frosting, or topping gets the attention.
The little checks I do before serving
Before I call this espresso chocolate chip cake done, I pause for one last look. I check whether the edges are the color I want, whether the center has settled, and whether the aroma matches the ingredients I put in. That sounds simple, but it has saved me from underbaked centers, thin sauces, and flat seasoning more than once.
I also taste or test a small piece when the recipe allows it. If it needs salt, acid, more cooling time, or a cleaner cut, I would rather know in the kitchen than at the table. That habit is what makes a home-cooked recipe feel steady instead of lucky.
Frequently asked questions
Can I make this espresso chocolate chip cake ahead?
Yes. I usually make it ahead when the schedule is tight, then store it covered. For the best texture, I keep crunchy toppings, fresh herbs, or final drizzles separate until serving.
How do I know it is done?
I look for the cue in the method first: set center, thickened sauce, golden edges, or fully cooked protein. If I am unsure, I give it a few more minutes and check again instead of rushing it.
Can I change the sweetness or spice?
I do, but in small steps. Sweetness and heat are easier to add than remove, so I start with a tablespoon or a pinch, taste, and adjust from there.
What is the most common mistake?
For me, it is usually hurrying the rest time or using ingredients that are too cold. A short pause and properly softened butter, cream cheese, or eggs make a bigger difference than people expect.
How should I store leftovers?
I cool leftovers first, then cover them tightly. Most baked items and cooked dishes keep well in the refrigerator for several days; sauces and frostings need airtight containers so they do not pick up fridge smells.
If you make this espresso chocolate chip cake, leave a comment with what worked for you. I always like hearing the small tweaks that happen in real kitchens.
Espresso Chocolate Chip Cake
Description
I make this espresso chocolate chip cake with cake flour, baking powder, baking soda, salt and practical timing I can trust. This rewrite keeps the source amounts while adding the kitchen notes I wish I had the first time through.
Ingredients You’ll Need
Instructions
- Preheat oven to 350°F (177°C). Grease three 8-inch cake pans, line with parchment paper rounds, then grease the parchment paper. Parchment paper helps the cakes seamlessly release from the pans.).
- Whisk the cake flour, baking powder, baking soda, and salt together. Set aside.
- Using a handheld or stand mixer fitted with a paddle or whisk attachment, beat the butter, espresso powder, and sugar together on medium-high speed until combined and creamy, about 2 minutes. Scrape down the sides and up the bottom of the bowl with a silicone spatula as needed. Beat in the egg whites until combined, and then add the sour cream and vanilla extract. Beat until combined. Mixture may look curdled as a result of the varying textures and solid butter combining. Scrape down the sides and up the bottom of the bowl as needed. Pour in the dry ingredients, turn the mixer on low speed and with the mixer running, slowly pour in the milk and coffee. Beat on low speed until combined, and then beat in the chocolate chips just until combined. Whisk it all by hand to make sure there are no butter lumps at the bottom of the bowl. The batter will be slightly thick. Do not overmix.
- Pour batter evenly into cake pans. Bake for around 25-28 minutes or until the cakes are baked through. To test for doneness, insert a toothpick into the center of the cake. If it comes out clean, it's done. Allow cakes to cool in the pans set on a wire rack for 30 minutes. Run a knife around the edges and then remove from pans. Allow cakes to cool completely set on a wire rack. The cakes must be completely cool before frosting and assembling.
- In a large bowl using a handheld mixer or stand mixer fitted with a whisk or paddle attachment, beat the butter and espresso powder together on medium speed until creamy, about 2 minutes. Add confectioners' sugar, cream/milk, vanilla extract, and salt. Beat on low speed for 30 seconds and then switch to high speed and beat for 2 minutes. Taste and beat in more espresso powder to taste if desired. I usually add another 1/4 teaspoon for more flavor. Yields about 4 cups frosting.
- If your cakes are domed on top, very carefully use a large serrated knife to slice a thin layer off the tops to create a flat surface. Discard (or crumble over ice cream!). Place 1 cake layer on your cake stand, cake turntable, or serving plate. Evenly cover the top with about 3/4 cup frosting. I use and recommend an icing spatula to apply the frosting. Top with 2nd cake layer and spread about 3/4 cup frosting on top. Place 3rd layer on top and frost the sides and top with remaining frosting.
- Refrigerate cake for 10-20 minutes before slicing. This helps the cake hold its shape when cutting.
- Cover leftover cake tightly and store in the refrigerator for up to 5 days.
Nutrition Facts
Servings 10
- Amount Per Serving
- Calories 403kcal
- % Daily Value *
- Total Fat 17g27%
- Saturated Fat 10g50%
- Trans Fat 0.6g
- Cholesterol 45mg15%
- Sodium 382mg16%
- Potassium 69mg2%
- Total Carbohydrate 60g20%
- Dietary Fiber 1g4%
- Sugars 36g
- Protein 3g6%
- Calcium 96 mg
- Iron 1.4 mg
* Percent Daily Values are based on a 2,000 calorie diet. Your daily value may be higher or lower depending on your calorie needs.
Note
Read the whole method once. I do this before I turn on heat because a few steps move quickly.
Use the pan size in the recipe. A different pan changes thickness, timing, and browning.
Trust the visual cues. I watch color, texture, and smell more than the timer alone.
Let it rest when the recipe says to. That short pause usually fixes texture better than extra cooking.
Frequently Asked Questions
Yes. I usually make it ahead when the schedule is tight, then store it covered. For the best texture, I keep crunchy toppings, fresh herbs, or final drizzles separate until serving.
I look for the cue in the method first: set center, thickened sauce, golden edges, or fully cooked protein. If I am unsure, I give it a few more minutes and check again instead of rushing it.
I do, but in small steps. Sweetness and heat are easier to add than remove, so I start with a tablespoon or a pinch, taste, and adjust from there.
For me, it is usually hurrying the rest time or using ingredients that are too cold. A short pause and properly softened butter, cream cheese, or eggs make a bigger difference than people expect.
I cool leftovers first, then cover them tightly. Most baked items and cooked dishes keep well in the refrigerator for several days; sauces and frostings need airtight containers so they do not pick up fridge smells.
You may also like...