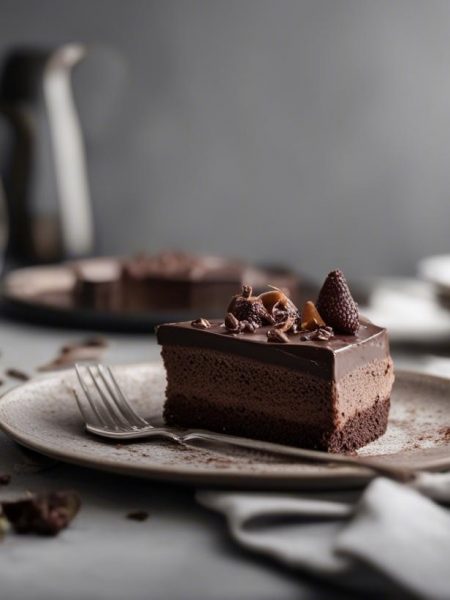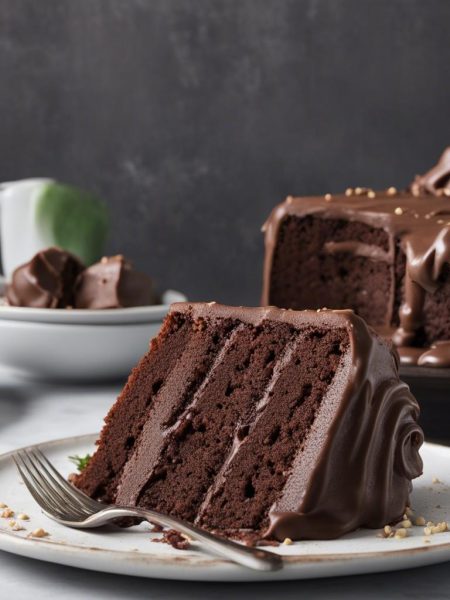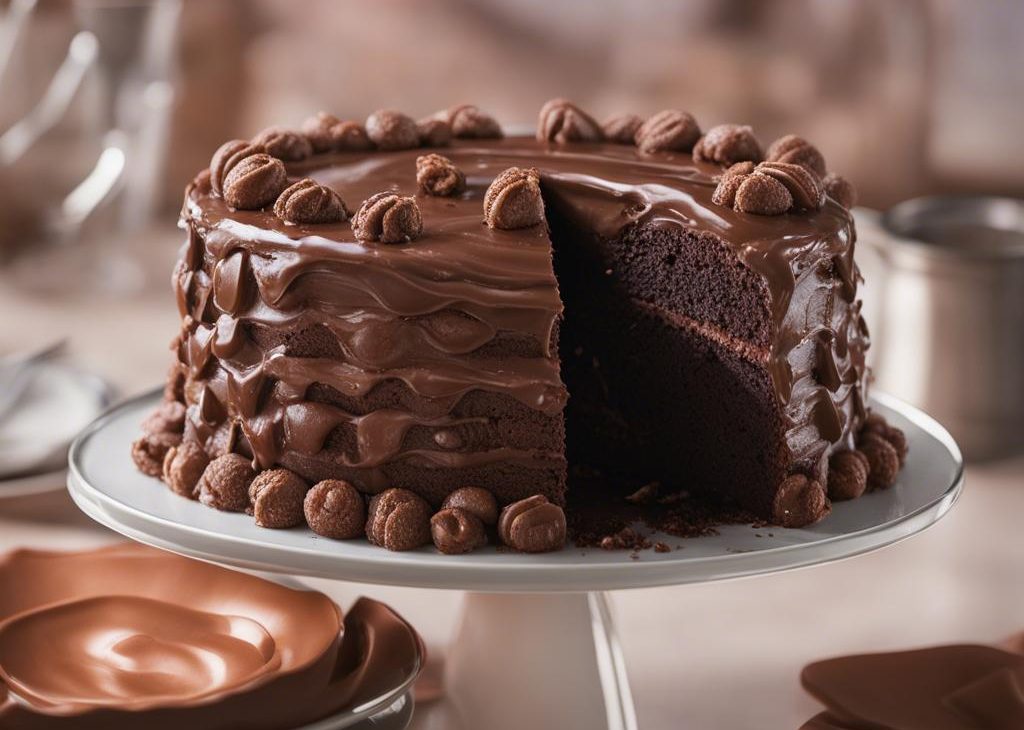

I make this Costco-style chocolate cake when I want a tall, dramatic dessert without using fussy pastry techniques. It has two 9-inch chocolate cake layers, a chocolate chip and cream mousse-style filling, and a cocoa frosting. It is rich, unapologetically chocolatey, and the kind of cake I slice smaller than I think I need because the layers mean business.
The batter starts a little differently from many cakes because hot water goes in with cocoa, oil, eggs, sugar, butter, and vanilla. That hot water helps the cocoa bloom, which makes the cake taste deeper. I still sift the flour, salt, and baking powder into the wet ingredients because cocoa batters show lumps easily.
My main rule is to cool the layers completely. I have rushed chocolate cake before, and warm layers turn mousse and frosting into a sliding mess. When I give the cake time, the filling sits neatly between the layers and the frosting spreads without dragging crumbs everywhere.
Why I keep coming back to this
- It bakes as two 9-inch layers, which gives the cake height without needing to split layers by hand.
- Hot water wakes up the cocoa powder and keeps the crumb moist.
- The mousse filling uses semisweet chocolate chips and heavy cream or half and half, so it tastes bold without a long process.
- Buttermilk or whole milk softens the cake batter and balances the cocoa.
- The frosting is cocoa-rich and spreadable once the butter is softened properly.
- It serves 6 generous slices, or more if I cut thinner pieces after a big meal.
What I use and why it matters
- Large eggs, 3, at room temperature.Room temperature eggs blend more smoothly into the oil and cocoa mixture.
- Baking soda, 1/2 tablespoon.This helps the cake rise and react with the dairy in the batter.
- Hot water, 1 cup.I use it to bloom the cocoa so the chocolate flavor tastes fuller.
- Vegetable oil, 1/2 cup.Oil keeps the cake moist after chilling.
- Unsweetened cocoa powder, 1 cup for the cake.I whisk it well so there are no bitter dry pockets.
- Brown sugar or white granulated sugar, 2 cups.Either works. Brown sugar gives a slightly deeper flavor and softer crumb.
- Pure vanilla extract, 1/2 tablespoon for the cake.Vanilla rounds out the cocoa.
- All-purpose flour, 2 cups.Sifting helps because this is a wet, dark batter where lumps can hide.
- Salt, 1 teaspoon.Chocolate needs salt to taste full rather than flat.
- Baking powder, 1/2 tablespoon.This supports the lift along with the baking soda.
- Buttermilk or whole milk, 1 cup.Buttermilk gives a little tang; whole milk gives a softer, milder cake.
- Butter, 1 stick.This belongs in the cake batter and adds richness alongside the oil.
- Semisweet chocolate chips, 7 ounces.I melt them with cream for the middle layer.
- Heavy cream or half and half, 1 cup.Heavy cream makes the filling thicker; half and half makes it lighter.
- Powdered sugar, 3 cups.This sweetens and thickens the frosting.
- Whole milk, 1/2 cup.I add it to the frosting mixture until it spreads smoothly.
- Unsalted butter, softened, 1 cup.Soft butter makes the frosting fluffy instead of greasy.
- Unsweetened cocoa powder, 1 cup for frosting.This makes the frosting taste like chocolate, not just sugar.
- Pure vanilla extract, 1/2 tablespoon for frosting.A second dose of vanilla rounds out the finished cake.
The cooling and layering cue
I want the cake layers fully cool and the chocolate filling cooled slightly before stacking. If the filling is hot, it soaks into the cake and runs out the sides. If it is too cold, it turns stiff and tears the crumb. I aim for spreadable, glossy, and just warm enough to move.
The frosting should be light enough to spread but thick enough to hold ridges from a spatula. If it drags, I add milk a teaspoon at a time. If it looks loose, I add a little powdered sugar and beat again.
How I make it
Step 1 — Mix the chocolate batter base
In a large bowl, I combine the eggs, baking soda, hot water, vegetable oil, cocoa powder, sugar, butter, and vanilla extract. I whisk until the mixture looks smooth and the cocoa is fully hydrated.
Step 2 — Add the dry ingredients and milk
I sift in the flour, salt, and baking powder, then mix only until just combined. I pour in the buttermilk or whole milk and stir until the batter is even, scraping the bottom of the bowl.
Step 3 — Make the mousse-style filling
In a medium bowl, I combine the semisweet chocolate chips and heavy cream or half and half. I microwave for 1 minute, stir until smooth, and let it cool slightly so it can spread without running.
Step 4 — Make the frosting
I whisk powdered sugar, vanilla extract, and whole milk in a bowl, then add the softened unsalted butter and cocoa powder. I mix until the frosting looks light, fluffy, and spreadable.
Step 5 — Bake the layers
I preheat the oven to 350°F (175°C), grease two 9-inch round cake pans, and line them with parchment. I divide the batter evenly and bake for 25-30 minutes, until a toothpick inserted into the center comes out clean.
Step 6 — Fill and frost
I let the layers cool completely. Then I place one layer on a plate or stand, spread the cooled chocolate filling over it, add the second layer, and cover the cake with frosting.
Tips from my kitchen
- Bloom the cocoa.I make sure the hot water hits the cocoa mixture so the flavor opens up.
- Sift the flour mixture.Lumps stand out in chocolate cake, so I do not skip this.
- Cool everything.Warm layers make filling and frosting slide.
- Use parchment rounds.Chocolate cake is tender and needs help releasing cleanly.
- Adjust frosting slowly.Milk by the teaspoon is safer than pouring too much at once.
Variations I have actually tried
- Brown sugar version:I use brown sugar for a deeper, slightly molasses-like crumb.
- White sugar version:I use granulated sugar when I want a cleaner cocoa flavor.
- Coffee note:I replace a small splash of the hot water with strong coffee when I want more depth.
- Berry serving:I serve slices with raspberries to cut the richness.
- Sheet cake idea:I bake the batter in a rectangular pan only when I do not need the filled layer look, checking early for doneness.
Storing and reheating
I store the finished cake covered in the refrigerator for up to 4 days because of the creamy filling and frosting. Before serving, I let slices sit at room temperature for 20 minutes so the frosting softens and the crumb tastes less cold.
For freezing, I prefer freezing unfrosted cake layers. I wrap cooled layers tightly and freeze for up to 2 months. Frosted slices can be frozen, too, but the frosting texture is a little less smooth after thawing.
What I serve with it
This cake does not need much. I serve thin slices with cold milk, coffee, or unsweetened tea. If I want contrast, I add fresh raspberries or sliced strawberries on the plate, not more chocolate sauce.
Frequently asked questions
Can I use half and half instead of heavy cream?
Yes. The source allows heavy cream or half and half. Heavy cream sets thicker, while half and half gives a softer filling.
Why did my filling run out?
It was probably too warm or the cake layers were warm. I cool the filling slightly and cool the layers completely before stacking.
Can I make the layers ahead?
Yes. I bake, cool, wrap, and refrigerate the layers for 1 day before filling and frosting.
Is this gluten-free?
No. It uses all-purpose flour. A gluten-free blend may work, but I have not tested it enough to promise the same texture.
How do I keep crumbs out of the frosting?
I use a thin first coat, chill briefly, then add the rest of the frosting. Fully cooled layers also help a lot.
If you make it, I would like to know whether you used brown sugar or white sugar in the batter.
Costco chocolate cake
Description
A rich Costco-style chocolate cake with two 9-inch layers, cocoa batter, semisweet chocolate filling, and cocoa frosting. I cool the layers completely so the filling stays put.
Ingredients You’ll Need
Instructions
- In a large bowl, combine the eggs, baking soda, hot water, vegetable oil, cocoa powder, sugar, butter, and vanilla extract. Whisk until smooth.
- Sift the flour, salt, and baking powder into the wet ingredients and mix until just combined.
- Pour in the buttermilk or whole milk and mix until incorporated.
- For the mousse-style topping, combine semisweet chocolate chips and heavy cream or half and half in a medium bowl. Microwave for 1 minute, stir until smooth, and cool slightly.
- For the frosting, whisk powdered sugar, vanilla extract, and whole milk, then add softened unsalted butter and cocoa powder and mix until light and fluffy.
- Preheat the oven to 350°F (175°C). Grease two 9-inch round cake pans and line with parchment. Divide the batter evenly and bake for 25-30 minutes, until a toothpick inserted into the center comes out clean. Cool completely.
- Place one layer on a plate or stand. Spread the cooled chocolate filling over the top, add the second layer, and cover with frosting.
Nutrition Facts
Servings 6
- Amount Per Serving
- Calories 1000kcal
- % Daily Value *
- Total Fat 67g104%
- Saturated Fat 33g165%
- Trans Fat 2.0g
- Cholesterol 124mg42%
- Sodium 469mg20%
- Potassium 301mg9%
- Total Carbohydrate 101g34%
- Dietary Fiber 6g24%
- Sugars 60g
- Protein 8g16%
- Calcium 134 mg
- Iron 4.0 mg
* Percent Daily Values are based on a 2,000 calorie diet. Your daily value may be higher or lower depending on your calorie needs.
Note
Cool the layers fully. Warm cake makes the filling slide.
Sift the dry ingredients. It prevents flour and cocoa lumps in the batter.
Soften frosting butter properly. Cold butter leaves lumps; melted butter makes frosting greasy.
Use parchment. Tender chocolate layers release more cleanly.
Frequently Asked Questions
Yes. Heavy cream makes a thicker filling, while half and half makes it softer.
The filling or cake layers were likely too warm. Cool both before stacking.
Yes. Bake the layers 1 day ahead, wrap them well, and frost the next day.
No. The recipe uses all-purpose flour.
Keep the finished cake covered in the refrigerator for up to 4 days, then let slices sit briefly before serving.
You may also like...