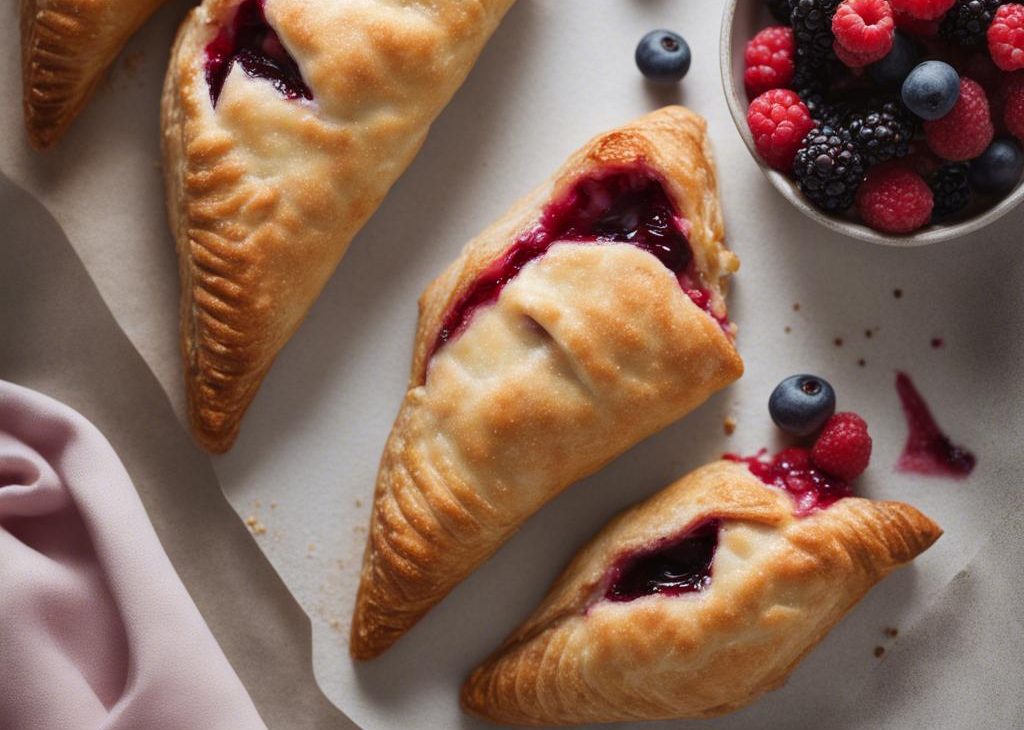

Homemade Berry Turnovers is the version I make when I want the idea of the original recipe, but with enough real kitchen detail that I can repeat it without second-guessing myself.
I have learned to slow down at the small moments: scraping the blender jar, letting dough puff, waiting for caramel to cool, or tasting a sauce after it sits for a minute. Those details are not fussy. They are the difference between a recipe I make once and a recipe I keep in my notes.
This recipe serves 9 and takes 330 min prep, 25 min cook. I wrote the method the way I talk myself through it at the counter: what I look for, where I adjust, and what I avoid when I am tired or in a hurry.
Why I keep coming back to this
- The recipe gives me clear doneness cues beyond the timer.
- Cooling time improves the final texture.
- It makes the kitchen smell warm and lived-in.
- I can prep pieces ahead when needed.
- Small changes like spice or fruit are easy to track.
- It slices or serves better when I let it rest.
What you need and what each ingredient is doing
- 1 teaspoon cornstarch.
- 1 teaspoon warm water.
- 1 cup mixed berries (about 150g).I blend or whisk it thoroughly because dry pockets are the fastest way to make this taste rushed.
- 1 1/2 Tablespoons granulated sugar (18g).
- 1 teaspoon lemon juice.I look for good color and freshness because this is the flavor that comes through first.
- 1 1/3 cups all-purpose flour (166g).I measure it carefully because a heavy scoop changes the texture.
- 1 teaspoon granulated sugar (for pastry).
- 1/2 teaspoon salt.I measure the small amount because it is what keeps the flavor from tasting flat.
- 3/4 cup unsalted butter, cold and cubed (12 Tbsp; 170g).I use it for richness and tenderness, then watch heat so it does not taste scorched.
- 6 Tablespoons ice-cold water (6-8 Tbsp; 90-120ml).
- 1 large egg (for egg wash).I let it do the binding work and mix until it disappears.
- 2 Tablespoons milk (30ml; for egg wash).
- coarse sugar (optional, for topping).
- vanilla icing (optional).
How I make it
Step 1 — Set up the recipe so nothing gets missed
I whisk the cornstarch and water together until all the cornstarch has dissolved. (I just use a fork to mix-very easy.) Place the berries, sugar, cornstarch mixture, and lemon juice into a small saucepan over medium heat. Using a wooden spoon or rubber spatula, stir the mixture as it cooks. Break up some of the berries as I stir. Bring it to a simmer and allow to simmer for 3 minutes, stirring constantly. Remove pan from the heat and cool completely. The mixture will thicken as it cools. Once cool, filling can be covered and refrigerated for up to 5 days before using. Makes 3/4 cup of filling. I whisk the flour, sugar, and salt together in a large bowl. Place the cold and cubed butter on top.. I do not want to break down.
Step 2 — Build the main mixture patiently
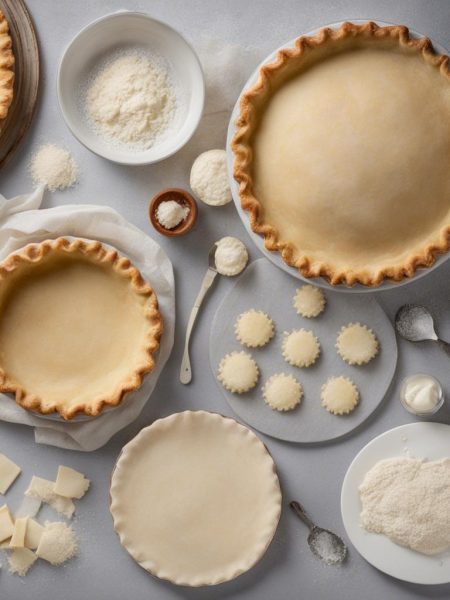
I refrigerate dough for at least 2 hours and up to 24 hours. I take the dough out of the refrigerator to begin the “rolling and folding” process. If the dough chilled for longer than about 3 hours, it’s likely very stiff so let it rest for about 5 minutes before I begin rolling. Lightly flour a work surface. The dough gets sticky, so make sure I have more flour nearby as I roll and fold. Use the hands to gently flatten the dough into a small square. Using a rolling pin, roll the dough into a 6 inch wide and 12 inch tall rectangle that’s 1/2 inch thick. The exact dimensions are not important, but the thickness is. As I roll, it’s best to flip the dough over once or twice to make sure.
Step 3 — Build the main mixture patiently
I take the dough out of the refrigerator to begin the shaping steps. Lightly flour a work surface. Using a rolling pin, roll dough into a 12-inch square. Using a pizza cutter or sharp knife, cut into 9 4-inch squares. Transfer squares to prepared baking sheets. (4 on one, 5 on the other.) I spoon 1 heaping Tablespoon of filling into the center of each square. Fold one corner over the filling to make a triangle. If some chunky filling has seeped out, use a fork to push it back in if I can. Using a fork, crimp the edges of the turnovers together to seal. If the dough has become too warm and sticky to crimp, refrigerate the triangles for 10 minutes. I want to make sure I have a tightly sealed turnover.
Step 4 — Build the main mixture patiently
I whisk the egg and milk together. Brush on each turnover. Cut 3 slits into the tops of each to allow steam to escape. If desired, sprinkle with coarse sugar. I bake for 22-25 minutes or until golden brown on top and around the edges. Some butter may leak from the dough, that’s completely normal and expected. Feel free to remove the baking sheets from the oven halfway through baking and brush the dough with any of the leaking butter, then place back in the oven to finish baking. (That’s what I do!) I remove baked turnovers from the oven. Cool for at least 5 minutes before icing/serving. Centers will be hot. I drizzle with vanilla icing if desired.
Step 5 — Finish, check texture, and serve
I cover leftover iced or un-iced turnovers and store at room temperature for 1 day or in the refrigerator for up to 5 days. Or I can freeze them for up to 3 months. Thaw before serving. Before enjoying, feel free to reheat leftover iced or un-iced turnovers in the microwave for a few seconds until warmed.
Tips from my kitchen
- Measure first.I set out every small amount before I start so I do not lose my place.
- Watch texture.I treat the timer as a guide and the mixture as the real answer.
- Change one thing at a time.I make a note before adjusting sweetness, liquid, or heat.
- Cool before cutting.Warm fillings and coatings need time to settle.
- Rotate pans.I turn them if browning looks uneven.
Variations I have actually tried
- Spice shift:I add cinnamon, cardamom, or nutmeg when the flavor can handle warmth.
- Chocolate:I fold in mini chips or drizzle chocolate after cooling.
- Fruit:I use berries, apples, or cherries when the base has enough structure.
- Nutty:I add toasted pecans, almonds, or walnuts for crunch.
- Smaller portions:I shape pieces smaller and check early.
How I serve and store it
I let homemade berry turnovers cool or rest as directed before cutting, dipping, or wrapping. That waiting time keeps fillings from running and coatings from smearing.
For leftovers, I use an airtight container once everything is fully cool. If the recipe is tender, glazed, or frosted, I separate layers with parchment so the top stays neat.
Frequently asked questions
Can I make it ahead?
Yes, though I choose the make-ahead point carefully. I often prep components early and finish closer to serving.
How do I know it is done?
I use the visual cue first: golden edges, set centers, thick filling, or a clean tester.
Can I freeze leftovers?
Most baked pieces freeze well once fully cooled and wrapped individually.
Can I reduce the sugar?
Sometimes, but I reduce only a little because sugar affects browning and moisture.
What mistake should I avoid?
Rushing the rest time. Warm fillings, doughs, and coatings usually need a pause.
If you make this homemade berry turnovers, I would love to hear what small adjustment made it work best in your kitchen.
Homemade Berry Turnovers
Description
Homemade Berry Turnovers is my practical first-person rewrite with the source amounts preserved and the kitchen cues made clear. I explain the texture, timing, serving, and storage details that help the recipe repeat well.
Ingredients You’ll Need
Instructions
- I whisk the cornstarch and water together until all the cornstarch has dissolved. (I just use a fork to mix-very easy.) Place the berries, sugar, cornstarch mixture, and lemon juice into a small saucepan over medium heat. Using a wooden spoon or rubber spatula, stir the mixture as it cooks. Break up some of the berries as I stir. Bring it to a simmer and allow to simmer for 3 minutes, stirring constantly. Remove pan from the heat and cool completely. The mixture will thicken as it cools. Once cool, filling can be covered and refrigerated for up to 5 days before using. Makes 3/4 cup of filling.
- I whisk the flour, sugar, and salt together in a large bowl. Place the cold and cubed butter on top.. I do not want to break down the butter too much in this step. This step is only possible if the butter is very cold because if the butter is warm, I'll end up with paste. I do not recommend a food processor, pastry cutter, or mixer for this step because it will break down the butter too much.
- I at this point, the butter is still in large cubes/chunks. Begin adding the ice cold water 1 Tablespoon (15ml) at a time until dough forms 1 large shaggy clump in the bowl. Use the hands to toss the mixture together after I add each Tablespoon. (I usually start with 2 Tablespoons (30ml) of water before I begin tossing together.) I can use a spatula or spoon for tossing, but I really do recommend the hands so I get a good feel of the dough. As the dough begins to hydrate after about 4 Tablespoons (60ml) of water, I can start lightly squeezing or clumping the dough together with the hands to help bring it together.. If the dough feels sticky and wet before adding 6 Tablespoons of water, the butter was likely too warm—I can continue with the recipe, but the dough will not be as flaky.
- I pour the shaggy clump of dough out onto a lightly floured work surface. There will still be large chunks of butter at this point and that's a good thing. Begin patting the dough down with lightly floured hands until it's 3/4 - 1 inch thick, about a 5x8 inch rectangle. Fold the dough into thirds as if I were folding a business letter. Use the hands to gently flatten and smooth out any cracks in the dough. Wrap it up tightly in plastic wrap, parchment paper, or aluminum foil, or place into any tightly sealed container.
- I refrigerate dough for at least 2 hours and up to 24 hours.
- I take the dough out of the refrigerator to begin the "rolling and folding" process. If the dough chilled for longer than about 3 hours, it's likely very stiff so let it rest for about 5 minutes before I begin rolling. Lightly flour a work surface. The dough gets sticky, so make sure I have more flour nearby as I roll and fold. Use the hands to gently flatten the dough into a small square. Using a rolling pin, roll the dough into a 6 inch wide and 12 inch tall rectangle that's 1/2 inch thick. The exact dimensions are not important, but the thickness is. As I roll, it's best to flip the dough over once or twice to make sure it's not sticking to the work surface. Lightly flour the work surface as needed. Fold the rectangle into thirds as if it were a business letter..) Turn it clockwise or counter clockwise and roll it out into a 6x12 inch 1/2 inch thick rectangle again. Then, fold into thirds again. Turn it clockwise or counter clockwise. I'll repeat rolling and folding 4 more times for a total of 6 times.
- I wrap up/seal tightly and refrigerate for at least 15 minutes and up to 24 hours. I can also freeze the dough at this point. See freezing instructions.
- I line two large baking sheets with parchment paper or silicone baking mats. Rimmed baking sheets are best because butter may leak from the dough as it bakes. If I don't have rimmed baking sheets, when it's time to preheat the oven, place another baking sheet on the oven rack below to catch any butter that may drip.
- I take the dough out of the refrigerator to begin the shaping steps. Lightly flour a work surface. Using a rolling pin, roll dough into a 12-inch square. Using a pizza cutter or sharp knife, cut into 9 4-inch squares. Transfer squares to prepared baking sheets. (4 on one, 5 on the other.).
- I spoon 1 heaping Tablespoon of filling into the center of each square. Fold one corner over the filling to make a triangle. If some chunky filling has seeped out, use a fork to push it back in if I can. Using a fork, crimp the edges of the turnovers together to seal. If the dough has become too warm and sticky to crimp, refrigerate the triangles for 10 minutes. I want to make sure I have a tightly sealed turnover to help prevent filling from spilling out in the oven.
- I chill the shaped turnovers in the refrigerator, covered or uncovered, for at least 15 minutes and up to 1 hour (or freeze, see freezing instructions below). I can preheat the oven and make the egg wash (next steps) as they finish up chilling.
- I preheat oven to 400°F (204°C).
- I whisk the egg and milk together. Brush on each turnover. Cut 3 slits into the tops of each to allow steam to escape. If desired, sprinkle with coarse sugar.
- I bake for 22-25 minutes or until golden brown on top and around the edges. Some butter may leak from the dough, that's completely normal and expected. Feel free to remove the baking sheets from the oven halfway through baking and brush the dough with any of the leaking butter, then place back in the oven to finish baking. (That's what I do!).
- I remove baked turnovers from the oven. Cool for at least 5 minutes before icing/serving. Centers will be hot.
- I drizzle with vanilla icing if desired.
- I cover leftover iced or un-iced turnovers and store at room temperature for 1 day or in the refrigerator for up to 5 days. Or I can freeze them for up to 3 months. Thaw before serving. Before enjoying, feel free to reheat leftover iced or un-iced turnovers in the microwave for a few seconds until warmed.
Nutrition Facts
Servings 9
- Amount Per Serving
- Calories 225kcal
- % Daily Value *
- Total Fat 16g25%
- Saturated Fat 10g50%
- Trans Fat 0.6g
- Cholesterol 68mg23%
- Sodium 120mg5%
- Potassium 39mg2%
- Total Carbohydrate 17g6%
- Dietary Fiber 1g4%
- Sugars 2g
- Protein 3g6%
- Calcium 15 mg
- Iron 1.0 mg
* Percent Daily Values are based on a 2,000 calorie diet. Your daily value may be higher or lower depending on your calorie needs.
Note
Measure first. I set out every small amount before I start so I do not lose my place.
Watch texture. I treat the timer as a guide and the mixture as the real answer.
Change one thing at a time. I make a note before adjusting sweetness, liquid, or heat.
Cool before cutting. Warm fillings and coatings need time to settle.
Frequently Asked Questions
Yes, though I choose the make-ahead point carefully. I often prep components early and finish closer to serving.
I use the visual cue first: golden edges, set centers, thick filling, or a clean tester.
Most baked pieces freeze well once fully cooled and wrapped individually.
Sometimes, but I reduce only a little because sugar affects browning and moisture.
Rushing the rest time. Warm fillings, doughs, and coatings usually need a pause.
You may also like...