
I make How to Lattice Pie Crust when I want food that feels familiar but still needs a little attention. The ingredient list tells only half the story; the other half is knowing when to slow down, when to stop stirring, and when to let the pan or bowl sit for a minute. That is the part I write down for myself, because it is the part that saves dinner on a busy day.
I set the pan, scraper, and cooling rack out before I start because stopping with sticky batter on my hands is how I miss details. I would rather have one extra bowl on the counter than realize halfway through that the oven is cold or the serving plate is still in the cabinet.
The timing on my card is 45 min. I treat that as a guide, not a dare. Food changes with brands, pan color, room temperature, and how crowded the pan is, so I check the look and feel before I check the clock a second time.
Why I keep coming back to this
- It gives me a reliable way to make How to Lattice Pie Crust without turning the kitchen upside down.
- The ingredients are easy to recognize, and most of them have a clear job instead of being there for decoration.
- I can prep several pieces ahead, which helps on days when I am cooking between other things.
- The method is forgiving as long as I pay attention to texture and heat.
- It scales into a casual meal, a make-ahead project, or a side dish without needing a full rewrite.
- Leftovers are useful, and I include exactly how I store them because that is where many recipes get vague.
What you need (and what each one is doing)
- Homemade Pie Crust (or use my all butter pie crust).
- all-purpose flour for work surface. It gives the recipe structure, so I measure instead of guessing.
- 1 wash: egg 1 large egg beaten with 1 Tablespoon (15ml). It binds the mixture and adds richness.
- coarse sugar for sprinkling on crust. It sweetens, but it also helps the color and texture land right.
How I make it
Step 1 — Chill and prepare
(Latticing is better seen than explained!) I prepare my pie crust recipe through step 5. Chill in the refrigerator overnight.
Step 2 — Roll out the dough
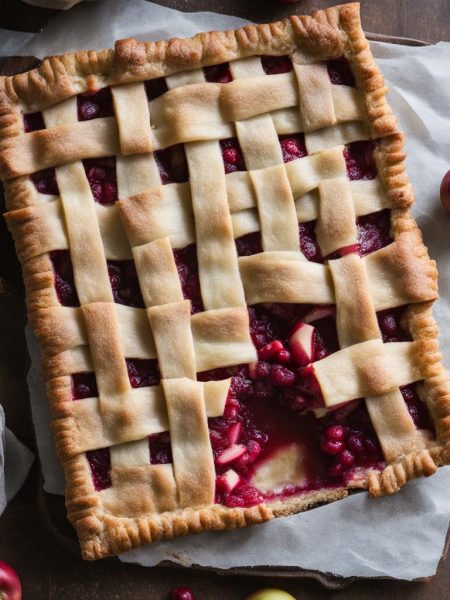
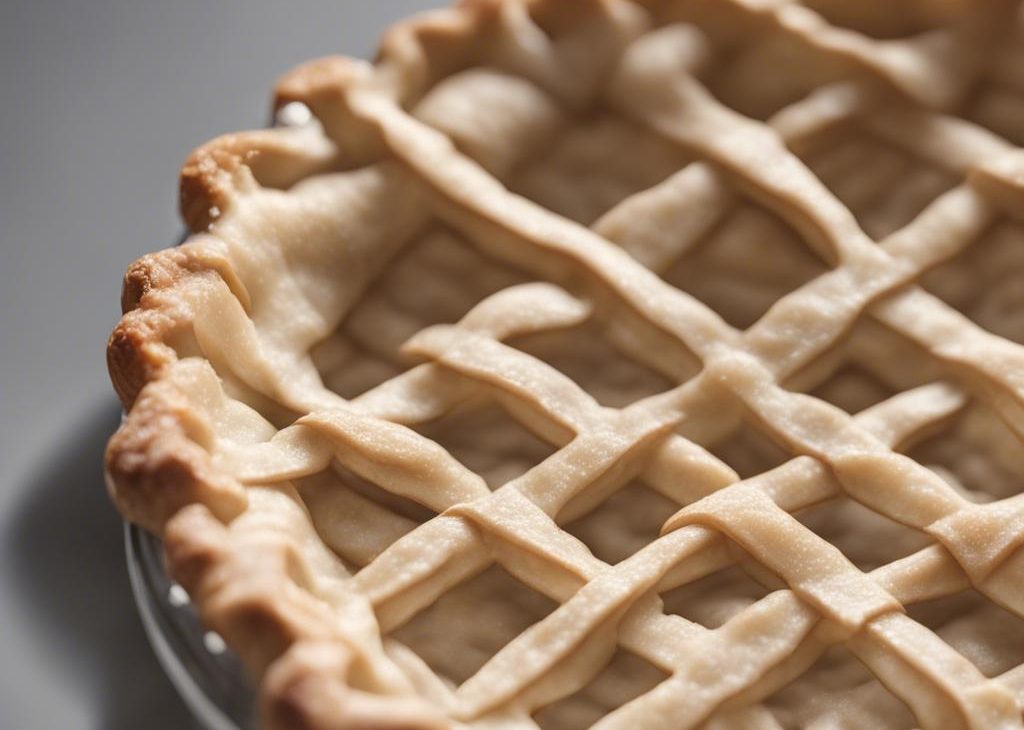
After you roll out the bottom crust and fill your pie, it’s time to lattice. On a lightly floured surface with a floured rolling pin, roll out top pie crust into a 12-inch circle. It’s ok if it’s not a perfect circle, as long as it’s 12 inches in diameter. I cut dough into strips. To keep things simple, I recommend 12 1-inch strips.
Step 3 — Fold together
I lay 6 strips vertically and evenly spaced on top of the filled pie. Use the longer strips in the center of the pie and the shorter strips on the ends. I fold every other strip (3 in total) all the way back so they’re almost falling off of the pie. Lay one of the 6 unused strips perpendicular on top. Unfold the 3 vertical strips back so they lay over the perpendicular strip. You have 5 strips left.
Step 4 — Fold in the other vertical
I fold the other 3 vertical strips back. Lay one of the 5 unused strips perpendicular on top. Unfold the 3 vertical strips back so they lay over the perpendicular strip. You’re now beginning to see the beautiful woven pattern! I repeat with last 4 strips, weaving the strips over and under one another.
Step 5 — Chill
I fold the excess dough that lays over the edges of the pie back and pinch them with the bottom pie crust to seal. Crimp or flute the edges of the pie, then brush with egg wash and sprinkle with a little coarse sugar. This adds a lovely sparkle and crunch! I refrigerate unbaked pie for 20 minutes prior to baking. This is an often overlooked step, but cold dough is guaranteed to hold the lattice shape.
Step 6 — Bake
I bake the pie as directed in your recipe. I recommend my apple pie.
Cues I trust more than the clock
For How to Lattice Pie Crust, I trust the touch test, a lightly springy center, and the smell of toasted edges more than I trust the timer by itself.
I also watch the edges. Edges tell me what the center is about to do: salad leaves start to wilt there, soup bubbles gather there, cake pulls from the pan there, and pizza browns there first. When I notice those small changes, I can adjust before anything goes too far.
Tips from my kitchen
- Measure once, then relax. I keep the original amounts close, especially the liquid and salt, because small changes show up fast.
- Use the timer as a helper. I start checking a little early and let the food tell me the last few minutes.
- Let it cool when the recipe says to. I have rushed cakes and crusts before, and the slice always tells on me.
- Write down the brand. Frozen items, oats, flour, and canned goods behave differently, so I note the one that worked best.
Variations I have actually tried
- Citrus note: I add a little lemon or orange zest when the batter or frosting tastes too sweet.
- Nut swap: Pecans, walnuts, or almonds can trade places as long as I keep the same amount.
- Spice adjustment: I add a small pinch of cinnamon or cardamom when I want a warmer flavor.
- Smaller portions: I divide the same mixture into smaller pans or cupcakes and start checking earlier.
- Less sweet finish: I keep the base recipe the same and use a thinner glaze or a lighter hand with frosting.
Storing, reheating, and making it fit real life
I cool leftovers before covering them, because trapped steam changes texture fast. If the food is meant to be crisp, I leave the lid slightly loose until it stops steaming; if it is meant to stay moist, I cover it sooner and keep it in the refrigerator.
For reheating, I match the method to the texture. Saucy or soft foods do fine in the microwave in short bursts. Crisp, baked, or bread-like foods do better uncovered in a moderate oven or skillet. I label the container when I know it will disappear into the back of the fridge.
Frequently asked questions
Can I make How to Lattice Pie Crust ahead?
Yes, at least partly. I prep the pieces that will not suffer from sitting, then finish the step that needs heat, crispness, or fresh texture closer to serving.
What is the mistake I watch for most?
Rushing. When I hurry the setup, I miss small cues like pan heat, thickness, or how wet the mixture looks. Those details matter more than fancy tools.
Can I change the seasoning?
Yes. I keep the base amounts the same the first time, then adjust salt, acid, spice, or herbs in small steps the next time so I know what changed.
How do I know when How to Lattice Pie Crust is ready?
I look for the visual cue in the recipe first, then use the listed bake time as the window. My oven runs a little hot, so I check early.
How long do leftovers keep?
Most leftovers keep 3-4 days in the refrigerator when covered well. Crisp foods soften, so I reheat those uncovered or in a hot oven instead of trapping steam.
If you make How to Lattice Pie Crust, leave a note with what you changed or what cue helped most — I read those details like kitchen field notes.
How to Lattice Pie Crust
Description
How to Lattice Pie Crust is my practical, first-person kitchen version with Homemade Pie Crust, all-purpose flour for work surface, egg 1 large egg beaten with 1 Tablespoon, coarse sugar for sprinkling on crust. I focus on the cues that matter — texture, timing, storage, and the little fixes that make the recipe easier to repeat.
Ingredients You’ll Need
Instructions
- (Latticing is better seen than explained!).
- I prepare my pie crust recipe through step 5. Chill in the refrigerator overnight.
- After you roll out the bottom crust and fill your pie, it's time to lattice. On a lightly floured surface with a floured rolling pin, roll out top pie crust into a 12-inch circle. It's ok if it's not a perfect circle, as long as it's 12 inches in diameter.
- I cut dough into strips. To keep things simple, I recommend 12 1-inch strips.
- I lay 6 strips vertically and evenly spaced on top of the filled pie. Use the longer strips in the center of the pie and the shorter strips on the ends.
- I fold every other strip (3 in total) all the way back so they're almost falling off of the pie. Lay one of the 6 unused strips perpendicular on top. Unfold the 3 vertical strips back so they lay over the perpendicular strip. You have 5 strips left.
- I fold the other 3 vertical strips back. Lay one of the 5 unused strips perpendicular on top. Unfold the 3 vertical strips back so they lay over the perpendicular strip. You're now beginning to see the beautiful woven pattern!
- I repeat with last 4 strips, weaving the strips over and under one another.
- I fold the excess dough that lays over the edges of the pie back and pinch them with the bottom pie crust to seal. Crimp or flute the edges of the pie, then brush with egg wash and sprinkle with a little coarse sugar. This adds a lovely sparkle and crunch!
- I refrigerate unbaked pie for 20 minutes prior to baking. This is an often overlooked step, but cold dough is guaranteed to hold the lattice shape.
- I bake the pie as directed in the recipe. I recommend my apple pie.
Nutrition Facts
Servings 1
- Iron 0.0 mg
* Percent Daily Values are based on a 2,000 calorie diet. Your daily value may be higher or lower depending on your calorie needs.
Note
Start with the listed amounts. I test swaps after the first batch so I know what changed.
Check early. Ovens, pans, and brands vary; I begin looking before the timer sounds.
Let texture lead. If it needs to cool, rest, thicken, or crisp, I give it that time instead of forcing it.
Season thoughtfully. I would rather add a final pinch of salt or splash of acid than overshoot at the start.
Frequently Asked Questions
Yes, at least partly. I prep the pieces that will not suffer from sitting, then finish the step that needs heat, crispness, or fresh texture closer to serving.
Rushing. When I hurry the setup, I miss small cues like pan heat, thickness, or how wet the mixture looks. Those details matter more than fancy tools.
Yes. I keep the base amounts the same the first time, then adjust salt, acid, spice, or herbs in small steps the next time so I know what changed.
I look for the visual cue in the recipe first, then use the listed bake time as the window. My oven runs a little hot, so I check early.
Most leftovers keep 3-4 days in the refrigerator when covered well. Crisp foods soften, so I reheat those uncovered or in a hot oven instead of trapping steam.
You may also like...