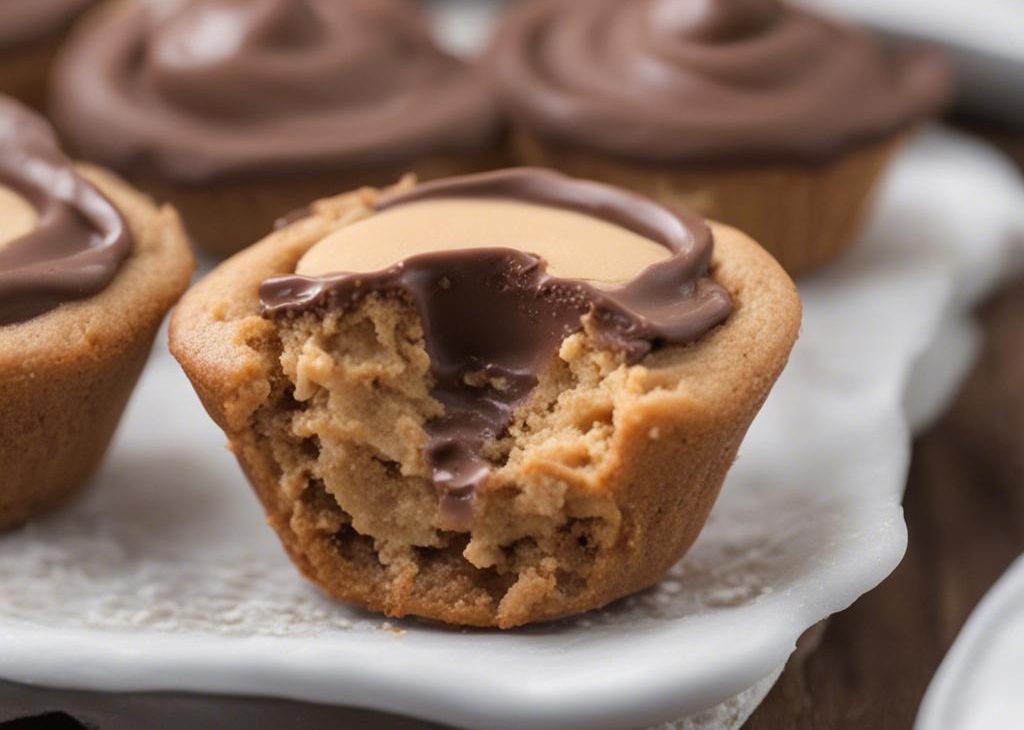
Peanut butter fudge puddles are delightful 2-bite peanut butter cookie cups baked in a mini muffin pan and filled with a rich chocolate cream—a pairing of complementary flavors and contrasting textures for chocolate-peanut butter lovers only! I got this recipe from a friend, and the whimsical name makes these sweet treats even more irresistible.
When I think of the variety of flavors that simply must be included in my holiday cookie trays, the assortment always includes traditional favorites like sugar cookies, spiced gingerbread cookies and molasses cookies, and peppermint mocha cookies. But I also need to have a chocolate-peanut butter combo in there. Because… do I really need a reason?
Chocolate + peanut butter IS the reason.
While I love classic peanut butter blossoms, today’s cookies are a little different because we’re making our own filling instead of pressing in a store-bought chocolate candy. But I promise it’s easy to make! It’s a silky-smooth, oh-so-creamy chocolate filling, similar to chocolate ganache, that stays soft.
Peanut Butter Fudge Puddles Recipe Snapshot
- Texture: A slightly crisp peanut butter cookie cup contrasts nicely with the soft, silky-smooth chocolate filling. A sprinkle of toffee bits on top adds a little crunch.
- Flavor: Chocolate. Peanut butter. Next question.
- Ease: Beginner bakers can definitely handle this recipe.
- Time: The dough needs to chill for 1 hour. Everything else moves pretty quickly.
Fudge Puddle Ingredients You Need & Why
- Butter: Butter adds flavor and structure. Make sure you have proper room-temperature butter, so it aerates and creams with the sugar.
- Sugars: We use a combination of granulated sugar and brown sugar in this recipe. Both for sweetness, and brown sugar for extra moisture and flavor.
- Peanut Butter: The most important ingredient! For best results, use processed peanut butter like Jif or Skippy—the same I recommend for my peanut butter balls and peanut butter chocolate chip cookies.
- Egg: One egg binds everything together and keeps the peanut butter cookie cups from crumbling apart in your hands.
- Vanilla Extract: For flavor.
- Flour: All-purpose flour forms the base of these peanut butter cookie cups. You don’t need a lot; did you know that nut butters act as a binder and can actually replace some or all flour in cookie recipes? See these flourless monster cookies! Using more flour will dry out the cookies, so stick with the recipe below.
- Baking Soda: Baking soda helps the dough expand in the oven.
- Salt: To balance all the flavors.
And for the chocolate filling, you need just 3 ingredients: chocolate, mascarpone cheese, and a little oil to keep it smooth.
To make the peanut butter cookie cups, combine the wet ingredients and then add the dry ingredients. This is an easy 1-bowl cookie dough. An electric mixer is key. Expect a very soft and creamy cookie dough:
Refrigerate the cookie dough for 1 hour. It will still be quite soft after this hour, but it will be easier to mold and shape. Scoop the chilled dough with a Tablespoon measuring spoon, and roll into balls. Place the cookie dough balls into a greased mini muffin pan. This is the mini muffin pan I use and love. If you don’t have more than 1 mini muffin pan, you can bake these in batches—just keep the 2nd batch of dough balls cold.
Use your thumb to press down in the center of the cookie dough ball and mold the dough up the sides of each cup. Like this:
Bake at 325°F (163°C). (Baking them at 350°F gave us hard, over-baked cookie cups.)
They puff up in the oven, so use a rounded spoon like a teaspoon to lightly press down the center of each cookie cup again when they come out of the oven. Let them cool in the pan for 10 minutes, and then transfer them from the pan to a cooling rack to cool completely before filling. A butter knife may be needed to help you remove them from the pan.
Success Tip
Do not under-bake these cookie cups. If they’re extra soft, they’ll completely crumble when you try to remove them from the mini muffin pan.
Fudge Puddle Filling
If you’ve ever made my recipe for chocolate ganache, you may remember that, to make ganache, we pour warm heavy cream over chopped chocolate to melt it, and then stir. For today’s filling, we’re sort of going in reverse. Melt the chocolate (with the oil) first, then fold the mascarpone into the melted chocolate.
Using a teaspoon, spoon the filling—as much as you can fit—into each cookie cup.
For extra texture and flair, sprinkle the tops with some crushed toffee bits. I use the Heath brand of toffee bits, found in the baking aisle near the chocolate chips. These are also fantastic sprinkled on top of chocolate chip cookie bark. You could also top these peanut butter fudge puddles with chopped peanuts, sprinkles, or flaky sea salt instead. Or don’t sprinkle them with anything at all, they’re perfect all on their own!
You don’t need rainboots to enjoy this delicious muddy puddle experience. It’s raining chocolate—hallelujah! 😉

Peanut Butter Fudge Puddles Recipe
Description
These delightful 2-bite peanut butter cookie cups are known as peanut butter fudge puddles. They're baked in a mini muffin pan, then filled with a rich chocolate cream. The secret ingredient is mascarpone cheese, which keeps the fudge-like chocolate filling super soft and creamy. Note that these bake at 325°F (163°C) and not 350°F.
Ingredients You’ll Need
Instructions
- In a large bowl using a hand mixer or a stand mixer fitted with paddle attachment, beat the butter, brown sugar, and granulated sugar on medium high speed until light and creamy, about 3 minutes. Add the egg and beat until combined, about 1 minute. Scrape down the sides and bottom of the bowl with a silicone spatula as needed. Add the peanut butter and vanilla extract and beat until combined.
- Add the flour, baking soda, and salt to the wet ingredients and beat on low speed until the dry ingredients are incorporated, and then increase to medium speed and beat until well combined. The dough will be very creamy and soft. Cover and chill the cookie dough in the refrigerator for at least 1 hour, and up to 3 days.
- Grease 2 mini muffin pans (or bake in batches if you have only 1 pan) with nonstick spray, or line with mini cupcake liners. I prefer these without liners; the dough is easier to “thumbprint” without liners. Set aside.
- Scoop and roll cookie dough, about 1 Tablespoon/20g of dough each. Place the dough balls in the prepared pan. With your thumb, press down in the center of each dough ball, to make an indent, and press the dough partway up the sides of the muffin cup. (If you only have 1 mini muffin pan, refrigerate the 2nd batch of dough balls until ready to bake.)
- Bake for 14–15 minutes or until the edges appear lightly browned. Do not under-bake these. The cookie cups will puff up in the oven; that’s ok and expected.
- Remove from the oven and place the mini muffin pan on a cooling rack. Let the cookie cups cool in the pan for just 5–10 minutes. During this time, use the back of a rounded teaspoon to lightly press into the center of each cookie cup to make the indent deeper again. After 5–10 minutes, carefully remove cookie cups from the pan. Use a butter knife to help, if needed. Place cookie cups on a cooling rack to cool completely.
- Melt the chopped chocolate and oil together in a double boiler or use the microwave. For the microwave, place the chocolate and oil in a large heat-proof bowl. Melt in 20-second increments, stirring after each increment until completely melted and smooth. Let slightly cool for 3 minutes. With a silicone spatula or a spoon, gently fold the mascarpone into the melted chocolate until combined.
- Spoon a heaping teaspoon of the filling into each cooled cookie cup. Top with toffee bits or chopped peanuts, if using.
- Cover and store at room temperature for up to 1 day, or in the refrigerator for up to 5 days.

