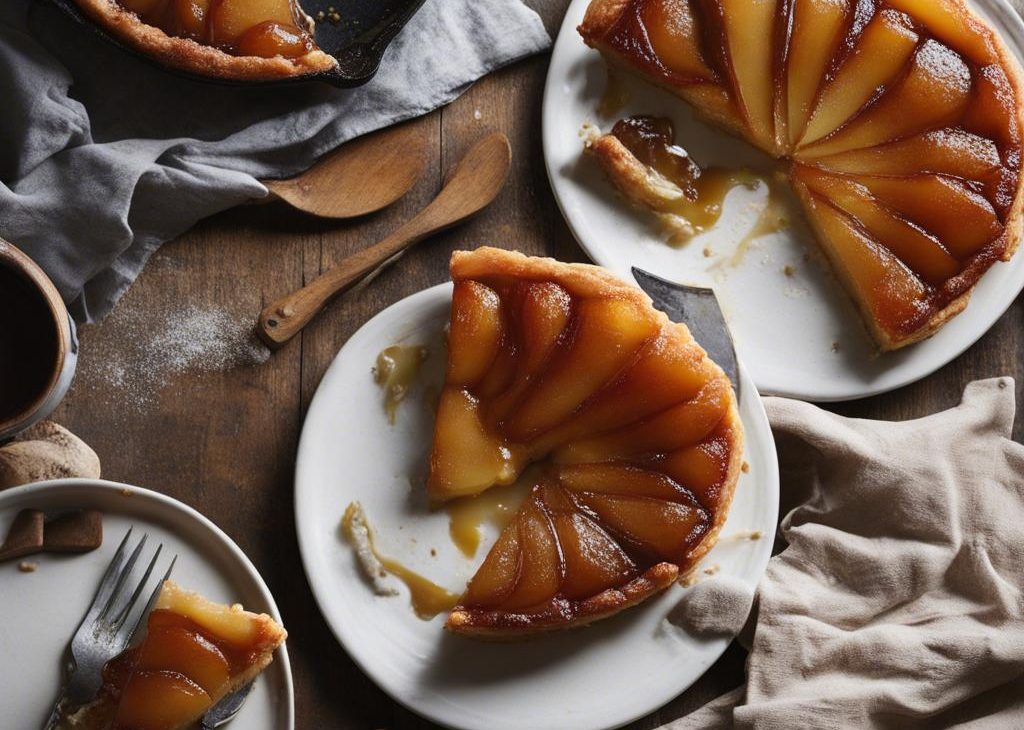

This is pear tarte tatin made simpler. A classic French dessert, tarte tatin is a rustic fruit tart served upside down. Caramelized with butter and sugar in a skillet, the fruit is then baked beneath a blanket of pastry dough—which becomes a crust once flipped. Depending how you make it, the recipe is often quite technical and complicated. I simplified the process as much as possible without compromising flavor.
There are many ways to make tarte tatin, and my team and I tried a lot of them! After several recipe fails, we finally cracked the code on how to make a deliciously spiced pear tarte tatinthat turns out consistently every time. It may not be the way they teach it in French pastry school, but our goal was to take a somewhat-daunting recipe and make it approachable and achievable for home/hobby bakers.
That is always my goal when I teach you.
What Is Tarte Tatin?
Tarte tatin is named for the Tatin sisters who created it and served it at their hotel in France in the 1880s. It’s essentially fruit, usually apples or pears, caramelized in butter and sugar on the stove, topped with a round of pastry dough and baked; to serve, the dessert is inverted onto a plate so the caramelized fruit is on top and the pastry becomes a crust beneath it.
Sort of like an apple upside down cake, but more saucy and made with pastry instead of cake.
Pretty simple, oui? Mais, non. 😉 Perfecting pear tarte tatin, which only has about 8 ingredients, proved to be a much bigger challenge than my team or I expected.
Start With a Quality Pastry Crust
This is actually the same dough we use to make apple galette. Many tarte tatin recipes call for puff pastry, but we had much better success with this crust vs. the puff pastry dough we tested at first. See recipe testing saga above!
This is a similar recipe to my all-butter pie crust, but it’s *slightly* sweeter and yields just 1 crust instead of 2. (But feel free to make the full pie crust recipe and use half for another single-crust pie like pumpkin pie, or freeze half for a future tarte tatin!)
I love how thick this crust is… think multiple flaky, buttery layers of crust for the sweet caramelized pears to nestle into. And it bakes through thoroughly, so no soggy crust situation here.
Ingredients You Need:
- Pears: You need about 5–6 small, semi-firm pears. See below for information on the best varieties of pears to use.
- Lemon or Orange Juice: A little fresh citrus juice brightens up and enhances the natural flavor of the pears; the fruit tastes a bit flat without it.
- Spices: Cinnamon, nutmeg, and ginger. Just enough of each to provide a warm flavor that complements—not overwhelms—the caramelized pears.
- Butter: One half of the caramel sauce.
- Brown Sugar: The other half of the caramel sauce.
Best Pears to Use in Tarte Tatin
Use small, somewhat-firm Anjou pears. Bartlett, Bosc, or Comice pears are all wonderful choices, too. But you want to use pears that are small and still fairly firm so they’ll hold their shape when baking.
*Some recipes instruct you to dry out the pears before using, to help prevent them from releasing too much liquid. I did not find that necessary, especially since we aren’t pre-cooking the pears on the stove and we’re using a thicker brown sugar caramel sauce.*
Peel, slice lengthwise, cut out the stem, and scoop out the core. I use a small cookie scoop for this, but you can use a melon baller if you have one, or carefully cut out the core with a knife. Toss the pears with the lemon juice and spices.
Cook the Caramel on the Stove
Many recipes call for caramelizing the pears on the stove first, but we found this step unnecessary (and ended up with several ruined batches of burnt pears). Instead, you’ll cook the butter and brown sugar together, and then take it off heat before adding the pears.
I use a 10-inch cast-iron skillet for this, but if you don’t have an oven-safe skillet, you can cook the caramel in a saucepan, and then pour the caramel into a pie dish.
Assemble the Pear Tarte Tatin
Arrange your pears over the hot caramel in the pan, core-side-up. You want to pack them in as tightly as possible. Once the tart is inverted after baking, you’ll be rewarded with a beautiful landscape of caramelized pear halves over top of the crust.
Roll out the pie dough and drape it over the pears. Don’t worry if the pie dough isn’t perfect; it will taste divine! There’s no crimping or fluting required, and you don’t even need an egg wash. Use a spoon to gently tuck the edges in around the pears.
Dock the crust with a fork to create some steam vents.
Bake, starting at a higher temperature at first to really begin browning and baking through the crust.
Let cool for about 10 minutes, and then very carefully (do it over the sink!) invert the warm tart onto a large (larger than the skillet) plate or serving platter.
Voila! And, for a little extra ooh la la, serving this spiced pear tarte tatin a la mode with vanilla ice cream or whipped cream is always a great idea. Bon appetit!
Pear Tarte Tatin Recipe
Description
This is pear tarte tatin made simpler. A classic French dessert, tarte tatin is a rustic fruit tart served upside down. Caramelized with butter and sugar in a skillet, the fruit is then baked beneath a blanket of pastry dough—which becomes a crust once flipped. Depending how you make it, the recipe is often quite technical and complicated. I simplified the process as much as possible without compromising flavor..
Ingredients You’ll Need
Instructions
- Whisk the flour, sugar, and salt together in a medium bowl. Using a pastry cutter or 2 forks, cut in the butter until the mixture resembles coarse pea-sized crumbs. Add the water and stir until the flour is moistened. Add 1–2 more Tablespoons of water if the dough seems dry. Turn the dough out onto a lightly floured work surface and, using your hands, work the dough into a ball. Flatten it into a thick disc. Wrap the dough disc in plastic wrap or parchment paper and refrigerate it for at least 1 hour, and up to 3 days.
- Peel, halve lengthwise, and scoop out the seeded core of the pears. Remove the stem, including the bottom part of the stem. Place the pears in a medium bowl, and toss gently with lemon/orange juice, cinnamon, nutmeg, and ginger, until evenly coated. Place the bowl in the refrigerator until you’re ready to use the pears.
- Melt the butter in a 10-inch oven-safe skillet over medium heat, or use a heavy-duty medium saucepan. Once the butter has melted, whisk in the brown sugar. At first it will look very separated, like it doesn’t want to combine, but that’s ok. Just keep whisking. Cook, whisking occasionally, for 3 minutes. Remove from heat and let cool for a few minutes while you roll out the crust. (If you used a saucepan for the caramel, pour it into an ungreased 9 or 10-inch pie dish.)
- Preheat oven to 400°F (204°C).
- Roll out the chilled dough into a circle about 11–12 inches in diameter (it doesn’t have to be perfect!). Arrange the pears, cut-side up, in the skillet. Drape the pastry crust round over top of the pears. Gently tuck in the edges of the crust around the pears with a spoon. Dock (prick) the crust with a fork, to allow steam to escape.
- Bake for 20 minutes, then keeping the tarte tatin in the oven, reduce the temperature to 375°F (191°C) and bake for 25 more minutes, or until the crust is golden-brown.
- Allow to cool for 10 minutes on a cooling rack, and then carefully invert the tart onto a large serving plate or platter. I recommend doing this over the sink to catch any possible spills. Use extreme caution as the caramel sauce and fruit are very, very hot.
- Slice and serve warm or at room temperature with vanilla ice cream, if desired. Cover and store leftover pear tarte tatin in the refrigerator for up to 4 days.
Frequently Asked Questions
Yes, certainly. Apples, apricots, peaches, plums—all good. Core, cut in half, place rounded-side-down in the caramel. Proceed as directed.
You absolutely can, but it's really difficult for it to cook all the way through without burning the caramel or pears.
Yes. The instructions remain exactly the same.
You may also like...