
Snickers Caramel Tart is the kind of recipe I pull out when I want a dependable result without pretending the kitchen is a studio set. I like food that gives clear signs as it cooks: edges that set, sauce that thickens, dough that changes from shaggy to smooth, or a blender that finally stops rattling over chunks of ice.
I keep the process close to the way I actually cook at home. I care about the small moments: when to stop mixing, what the center should look like, how long to cool it, and what I do when a batch looks a little different from the last one.
For this tart, I keep the flavor direct and the method honest. If there is a wait time, I say why it matters. If a step is easy to rush, I point it out. That is usually the difference between food that is fine and food I want to make again.
Why I keep coming back to this
- It feels special without needing bakery equipment.
- The make-ahead window helps me avoid rushing the finish.
- The slices hold cleaner when I cool it properly.
- The flavor improves after the crumb or filling has time to settle.
- I can decorate simply and still bring it to the table with confidence.
What you need and what each ingredient is doing
- 1 and 3/4 cups salted peanuts, divided (220g).
- 1 cup all-purpose flour (125g). I rely on it for structure, and I measure it lightly so the crumb does not turn heavy.
- 2 Tablespoons packed brown sugar (25g).
- 1/4 teaspoon salt.
- 1/2 cup unsalted butter, cold and cubed (8 Tbsp; 113g).
- 3 Tablespoons ice water (45ml).
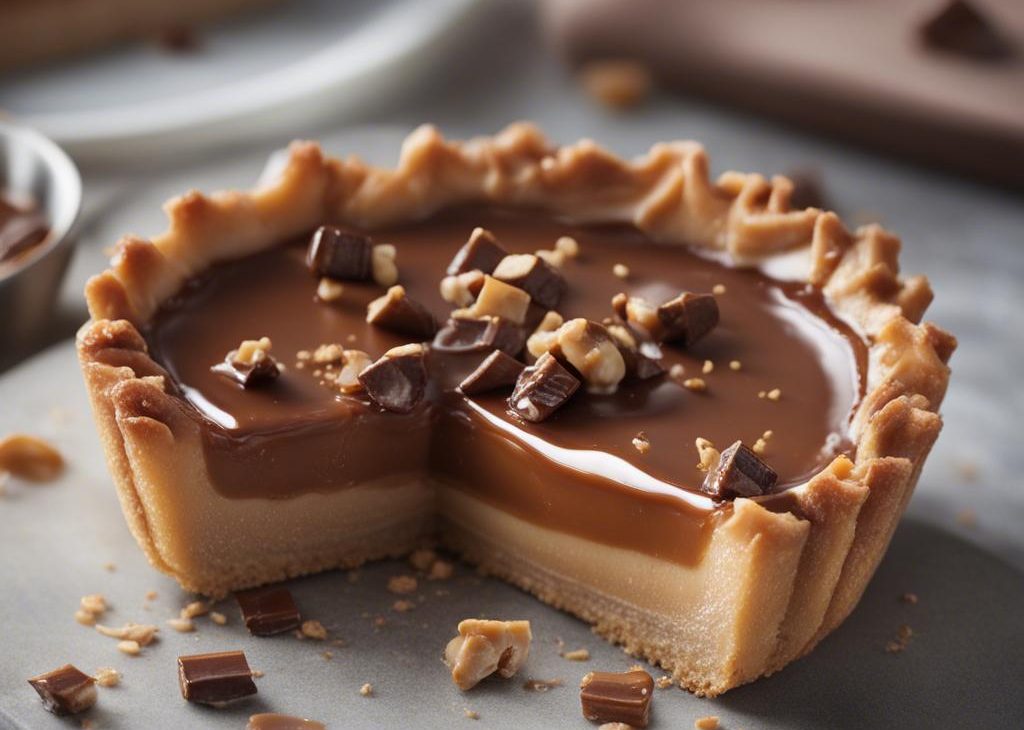
- 1 cup salted caramel (290g).
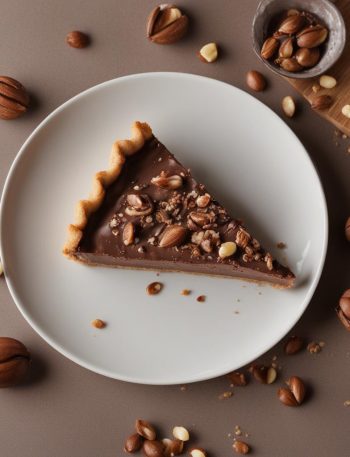
- 6 ounces milk or semi-sweet chocolate, coarsely chopped. It is the main flavor note, and I chop or fold it evenly so every bite gets some.
- 2 Tablespoons creamy peanut butter (31g).
- optional: chopped Snickers bar, crushed peanuts, extra caramel for topping.
How I make it
Step 1 — Preheat the oven
Preheat the oven to 350°F (177°C). Using a food processor, pulse 3/4 cup peanuts, the flour, brown sugar, and salt together until it reaches the consistency of coarse meal. Add the cubes of cold butter and pulse until the mixture turns into pea-sized crumbs. Transfer mixture to a large bowl. Slowly stir in 3 Tablespoons of ice water. You only want to add enough water to bring the dough somewhat together. Using floured fingers.
Step 2 — Bake
Bake (with pie weights) for 18-20 minutes. Remove from the oven and allow to slightly cool as you prepare the filling.
Step 3 — Combine the ingredients
Mix the salted caramel and 1 cup of peanuts together. If the salted caramel was made ahead of time, slightly warm it so that it can easily be poured. Pour caramel nut filling into crust.
Step 4 — Microwave
Using a double boiler or microwave, melt the chocolate and peanut butter together until smooth. If using the microwave, stop and stir every 15 seconds until melted. Spread over caramel nut filling. Garnish with optional toppings, if desired.
Step 5 — Chill and prepare
Chill in the refrigerator, uncovered, for 2-3 hours or until set. Store leftovers in the refrigerator.
Tips from my kitchen
- I measure before I start; the calm counter keeps me from missing the small ingredients.
- I trust the visual cues more than the timer when my oven or pan is acting different.
- I let the finished food cool or rest before judging the texture. Heat can make it seem softer than it really is.
- I run a thin knife around chilled edges before slicing for cleaner pieces.
- For neat slices, I wipe the knife between cuts instead of sawing through crumbs.
Variations I have actually tried
- Use chopped roasted peanuts for a saltier bite.
- Drizzle extra caramel over the chilled top right before serving.
- Swap in dark chocolate if milk chocolate tastes too sweet.
- Cut smaller pieces for a candy-platter style dessert.
- Add a pinch of flaky salt to make the caramel taste deeper.
Storing, reheating, and making ahead
I chill the dessert before covering it so condensation does not drip onto the top. Slices keep best in a covered container in the refrigerator. For freezing, I wrap individual pieces tightly, then thaw overnight in the refrigerator. I avoid microwaving frosted or filled slices because the texture goes uneven fast.
How I like to serve it
I like clean slices and simple plates. A few berries, a little whipped cream, or a small pinch of flaky salt can do more than a heavy decoration.
Frequently asked questions
Can I make it the day before?
Yes. I prefer that for this kind of dessert because the crumb or filling settles and slicing is cleaner.
Why did the center sink or crack?
It is usually overmixing, a quick temperature change, or cutting before it has cooled. I give it time and avoid rushing the finish.
Can I use a different pan?
Sometimes, but I keep the depth close to the original pan and start checking early. A deeper pan needs more time and can change the texture.
How should I slice it neatly?
I chill it well, use a sharp knife, and wipe the blade between cuts. That small pause makes a big difference.
Can I freeze leftovers?
Yes. I wrap individual slices tightly and thaw in the refrigerator so the texture comes back gently.
If you make Snickers Caramel Tart, leave a comment with the change you tried or the cue that helped most. I read those notes because they make the next batch better.
Snickers Caramel Tart
Description
This is my practical rewrite for Snickers Caramel Tart, built around salted peanuts, divided, all-purpose flour, packed brown sugar, salt. I keep the method clear, call out the texture cues I watch for, and include storage notes so the leftovers are not an afterthought.
Ingredients You’ll Need
Instructions
- Preheat the oven to 350°F (177°C). Using a food processor, pulse 3/4 cup peanuts, the flour, brown sugar, and salt together until it reaches the consistency of coarse meal. Add the cubes of cold butter and pulse until the mixture turns into pea-sized crumbs. Transfer mixture to a large bowl. Slowly stir in 3 Tablespoons of ice water. You only want to add enough water to bring the dough somewhat together. Using floured fingers.
- Bake (with pie weights) for 18-20 minutes. Remove from the oven and allow to slightly cool as you prepare the filling.
- Mix the salted caramel and 1 cup of peanuts together. If the salted caramel was made ahead of time, slightly warm it so that it can easily be poured. Pour caramel nut filling into crust.
- Using a double boiler or microwave, melt the chocolate and peanut butter together until smooth. If using the microwave, stop and stir every 15 seconds until melted. Spread over caramel nut filling. Garnish with optional toppings, if desired.
- Chill in the refrigerator, uncovered, for 2-3 hours or until set. Store leftovers in the refrigerator.
Nutrition Facts
Servings 8
- Amount Per Serving
- Calories 194kcal
- % Daily Value *
- Total Fat 14g22%
- Saturated Fat 8g40%
- Trans Fat 0.5g
- Cholesterol 31mg11%
- Sodium 62mg3%
- Potassium 46mg2%
- Total Carbohydrate 16g6%
- Dietary Fiber 1g4%
- Sugars 3g
- Protein 3g6%
- Calcium 8 mg
- Iron 0.8 mg
* Percent Daily Values are based on a 2,000 calorie diet. Your daily value may be higher or lower depending on your calorie needs.
Note
I measure before I start; the calm counter keeps me from missing the small ingredients.
I trust the visual cues more than the timer when my oven or pan is acting different.
I let the finished food cool or rest before judging the texture. Heat can make it seem softer than it really is.
I run a thin knife around chilled edges before slicing for cleaner pieces.
Frequently Asked Questions
Yes. I prefer that for this kind of dessert because the crumb or filling settles and slicing is cleaner.
It is usually overmixing, a quick temperature change, or cutting before it has cooled. I give it time and avoid rushing the finish.
Sometimes, but I keep the depth close to the original pan and start checking early. A deeper pan needs more time and can change the texture.
I chill it well, use a sharp knife, and wipe the blade between cuts. That small pause makes a big difference.
Yes. I wrap individual slices tightly and thaw in the refrigerator so the texture comes back gently.
You may also like...