
I make Virginia Spots when I want a recipe that feels familiar but still asks me to pay attention. The ingredient list is straightforward, yet the small details matter: measured bowls, the right pan, and a little patience while it cools or rests.
This version keeps the original timing intact: 10 min prep, 6 min cook time. It serves a flexible number of, and I use that number when I portion it.
I wrote the method the way I move through the kitchen. I set out the ingredients first, watch for visual cues, and avoid rushing the final cooling step.
Why I keep coming back to this
- The timing is predictable: 10 minutes of prep and 6 minutes of cooking gives me a clear plan.
- The serving count stays at a flexible number of, so I know whether I am feeding a table or saving leftovers.
- The main heat cue is 375 °F, which I write on a note before I start.
- The pan cue is the pan listed in the method, and I do not swap it unless I can adjust the timing.
- The recipe rewards measured ingredients more than fancy equipment.
- Leftovers hold up better when I cool them before covering.
What you need and why it matters
I measure everything into small bowls and group finishing ingredients separately. That simple habit keeps the last few minutes calm.
- Self-rising flour, 8 cups. It gives the recipe its structure; I spoon it into the cup rather than scooping to avoid packing.
- Cooking oil. It keeps things moist without adding dairy flavor.
- Cornmeal, 4 cup.
- 4 -8 lbs of spots, 4.
- Salt, 4 teaspoon. A small amount sharpens every other flavor in the recipe.
- Black pepper, 2 teaspoon. A few cracks at the end wake up the other flavors.
How I make it
Step 1 — Prep the ingredients
I step 1: Clean And Debone The Spots Thoroughly cleaning and deboning the Spots. I rinse them under cold water, pat dry with paper towels, and remove any visible bones or scales.
Step 2 — Mix the base
I step 2: Prepare The Batter: In a large mixing bowl, combine the self-rising flour, cornmeal, salt, and black pepper. I mix well until all the ingredients are evenly incorporated. I step 3: Heat The Cooking Oil: Pour enough cooking oil into a large, deep skillet to reach a depth of 2-3 inches.
Step 3 — Fry until golden
I heat the oil over medium-high heat until it reaches approximately 375 degrees Fahrenheit. I step 4: Set Up For Frying: While the oil is heating up, prepare a baking sheet lined with paper towels for draining the fried fish. I step 5: Coat The Fillets: Using tongs or your hands, dip each fillet into the batter mixture, ensuring it is evenly coated on all sides.
Step 4 — Fry until golden
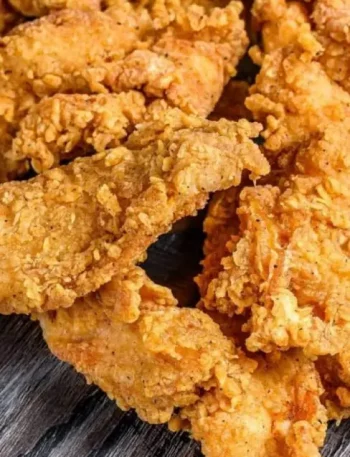
I step 6: Fry The Fish: Carefully place the batter-covered fillets into the hot oil, making sure not to overcrowd the pan. I fry for approximately 3-4 minutes per side or until golden brown and crispy. I step 7: Drain The Fried Fish: Remove the fried fish from the skillet using a slotted spoon or tongs and place them on the prepared baking sheet to drain excess oil.
Step 5 — Fry until golden
I step 8: Double Fry For Crispy Coating once all the fish has been fried, increase the heat of the oil slightly. I fry the fish a second time for an additional 1-2 minutes per side. This double-frying method ensures that the coating is extra crispy while also ensuring that the fish is cooked through.
Step 6 — Serve
I step 9: Serve And Enjoy: Serve the fried Virginia Spots hot with your choice of sides, and savor the delicious meal you’ve prepared!
Tips from my kitchen
- Measure first. I set every ingredient on the counter before heating the oven or stove.
- Watch the heat. I trust the visual cue over the clock when my pan or oven runs different.
- Cool before covering. Steam softens crisp edges and can
- Keep tools simple. A bowl, spatula, whisk, and small offset spatula handle most of the work.
Variations I have actually tried
- Variation 1: I add extra black pepper when the dish needs more edge.
- Variation 2: I serve it with something crisp and acidic for balance.
- Variation 3: I make the base early and finish it close to dinner.
- Variation 4: I use a smaller dish for thicker portions and check the center carefully.
- Variation 5: I pack leftovers into single servings before refrigerating.
How I serve it
I serve Virginia Spots after it has had enough time to settle. For sweets, I like clean slices or tidy pieces with coffee, tea, or cold milk. For savory dishes, I add something crisp, bright, or fresh on the side.
If I am taking it somewhere, I keep garnishes separate until the last minute. That small move keeps crumbs crisp, frosting cleaner, sauces brighter, and toppings from sliding around.
Storing and reheating
I cool leftovers completely, then cover them tightly.
For reheating, I use gentle heat. A short microwave burst works for single portions, while a low oven brings back better texture for pieces with a crust, crumb, or crunchy topping.
Frequently asked questions
Can I make Virginia Spots ahead?
I often do part of the work ahead, then finish close to serving so the texture stays fresh.
Can I change the pan size?
I try to use the listed pan. If I change it, I watch thickness and start checking early.
How do I know it is done?
I use the source time as a guide, then check color, set edges, and the cue at 375 °F.
Can I freeze leftovers?
I freeze sturdy portions after they cool completely, wrapped tightly and labeled with the date.
What mistake should I avoid?
I do not rush the cooling or resting step. Warm layers, crumbs, or fillings can shift if handled too soon.
If you make Virginia Spots, I would love to hear what variation or garnish you used.
Virginia Spots
Description
I make Virginia Spots with the original prep time of 10 min and cook time of 6 min. The steps below keep the source quantities, pan cues, temperatures, and serving count intact while adding my practical kitchen notes.
Ingredients You’ll Need
Instructions
- I step 1: Clean And Debone The Spots Thoroughly cleaning and deboning the Spots. I rinse them under cold water, pat dry with paper towels, and remove any visible bones or scales.
- I step 2: Prepare The Batter: In a large mixing bowl, combine the self-rising flour, cornmeal, salt, and black pepper. I mix well until all the ingredients are evenly incorporated. I step 3: Heat The Cooking Oil: Pour enough cooking oil into a large, deep skillet to reach a depth of 2-3 inches.
- I heat the oil over medium-high heat until it reaches approximately 375 degrees Fahrenheit. I step 4: Set Up For Frying: While the oil is heating up, prepare a baking sheet lined with paper towels for draining the fried fish. I step 5: Coat The Fillets: Using tongs or your hands, dip each fillet into the batter mixture, ensuring it is evenly coated on all sides.
- I step 6: Fry The Fish: Carefully place the batter-covered fillets into the hot oil, making sure not to overcrowd the pan. I fry for approximately 3-4 minutes per side or until golden brown and crispy. I step 7: Drain The Fried Fish: Remove the fried fish from the skillet using a slotted spoon or tongs and place them on the prepared baking sheet to drain excess oil.
- I step 8: Double Fry For Crispy Coating once all the fish has been fried, increase the heat of the oil slightly. I fry the fish a second time for an additional 1-2 minutes per side. This double-frying method ensures that the coating is extra crispy while also ensuring that the fish is cooked through.
- I step 9: Serve And Enjoy: Serve the fried Virginia Spots hot with your choice of sides, and savor the delicious meal you've prepared!
Note
Measure before heating. I set every ingredient for Virginia Spots on the counter before I turn on the oven or stove.
Use the listed pan. A different size changes thickness, browning, and timing.
Cool with patience. Warm filling, frosting, or crumbs can shift if I cut too soon.
Season or garnish at the end. I taste and adjust once the main texture is set.
Frequently Asked Questions
I often do part of the work ahead, then finish close to serving so the texture stays fresh.
I try to use the listed pan. If I change it, I watch thickness and start checking early.
I use the source time as a guide, then check color, set edges, and the cue at 375 °F.
I freeze sturdy portions after they cool completely, wrapped tightly and labeled with the date.
I do not rush the cooling or resting step. Warm layers, crumbs, or fillings can shift if handled too soon.