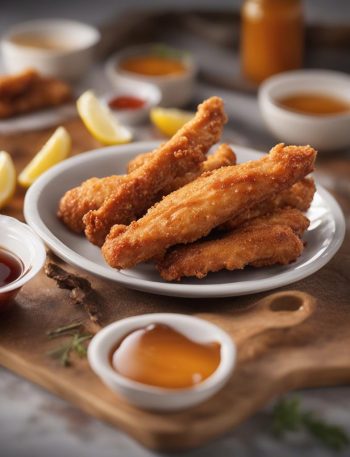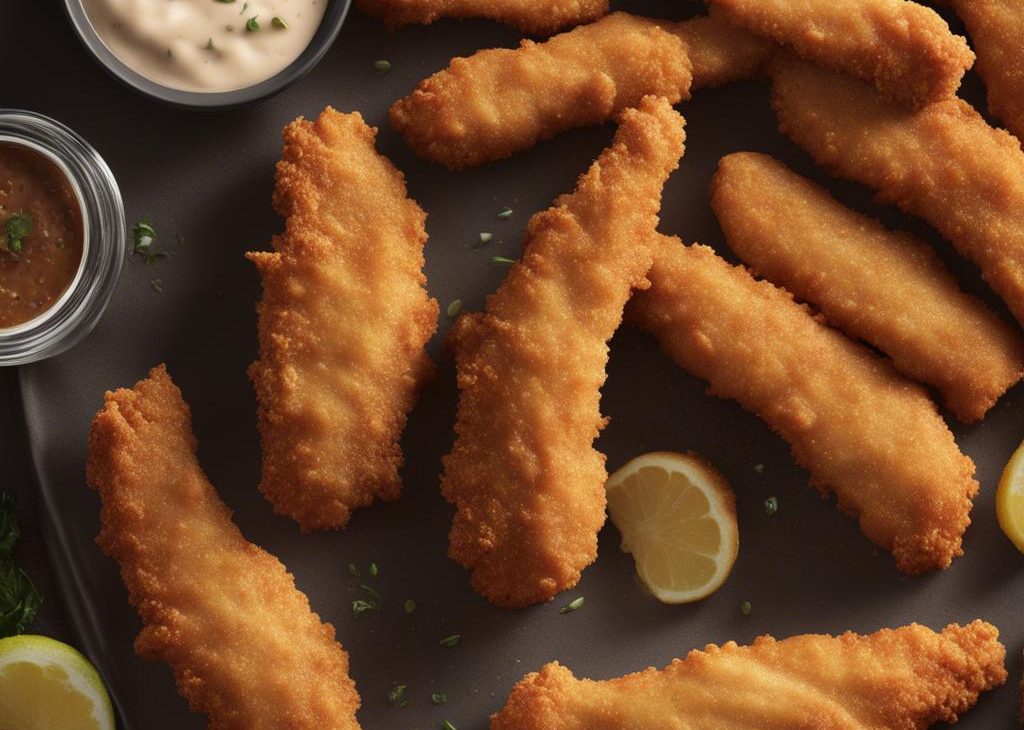

I make these Zaxby’s-Style Chicken Fingers when I want the crispy tenderloin experience without hauling everyone into the car. They are not a deep-fried clone, and I do not pretend they are. They are a practical skillet version with a crunchy coating, tender chicken, and enough seasoning that the first bite tastes good even before dipping sauce.
The coating is a little unusual because the source uses breadcrumbs, flour, eggs, and Italian seasoning together, then finishes with crushed cornflakes. I tried sprinkling the cornflakes before cooking and after cooking, and after wins for crunch. The flakes stay lighter and do not scorch in the skillet.
I like chicken tenderloins here because they cook fast and stay juicy. If I am using sliced chicken breast instead, I cut the strips evenly and keep a close eye on the pan. A few extra minutes can turn good chicken fingers into dry chicken fingers.
Why I keep coming back to this
- The recipe uses common grocery-store ingredients, not a long spice cabinet list.
- Buttermilk gives the chicken a softer texture and helps the coating grab.
- The skillet method is faster and less messy than setting up a deep fryer.
- Cornflakes add a crisp finish that feels fun on a weeknight plate.
- The tenders work with ranch, honey mustard, hot sauce, or a Zax-style dipping sauce.
- Leftovers reheat well in an air fryer, which matters if I am cooking for kids.
What you need (and what each one is doing)
- Chicken tenderloins, 2 lb. Tenderloins cook quickly and are already the right shape. I pat them dry before they go into buttermilk so the coating does not slide.
- Buttermilk or whole milk, 2/3 cup. Buttermilk gives a light tang and tender bite. Whole milk works when that is what I have.
- Flour and bread crumbs. Flour helps the coating cling; bread crumbs bring structure and browning.
- Beaten eggs, 4. They make the crumb mixture sticky enough to coat the chicken thickly.
- Dried Italian seasoning, 3 teaspoons. It is not restaurant-secret seasoning, but it gives the coating an herby background.
- Crushed cornflakes, 2 cups. I keep them a little coarse instead of crushing them into dust.
- Salt and pepper. I season both the milk mixture and the crumbs lightly because bland chicken cannot be rescued by sauce alone.
How I make it
Step 1 — Dip and coat
I stir buttermilk with salt and pepper in a shallow dish and turn the tenderloins through it. If I have the full 30 minutes, I let them sit; if dinner is loud and late, even a quick dip helps.
Step 2 — Combine the ingredients
In another shallow dish I combine the flour, breadcrumbs, beaten eggs, and Italian seasoning. It looks thicker than a classic breading station, but that thick mixture hugs the chicken well.
Step 3 — Serve
I lift each tenderloin from the buttermilk, let the extra drip off, and press it into the crumb mixture. I set coated pieces on a plate for a few minutes while the skillet heats.
Step 4 — Cook in the skillet
I spray the skillet and cook the chicken over medium heat for about 3 minutes per side. I check the thickest piece with a thermometer and pull it at 165°F (74°C).
Step 5 — Finish with cornflakes
Once the chicken is on a paper towel-lined plate, I scatter crushed cornflakes over the top. That final crunch is the small thing that makes this version worth repeating.
Tips from my kitchen
- Do not crowd the pan. Crowded chicken steams, and steamed coating turns soft.
- Keep one wet hand and one dry hand. It saves the coating from turning into paste on my fingers.
- Crush cornflakes by hand. I want flakes, not cereal flour.
- Rest before serving. Two minutes on paper towels lets the coating settle and the center finish evenly.
Variations I have actually tried
- Spicy fingers: add cayenne or hot sauce to the buttermilk.
- Garlic-paprika: add garlic powder and smoked paprika to the crumb mixture.
- Oven version: bake on a greased rack at 425°F (218°C), flipping once, until cooked through.
- Air-fryer batch: spray well and air fry at 400°F (204°C), turning once, until crisp and 165°F (74°C).
- Extra crunchy: mix some crushed cornflakes directly into the crumbs and still add a little on top.
How I store and reheat it
I refrigerate leftover chicken fingers in a covered container for up to 3 days. I do not stack them until they are cool, because trapped steam softens the crust.
For reheating, I use an air fryer at 375°F (191°C) for 4-6 minutes or an oven at 375°F (191°C) for about 10 minutes. The microwave works, but I only use it when I accept a softer coating.
Make-ahead rhythm
When I make this on a busier day, I separate the parts that can wait from the parts that need to happen close to serving. Chopped vegetables, measured dry ingredients, mixed sauces, and chilled doughs are all friendly to a head start. Crisp toppings, hot pans, final garnishes, and anything poured over ice are the pieces I save for last.
That small bit of planning keeps the recipe from feeling rushed. I would rather have a bowl covered in the refrigerator or a pan already lined than discover, at the noisy part of dinner, that I still need to chop, measure, and hunt for parchment. The food tastes better when I am not racing it or myself.
- Early prep: I measure dry ingredients, chop sturdy vegetables, or mix sauces when the kitchen is quiet.
- Last-minute work: I save frying, grilling, icing, crisp toppings, and ice-filled drinks for the moment closest to serving.
- Clean reset: I clear the cutting board before cooking so the final steps feel calm instead of crowded.
What I serve it with
I serve these with fries, celery sticks, coleslaw, or a simple green salad. For sauces, I rotate between ranch, honey mustard, barbecue sauce, and a mayo-ketchup dipping sauce with a lot of black pepper.
If I am feeding a crowd, I keep cooked pieces warm on a rack in a 250°F (121°C) oven while I finish the next skillet batch.
Where I pay attention
I do not need restaurant equipment for Zaxby’s-Style Chicken Fingers, but I do need to watch the small cues. I check texture, temperature, and timing before I move on, because those details decide whether the finished recipe tastes intentional or merely assembled. That is especially true with simple recipes, where there is not a long ingredient list to hide behind.
I also taste at the point where tasting makes sense. Sauces get adjusted after chilling, soups after simmering, baked goods after cooling, and grilled or fried foods after they have rested long enough not to burn my mouth. That habit has saved more dinners for me than any fancy tool in the drawer.
- Texture first: I look for smooth, crisp, tender, thick, or set before I trust the clock completely.
- Heat control: I would rather cook a minute longer at steady heat than scorch the outside and hope the inside catches up.
- Final seasoning: I make the last salt, pepper, lemon, or sweetener adjustment near the end, when the recipe tastes closest to how it will be served.
When I write the timing down, I still leave room for common sense. Pans, ovens, blenders, grills, and even the size of chopped vegetables change the last few minutes, so I watch the food instead of walking away.
Frequently asked questions
Can I use chicken breasts instead of tenderloins?
Yes. I cut boneless chicken breasts into even strips so they cook at the same speed as tenderloins.
Can I use regular milk instead of buttermilk?
Yes. Whole milk works, though buttermilk gives a slightly tangier and more tender result.
Why did my coating fall off?
The chicken was probably too wet, the pan was not hot enough, or the pieces were moved too soon. I press the coating on firmly and let the first side brown before flipping.
Can I bread these ahead?
I bread them a few hours ahead at most, then refrigerate uncovered or loosely covered so the coating does not get soggy.
What temperature should the chicken reach?
I cook chicken tenderloins to 165°F (74°C) in the thickest part.
If you make these, tell me which sauce you put beside them first.
Zaxby’s-Style Chicken Fingers
Description
These Zaxby's-style chicken fingers are skillet-cooked tenderloins with a crunchy cornflake and breadcrumb coating. I use buttermilk for tenderness and season the crumbs so the chicken tastes good before it ever touches sauce.
Ingredients You’ll Need
Instructions
- Stir the buttermilk with salt and pepper in a shallow dish, then add the chicken tenderloins and turn to coat.
- Coat a large skillet with nonstick cooking spray and warm it over medium heat.
- In a second shallow dish, combine the bread crumbs, flour, beaten eggs, and dried Italian seasoning until the mixture is evenly moistened.
- Dip each tenderloin from the buttermilk into the breadcrumb mixture, pressing so the coating sticks well.
- Cook the chicken fingers for about 3 minutes per side, until golden brown and cooked through.
- Move the cooked chicken to a paper towel-lined plate, then sprinkle crushed cornflakes over the top for extra crunch.
- Serve hot with your favorite dipping sauce.
Note
Press the coating. I use dry fingers to press crumbs onto the chicken so the crust does not slide off in the pan.
Medium heat matters. Too hot and the coating browns before the center cooks; too low and it dries out.
Use a thermometer. Chicken tenderloins are done at 165°F (74°C).
Add cornflakes at the end. They stay crunchier as a final sprinkle than they do when buried in the wet coating.
Frequently Asked Questions
Yes. I cut boneless chicken breasts into even strips so they cook at the same speed as tenderloins.
Yes. Whole milk works, though buttermilk gives a slightly tangier and more tender result.
The chicken was probably too wet, the pan was not hot enough, or the pieces were moved too soon. I press the coating on firmly and let the first side brown before flipping.
I bread them a few hours ahead at most, then refrigerate uncovered or loosely covered so the coating does not get soggy.
I cook chicken tenderloins to 165°F (74°C) in the thickest part.
You may also like...