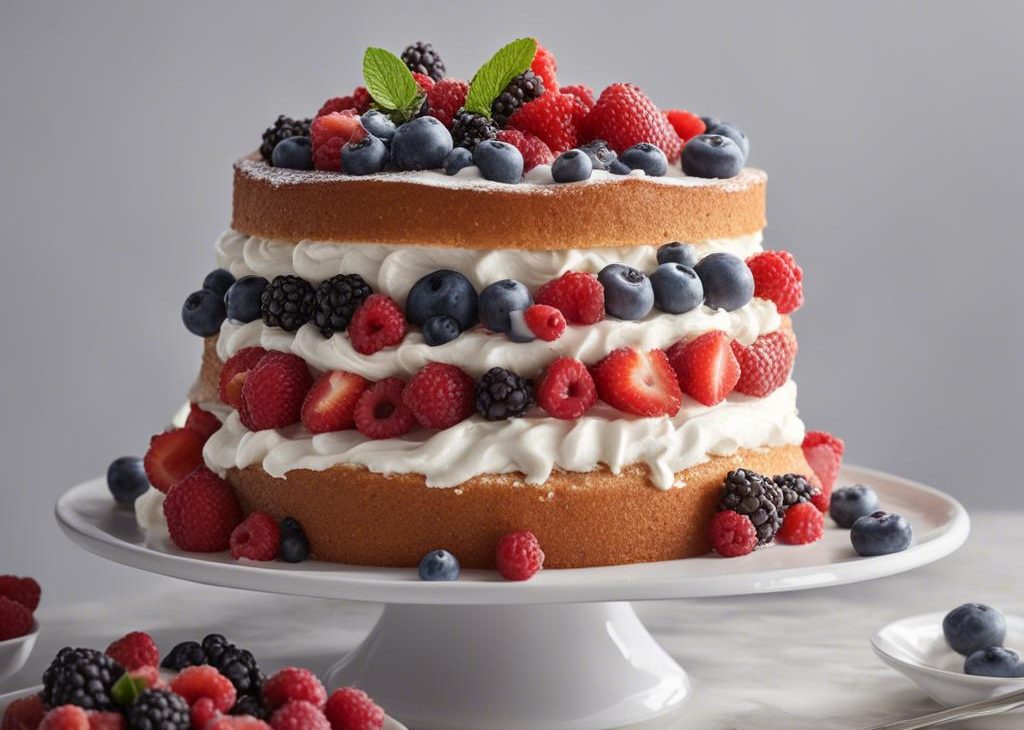

Using any soft/light cake recipe of your choice, you can create a delicious fresh berry cream cake. I recommend using my white cake recipe below or you could even try chocolate, pistachio, or a 6-inch cake instead. This minimally decorated naked-style cake is layered between fresh and fluffy whipped cream and piled high with juicy berries.
Channeling strawberry shortcake cake with this one!
Tell Me About This Fresh Berry Cream Cake
Using practically any soft/light cake recipe of your choice, you can create a naked-style cake with three lovely layers of whipped cream and fresh berries. If decorating layer cakes makes you nervous, this cake is FOR YOU; no complicated decorating involved!
I chose my vanilla flavored white cake because it’s ultra soft and sponge-like, which pairs beautifully with light whipped cream and summer berries. Heavier cakes would make this difficult to cut and serve. I have a list of other cake flavors you can use below.
This cake is:
- Towering tall with whipped cream and berries
- Light, fresh, and naked-style
- Very easy to decorate—less is more!
- Celebrating the season’s fresh flavors
- Like a fruit pizza in cake form
- Adaptable to many cake flavors
What a beautiful choice for Memorial Day recipes or 4th of July desserts!
Use Any Cake You Love
Let’s talk cake flavors. As I mentioned above, I use my white cake recipe. I divide the batter between 3 round cake pans.. Three 9-inch pans work too, but the cake layers will be pretty thin. I love using this white cake recipe because it’s soft, moist, and doesn’t overpower the delicate whipped cream or fresh berries. It’s made with cake flour, egg whites, and sour cream to guarantee the softest crumb. Highly recommended! If white cake isn’t your ideal choice, I have a few other flavor ideas. Most are actually adapted from my white cake recipe:
- Pistachio Cake
- Coconut Cake
- Lemon Cake
- Chocolate Cake (spongey and delicious!)
You Could Also Make a 6-Inch Cake
Don’t want to make such a large cake? You can use this exact decorating technique on a 6-inch cake. I have plenty of 6 inch cake flavor ideas in my 6-Inch Cake recipes post. (Use my vanilla cupcakes batter or any cupcake batter!) Simply halve the amount of whipped cream and berries.
Prepare the Cake Pans
No matter which size round cake pans you use, I always recommend lining them with parchment paper rounds. Cakes release seamlessly from the pans this way:
Garnishes for Fresh Berry Cream Cake
- Whipped Cream: I recommend the whipped cream recipe below, which yields plenty for a 3 layer 8- or 9-inch cake. (See recipe note about a 6-inch cake.) It’s a slightly scaled up version of my vanilla whipped cream. I add a little almond extract for extra flavor like I do in my berry icebox cake, but that’s optional. You know what would be equally tasty? The mocha whipped cream from my flourless chocolate cake—double that whipped cream to ensure you have enough for a 3 layer 8- or 9-inch cake. Interested in chocolate whipped cream? Add 3 Tablespoons of unsweetened cocoa powder and 1 extra Tablespoon of confectioners’ sugar to the recipe below. You could also flavor the whipped cream with various extracts such as lemon extract, orange extract, coconut extract, etc. Leave out the almond extract, replace with 1/2 teaspoon of your desired flavor, taste the finished whipped cream, then fold in more extract if desired.
- Fresh Berries: Layer fresh berries into the cake on top of the layers of whipped cream. You can use blueberries, strawberries, blackberries, raspberries, or even fresh sliced cherries.
- Florals: Use edible flowers or flowers that haven’t been sprayed with pesticides. Avoid strong-smelling flowers as the smell may linger on the cake..
3 Final Success Tips
See Your Fresh Berry Cakes!
Like pound cake with fresh berries and cream, but much lighter!
Fresh Berry Cream Cake Recipe
Description
This minimally decorated naked-style cake is layered between fresh and fluffy whipped cream and piled high with juicy berries.
Ingredients You’ll Need
Instructions
- Preheat the oven to 350°F (177°C). Grease three 8-inch or 9-inch cake pans, line with parchment paper rounds, then grease the parchment paper. Parchment paper helps the cakes seamlessly release from the pans..) I recommend using nonstick spray for greasing. I also recommend 8 inch cake pans as the 9 inch cakes will be pretty thin.
- Whisk the cake flour, baking powder, baking soda, and salt together. Set aside.
- Using a handheld or stand mixer fitted with a whisk attachment, beat the butter on high speed until smooth and creamy, about 1 minute. Add the sugar and beat on high speed for 2 minutes until creamed together. Scrape down the sides and up the bottom of the bowl with a rubber spatula as needed. Add the egg whites. Beat on high speed until combined, about 2 minutes. Then beat in the sour cream and vanilla extract. Scrape down the sides and up the bottom of the bowl as needed. With the mixer on low speed, add the dry ingredients until just incorporated. With the mixer still running on low, slowly pour in the milk until combined. Do not overmix. You may need to whisk it all by hand to make sure there are no lumps at the bottom of the bowl. The batter will be slightly thick.
- Pour batter evenly into cake pans. Bake for around 22-24 minutes or until the cakes are baked through. To test for doneness, insert a toothpick into the center of the cake. If it comes out clean, it is done. Allow cakes to cool completely in the pans set on a wire rack. The cakes must be completely cool before assembling.
- Using a hand mixer or a stand mixer fitted with a whisk attachment, whip the heavy cream, confectioners’ sugar, vanilla extract, and almond extract on medium-high speed until medium peaks form, about 3-4 minutes. Medium peaks are between soft/loose peaks and stiff peaks and are the perfect consistency for decorating cakes. Use immediately or cover tightly and chill in the refrigerator for up to 24 hours. Yields about 4 cups.
- If cooled cakes are domed on top, use a large serrated knife to slice a thin layer off the tops to create a flat surface. This is called “leveling” the cakes. (Discard thin layer or crumble over ice cream.) Place 1 cake layer on your cake stand, cake turntable, or serving plate. Evenly spread 1 heaping cup of whipped cream on top. I always use an icing spatula to spread. Arrange a single layer of mixed berries on top. Top with 2nd cake layer. Spread another 1 heaping cup of whipped cream on top, then a single layer of berries. Top with 3rd cake layer. Spread remaining whipped cream on top and garnish with fresh berries. Add a dusting of confectioners’ sugar on the berries, if desired, and/or garnish with fresh florals.
- Chill the assembled cake, uncovered, for at least 2 hours and up to 1 day before slicing and serving. This time in the refrigerator helps the whipped cream thicken and makes cutting neater and easier. If chilling for longer than a few hours, you can carefully cover it with plastic wrap or use a cake carrier for storing in the refrigerator (what I always store my cakes in!). *Note that the berries could begin to release their juices if kept in the refrigerator for longer than 2 hours. For cutting, I recommend using your sharpest knife and cutting slowly.
- Cover leftover cake tightly and store in the refrigerator for up to 5 days.
You may also like...