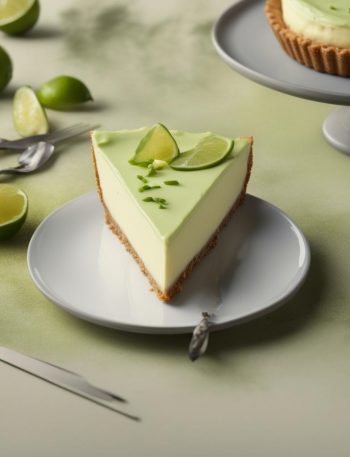
This 6 inch sunshine citrus cake cures the cold weather blues with bright flavor, a light and springy cake crumb, and creamy whipped frosting. This whipped frosting is lightly sweetened, so it doesn’t overpower the cake’s tangy citrus flavor. Use lemon, orange, and/or lime juice and zest in the cake batter and don’t forget the homemade lemon curd!
This is Sunshine on a Cake Stand
. And so we’re calling it sunshine citrus cake because nothing is more fitting as we yearn for warmer, brighter days ahead!
Sunshine Citrus Cake Details
- Flavor: If you love the sweet, sour, and refreshing flavor of fresh citrus fruits, you will fall in love with today’s cake recipe. Cream butter and sugar together for a minute before adding fresh orange, lemon, and lime zest. In this creaming step, we’re infusing flavor right into the base of the cake. Add fresh-squeezed juice into the batter when you add milk. We’ll also prepare fresh lemon curd which you’ll mix with whipped frosting to fill the cake. You have control over the citrus used, so if you want to skip the orange—go right ahead! You can also add grapefruit, use blood orange, or stick with plain lemon.
- Texture: The crumb is light and springy, but still holds up nicely to the creamy whipped frosting.
- Size: This is a 6-inch 3 layer cake. 6 inch cakes are massively popular right now because they’re a more manageable size. If you have a small family or gathering, there’s not as much leftover plus the smaller size makes for easier assembling, decorating, and serving. If you don’t have 6 inch cake pans, they’re a wonderful size to consider. I use and love (affiliate link) these 6-inch pans. And if you visit my 6-inch cake recipes page, you’ll find dozens of recipes to try!
- Ease: Even though the round layer cake is a smaller size than a traditional 9-inch cake, there are a few steps requiring your focus including making the lemon curd, carefully whipping the frosting, and applying a crumb coat. You can use this detailed how to assemble and decorate a layer cake post as your guide.
Three Parts to Sunshine Citrus Cake & Why This Recipe Works
This recipe combines citrus cake layers, a lemon curd-infused whipped frosting filling, and plain whipped frosting around the exterior.
Make the lemon curd and then let it cool and thicken completely:
I like this cake flavored with a variety of citrus. You will have between 3.5 – 4 cups of batter and it will be slightly thick with some small lumps:
Prepare your 6 inch cake pans by lightly greasing them, lining each with parchment paper rounds, and then lightly greasing the parchment paper. I just use nonstick spray.
After the cakes bake and cool, prepare your whipped frosting with just 4 ingredients—cream cheese, confectioners’ sugar, vanilla extract, and heavy cream. You will have about 3.5 cups of frosting. Stir 3 Tablespoons of your lemon curd into just under half of your frosting:
The lemon curd portion of your whipped frosting is the cake’s filling. If you have leftover lemon curd frosting, use it on the exterior of the cake. Apply a crumb coat, which is a thin layer of frosting that “catches” any crumbs, and then refrigerate the cake. Chilling the filled crumb-coated cake establishes its structure. Without time in the refrigerator, your filled and frosted cake will fall apart.
Add the remaining frosting on your chilled crumb-coated cake and if you have any leftover, feel free to pipe some on top. You can even tint the frosting yellow, green, or orange with gel food coloring.
Helpful Tools for Citrus Cake
These are products I use and love and the links below are affiliate links. Most (but not all) of these tools are optional, so you can still make the recipe without them.
That was a lot of information to prep you! If you made it down this far, you’re completely ready to begin this recipe. I hope you love this drop of sunshine.
See Your Sunshine Citrus Cakes!
6 Inch Sunshine Citrus Cake Recipe
Description
This sunshine citrus cake cures the cold weather blues with bright flavor, a light and springy cake crumb, and creamy whipped frosting. Be sure to set aside enough time to prepare the lemon curd in advance.
Ingredients You’ll Need
Instructions
- Fill the bottom pot of your double boiler with 1-2 inches of water. (Or use the DIY double boiler method listed in the notes.) Place on high heat. Once the water begins to boil, reduce to low heat to keep the water at a simmer. Place egg yolks, egg, granulated sugar, lemon zest, lemon juice, and salt into the top pot of your double boiler. Using a silicone whisk (avoid metal because it leaves an aftertaste), whisk until completely blended and then continue to whisk as the curd cooks. Whisk and cook until the mixture becomes thick and is the consistency of hollandaise sauce or a really thick soup, about 10 minutes or when an instant read thermometer reaches 160°F (71°C). If curd isn’t thickening, turn up the heat and constantly whisk. Remove pan from heat. Cut the butter into 6 separate pieces and then whisk into the curd until butter has melted and combined. Pour curd into a jar or bowl and place a piece of plastic wrap directly on top so it is touching the top of the curd. This prevents a skin from forming on top. The curd will continue to thicken as it cools. Place in refrigerator to speed up cooling. Once cool, the plastic wrap can be removed. Refrigerate the curd for up to about 10 days or for longer storage, you can freeze the cooled curd for up to 3-6 months. Thaw in the refrigerator overnight before enjoying. Makes 1 heaping cup.
- Preheat oven to 350°F (177°C). Grease three 6-inch round cake pans, line with parchment paper rounds, then grease the parchment paper. Parchment paper helps the cakes seamlessly release from the pans..)
- Whisk the flour, baking powder, and salt together in a medium bowl. Set aside. Using a handheld or stand mixer fitted with a paddle or whisk attachment, beat the butter and sugar together on medium-high speed until combined, about 1 minute. Scrape down the sides and up the bottom of the bowl with a rubber spatula and then add the citrus zest. Beat on medium-high speed until combined and creamy, about 2 minutes. Add the eggs and vanilla extract. Beat on medium-high speed until combined. Scrape down the sides and up the bottom of the bowl and beat again as needed to combine. Add half of the flour mixture (just eyeball it), half of the milk, and half of the citrus juice. Beat on low speed until mostly combined, and then add the remaining flour mixture, milk, and citrus juice. Beat on low speed until combined. Do not over-mix. You may need to whisk it all by hand to make sure there are no large lumps at the bottom of the bowl. The batter will be slightly thick with some small lumps. You will have between 3.5 – 4 cups of batter.
- Divide and pour batter evenly into cake pans. If batter appears to have bubbles, give the pans a light tap on the counter to pop them. Bake cakes for 18-21 minutes or until baked through. To test for doneness, insert a toothpick into the center of the cake. If it comes out clean, it’s done.
- Allow cakes to cool completely in the pans set on a wire rack for 30 minutes. Remove cakes from the pans and set them on a wire rack to cool completely. The cakes must be completely cool before frosting and assembling.
- In a large bowl using a hand-held mixer or stand mixer fitted with a whisk or paddle attachment, beat the cream cheese on medium-high speed until creamy, about 1 minute. Scrape down the sides and up the bottom of the bowl and beat again as needed until creamy. Add the confectioners’ sugar and vanilla extract, and then beat on medium speed until combined and completely smooth (absolutely no lumps), at least 2 full minutes. Scrape down the sides and up the bottom of the bowl and beat again as needed to smooth out. Switch to a whisk attachment (if you haven’t already been using it). Turn the mixer to low speed and with the mixer running, carefully pour in the cream in a slow and steady stream. After all of the cream has been added, turn the mixer up to high speed and whip until thick and stiff peaks form, about 1-2 minutes. Do not walk away during this time and do not be concerned if your frosting takes longer to whip. You’re looking for a thick, airy consistency with stiff peaks. If your frosting appears soupy now or at any point you are working with it, it needs more whipping to introduce more air. If your frosting appears chunky or curdled, it’s over-whipped. To fix, stir 1 Tablespoon of heavy cream into the frosting by hand to smooth out again. You will have about 3.5 cups of frosting.
- Spoon 1 cup of frosting (about 240ml) into a separate bowl. Stir in 3 heaping Tablespoons of cooled lemon curd. This will be your filling for the cake. Enjoy remaining lemon curd drizzled on the cake slices or as a topping on other baked goods.
- First, make sure you have enough room for the cake inside your refrigerator because it must chill at the end of this step and briefly in the next step as well. If the cake layers aren’t flat on top, carefully and slowly level them off using a large serrated knife. Discard (or crumble over ice cream!). Place 1 cake layer on your cake stand, cake turntable, or serving plate. Evenly cover the top with 1/2 of the lemon curd frosting. Top with 2nd cake layer and evenly cover the top with remaining lemon curd frosting (if you have extras, just use it on the exterior of the cake). Top with the third cake layer. Spread a very thin layer of regular whipped frosting on top and all around the sides of the cake to create a crumb coat. A bench scraper and small icing spatula are handy for this. Refrigerate uncovered for 30 minutes.
- Add remaining frosting on chilled crumb-coated cake using a small icing spatula or a larger flat icing spatula. Use a bench scraper, if desired, to smooth out the sides. Refrigerate the decorated cake uncovered for at least 30 minutes to help set the frosting. After that, if you used a cake turntable, you can carefully transfer the cake to a cake stand or serving plate using a couple flat spatulas.
- After 30 minutes in the refrigerator, the decorated cake is fine to slice and serve or sit out at room temperature for a few hours. Cover leftover cake tightly and store in the refrigerator for 5 days.
You may also like...