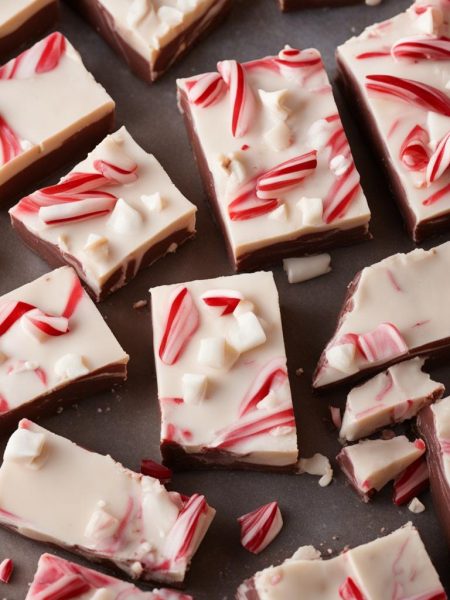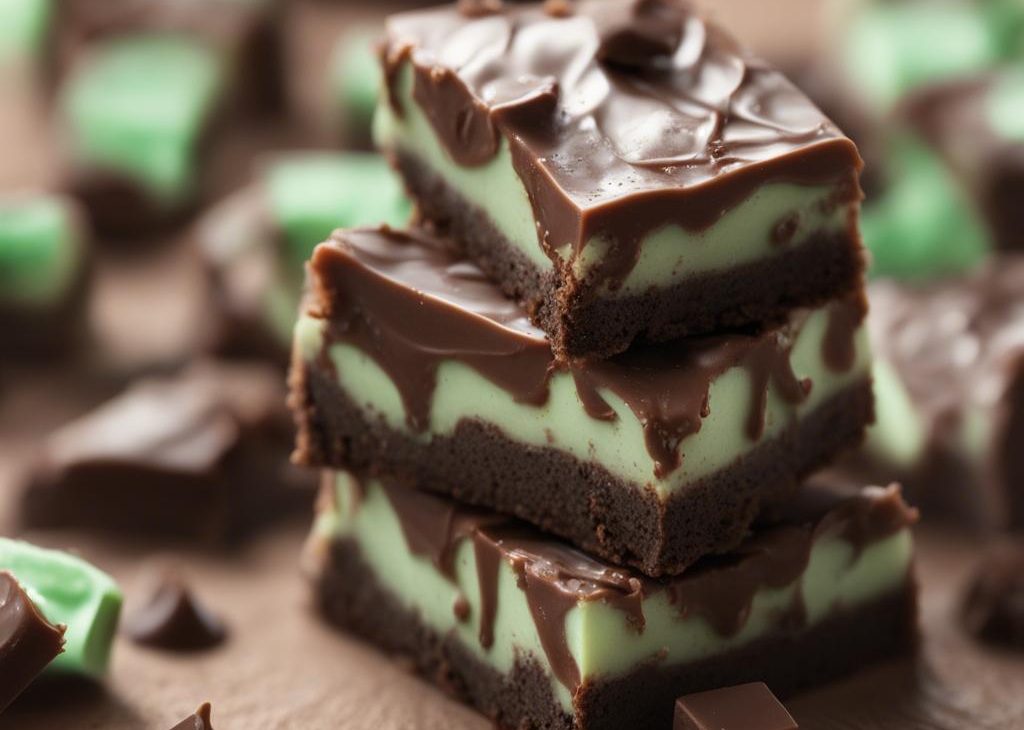

This Andes mint chocolate chip fudge is the tray I make when I want something that looks striped and festive without pulling out a candy thermometer. It tastes like a thick Andes mint: chocolate on the bottom, cool green mint through the middle, and a glossy chocolate cap with chips on top.
I learned to respect the short chilling breaks between layers after dragging warm chocolate through the mint once. It still tasted good, but the pieces looked muddy. Now I give each layer those 5-10 minutes, wipe my spatula, and spread gently instead of rushing.
The fudge is rich, so I cut it into 42 small squares and keep it cold. A little piece with coffee is enough for me, though I always notice a few extra squares disappearing while everyone is supposedly cleaning up.
Why I keep coming back to this
- It gives me layered refrigerator fudge that tastes like a giant Andes mint without a complicated restaurant-style process.
- The 30-minute hands-on time is realistic because the rest is patient chilling, not complicated candy work.
- The ingredient list is specific enough that I can prep it before starting and avoid mid-recipe scrambling.
- It works for sharing because the serving size is clear and easy to portion.
- The flavors are familiar, but the details make the finished dish feel intentional.
- I can make small adjustments after I understand the base recipe, not before.
What you need (and what each one is doing)
- 2 1/2 cups semi-sweet chocolate chips(divided).
- 1 14-ounce can sweetened condensed milk(divided). This gives creaminess. I keep the heat gentle or the mixing light so the dairy stays smooth.
- 1 1/2 cups white chocolate baking chips
- 1 teaspoon peppermint extract(or more, to taste). This is where the flavor sharpens. I keep the listed amount, then taste only when the recipe is at the right stage.
- 2 drops green food coloring
- 1 teaspoon canola or vegetable oil
- 1/2 cup mini chocolate chips and/or Andes Creme De Menthe Baking Chips
How I make it
Step 1 — Prep
I line an 8-inch square baking pan with parchment paper and mist it with nonstick spray.
Step 2 — Mix
I melt 1 1/2 cups semi-sweet chocolate chips with 3/4 cup sweetened condensed milk over low heat, spread in the pan, and chill 5-10 minutes.
Step 3 — Build flavor
I melt white chocolate baking chips with the remaining condensed milk, remove from heat, stir in peppermint extract and 2 drops green food coloring, spread over the first layer, and chill 5-10 minutes.
Step 4 — Cook or bake
I melt the remaining 1 cup semi-sweet chocolate chips with 1 teaspoon oil in 30-second microwave increments, spread over the mint layer, top with mini chips and/or Andes chips, and refrigerate at least 2 hours or up to 4 hours.
Step 5 — Finish
I cut into 42 squares and store airtight in the refrigerator for up to two weeks.
Timing and texture cues I watch for
The clock matters, but I treat it as a guide. If the recipe gives a temperature, I keep it exactly; when I need a general warmth cue, I think in practical kitchen terms like a refrigerator near 40°F or a warm sauce that is hot but not boiling. For this recipe, I keep the listed prep, cook, and rest times in place and use visual cues to decide when to move on.
I also pay attention to how the mixture feels. Thick mixtures should look evenly hydrated, whipped mixtures should hold their shape without looking dry, and baked recipes should be allowed to cool or rest when the instructions call for it. That pause is often what turns a messy result into a clean slice, scoop, or serving.
Tips from my kitchen
- Measure before starting.I do not want to hunt for a teaspoon or open a package while something is melting, whipping, or baking.
- Respect the heat.Low or moderate heat gives me more control, especially with dairy, chocolate, butter, eggs, and spices.
- Use the pan size or format listed.Changing pan size changes thickness, cooking time, and texture.
- Rest when directed.Cooling, chilling, or resting is part of the structure, not dead time.
- Taste at the right moment.I taste sauces and drinks near the end, but I rely on temperature and doneness cues for baked dishes.
Variations I have actually tried
- Variation 1:Use dark chocolate chips for a less sweet edge.
- Variation 2:Skip the green coloring and keep the mint layer ivory.
- Variation 3:Use all Andes baking chips on top for stronger mint flavor.
- Variation 4:Add a pinch of espresso powder to the chocolate layers.
- Variation 5:Scatter holiday sprinkles on top with the chips.
Serving, storing, and make-ahead notes
For serving, I think in portions: 1 small square. That keeps the recipe realistic, especially when the serving count is 42 and the dish is rich, sweet, or meant to be shared.
I keep the cut squares in an airtight container in the refrigerator for up to two weeks, with parchment between layers. For gifting, I pack them cold and tell people to refrigerate them again when they get home.
Frequently asked questions
Can I make this ahead?
Yes, I usually can. I follow the storage notes and keep the texture in mind; recipes with whipped cream, crisp toppings, or fresh garnish are best finished close to serving.
Can I change the main ingredient?
I make small swaps only after I have tried the base version. Main ingredients affect moisture, sweetness, salt, and structure, so I change one thing at a time.
What is the most common mistake?
Rushing is the mistake I see most. Skipping a chill, rest, gentle fold, or low-heat step can change the final texture even when the ingredients are correct.
How do I know it is done?
I use the listed time plus the cue in the instructions: set edges, soft peaks, melted layers, softened onions, a clean toothpick, or a safe internal temperature depending on the recipe.
Can I double it?
Often, yes, but I use the same pan size logic and do not crowd the pan. For baked recipes, two separate pans usually work better than one overfilled pan.
If you make Andes Mint Chocolate Chip Fudge, leave a comment with what worked for you — I always like hearing the little changes that happen in real kitchens.
Andes Mint Chocolate Chip Fudge
Description
A no-bake Andes mint chocolate chip fudge with chocolate, mint, and chocolate chip layers. I chill each layer briefly so the squares cut cleanly and taste like a thick Andes mint.
Ingredients You’ll Need
Instructions
- Line an 8-inch square baking pan with parchment paper and mist it with nonstick spray.
- Melt 1 1/2 cups semi-sweet chocolate chips with 3/4 cup sweetened condensed milk over low heat, spread in the pan, and chill 5-10 minutes.
- Melt white chocolate baking chips with the remaining condensed milk, remove from heat, stir in peppermint extract and 2 drops green food coloring, spread over the first layer, and chill 5-10 minutes.
- Melt the remaining 1 cup semi-sweet chocolate chips with 1 teaspoon oil in 30-second microwave increments, spread over the mint layer, top with mini chips and/or Andes chips, and refrigerate at least 2 hours or up to 4 hours.
- Cut into 42 squares and store airtight in the refrigerator for up to two weeks.
Nutrition Facts
Servings 42
- Amount Per Serving
- Calories 84kcal
- % Daily Value *
- Total Fat 5g8%
- Saturated Fat 3g15%
- Trans Fat 0.0g
- Cholesterol 2mg1%
- Sodium 13mg1%
- Potassium 76mg3%
- Total Carbohydrate 10g4%
- Sugars 9g
- Protein 1g2%
- Calcium 18 mg
- Iron 0.7 mg
* Percent Daily Values are based on a 2,000 calorie diet. Your daily value may be higher or lower depending on your calorie needs.
Note
Measure first. I set out each ingredient before starting.
Watch texture. The visual cues matter as much as the clock.
Keep the listed timing. Chilling, resting, and cooling are part of the recipe.
Store tightly. Airtight storage protects flavor and texture.
Frequently Asked Questions
Yes. I follow the storage notes and finish any delicate topping or garnish close to serving.
I change one ingredient at a time so I can tell how it affects sweetness, moisture, salt, and texture.
I watch the cue in the method: gentle heat, soft peaks, set edges, safe temperature, or full chilling time depending on the recipe.
Usually, but I keep the same pan-size logic and avoid overfilling. Two pans are often safer than one crowded pan.
I keep the cut squares in an airtight container in the refrigerator for up to two weeks, with parchment between layers. For gifting, I pack them cold and tell people to refrigerate them again when they get home.
You may also like...