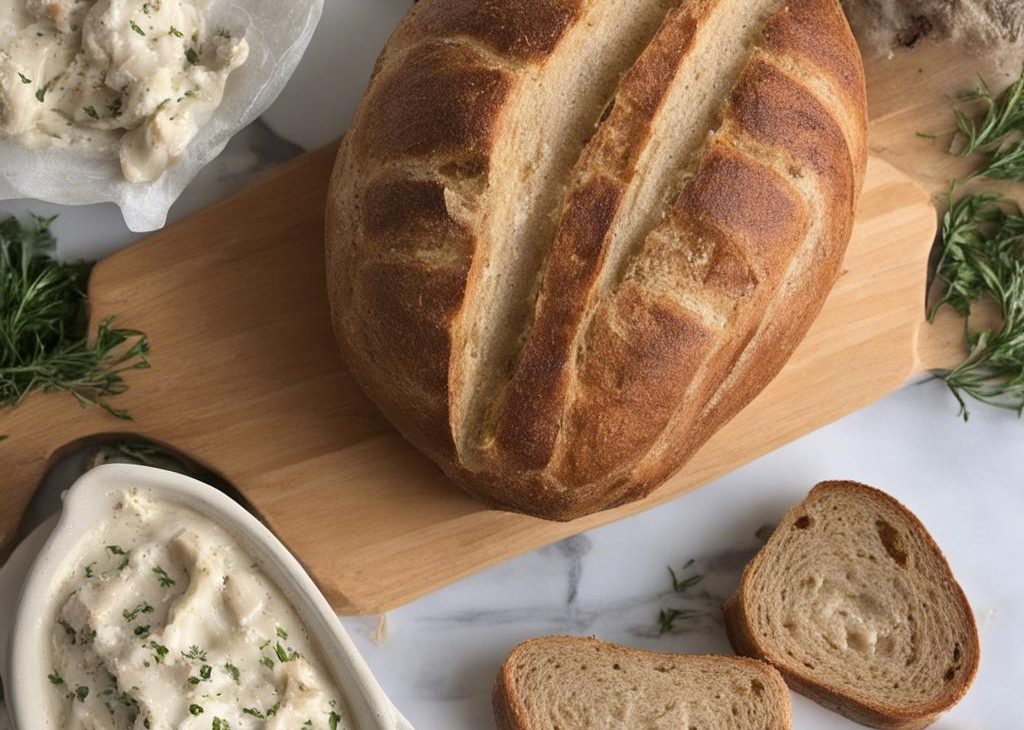

I bake this Ballerina Farm Sourdough when I want a crusty, traditional-style loaf with a tangy smell and a chewy crumb.
I come back to Ballerina Farm Sourdough because the results are consistent and the process is straightforward once I know what to watch for. This is a recipe I have made often enough to trust completely, and that kind of confidence makes the whole cooking or baking experience better.
Every time I make this, I notice something small that makes the outcome better—a slightly riper piece of fruit, a pan I remembered to grease well, or a thermometer I checked before putting anything in the oven. Small preparations add up to a noticeably better result, and I want to walk through all of them here.
Why I Make Ballerina Farm Sourdough
I keep returning to this recipe because it solves a real problem in my kitchen. I trust my eyes more than the clock once a recipe gets close to done. The listed time is a guide, but texture, color, and aroma tell me when the food is really where I want it. The technique here is not complicated, but it rewards attention.
This is also a recipe that holds up well when I make it for guests. The yield is reliable, the flavors are clear, and I do not spend extra time second-guessing whether it will work. That reliability is something I value more than novelty when I am cooking for people I want to impress.
What You Need
The ingredient list for Ballerina Farm Sourdough is intentionally approachable. I measure carefully here because a packed cup of flour, a rushed stir, or fruit that is not quite ripe can change the texture faster than people expect. Here is what each component does in the finished dish:
- 250 gram active starter
- 1 kg all-purpose flour
- 20 gram sea salt
- 700 ml water— instructions use 735g plus up to 50g more if needed
Before You Start
Before I begin Ballerina Farm Sourdough, I read through the entire recipe once and set out every ingredient I need. Cold ingredients take extra time to incorporate, so I pull refrigerated items out early. I also grease or line any pans in advance so they are ready the moment I need them.
I also check my timing. Some steps need attention while something else is cooking, so understanding the flow before I start means I am never caught off guard. When I make this for other people, I leave myself a little margin at the end instead of rushing the last step. A short cool-down, rest, or careful garnish usually improves the final result.
How to Make It, Step by Step
Step 1
In a mixing bowl, combine the active starter, sea salt, and all-purpose flour. Slowly add 735g of water while stirring with your hands. Add an additional 50g of water if needed; the dough should be relatively soft.
Step 2
Once combined, cover the dough with plastic wrap and allow it to rest at room temperature for at least 4 hours. After resting, divide the dough into two equal pieces. Shape each piece into a ball and place them in an iron pot that has been lightly greased with oil.
Step 3
Let the dough balls rise in the pot for 1–2 hours until doubled in size. Preheat the oven to 500°F (260°C) and place a baking stone on the middle rack.
Step 4
Place the pot in the oven and bake for about 20 minutes. Then reduce the oven temperature to 400°F (200°C) and bake for an additional 25–30 minutes or until golden brown. Remove the pot from the oven and place it on a cooling rack. Allow it to cool for at least 15 minutes before slicing.
What to Look For
I rely on visual and tactile cues as much as timing when I make Ballerina Farm Sourdough. The color should be consistent across the surface, the texture should feel set—not tacky or overly soft—and the aroma should have shifted from raw to toasted or cooked through.
If I am unsure, I use a toothpick, an instant-read thermometer, or simply press gently to feel for resistance. A few extra seconds of checking beats an underdone result every time. I have learned to trust these physical signals over following a timer blindly, especially in an oven I know runs a little hot or cool.
When everything looks right, I remove the dish from the heat source and let it rest before cutting or serving. Resting is not a delay—it is the final step in cooking, and skipping it usually means the finished dish loses moisture or structure before it reaches the plate.
How I Serve It
I usually serve Ballerina Farm Sourdough while it is still slightly warm, because that is when the texture and aroma are at their most appealing. A simple accompaniment is often the best choice—something that complements rather than competes with the main flavors already in the dish.
If I am making this for a larger group, I plan the rest of the meal to come together around the same time so nothing sits and loses temperature while I finish other components. That kind of coordination makes everything taste better and reduces last-minute stress in the kitchen.
Variations I Have Tried
- Change the mix-in ratio slightly to favor what I have on hand that day.
- Use a different size pan and adjust the bake time accordingly, checking earlier.
- Add a complementary spice or extract to shift the flavor in a new direction.
- Top with a simple glaze, streusel, or flaked salt for a different finish.
- Reduce the sugar slightly and add extra fruit or nuts for a less sweet version.
- Make a smaller batch when I only need a few servings to avoid extra leftovers.
Tips for Best Results
- Measure flour by spooning it into the cup and leveling off the top, never scooping directly.
- Let any baked item cool in the pan first before attempting to remove it.
- Taste the batter or dough before baking to check seasoning and sweetness.
- Use an oven thermometer at least once to confirm the oven’s actual temperature.
- Avoid opening the oven door in the first two-thirds of the bake time.
Storage and Make-Ahead
Once Ballerina Farm Sourdough has cooled completely, I store it covered at room temperature for up to 3 days or in the refrigerator for up to 1 week. Most versions also freeze well for up to 3 months. I wrap tightly in plastic wrap, then in a freezer bag, and thaw overnight in the refrigerator.
If I need to make this ahead for an event, I prepare it 1–2 days early and store it properly. The flavors often improve after a rest, and having it ready in advance removes one task from a busy day.
Frequently Asked Questions
Can pregnant women eat this sourdough?
Yes. Once baked, the bread is safe to eat during pregnancy, and it also offers some fiber and a little protein.
Is this sourdough vegan?
Yes. The loaf is already vegan because it uses flour, water, salt, and starter.
How do you know when the bread is done?
I look for a golden-brown crust, I listen for a hollow sound when I tap the loaf, and I can check for an internal temperature around 200°F (93°C) if I want extra confirmation.
Can I refrigerate the dough instead of leaving it at room temperature?
You can, but this recipe is written for a room-temperature rest and rise, so refrigeration will change the timing and the way the dough handles.
If you make Ballerina Farm Sourdough, I would love to hear how it went. Leave a comment below and let me know what you thought, or share any changes you made.
Ballerina Farm Sourdough
Description
I bake this ballerina farm sourdough when I want a crusty, traditional-style loaf with a tangy smell and a chewy crumb.Ingredients You’ll Need
Instructions
- In a mixing bowl, combine the active starter, sea salt, and all-purpose flour. Slowly add 735g of water while stirring with your hands. Add an additional 50g of water if needed; the dough should be relatively soft.
- Once combined, cover the dough with plastic wrap and allow it to rest at room temperature for at least 4 hours. After resting, divide the dough into two equal pieces. Shape each piece into a ball and place them in an iron pot that has been lightly greased with oil.
- Let the dough balls rise in the pot for 1–2 hours until doubled in size. Preheat the oven to 500°F (260°C) and place a baking stone on the middle rack.
- Place the pot in the oven and bake for about 20 minutes. Then reduce the oven temperature to 400°F (200°C) and bake for an additional 25–30 minutes or until golden brown. Remove the pot from the oven and place it on a cooling rack. Allow it to cool for at least 15 minutes before slicing.
Note
Start with active starter. The loaf depends on lively fermentation for rise and flavor.
Keep the dough soft. Add the last bit of water only if the dough needs it.
Cool before slicing. A short rest keeps the crumb from turning gummy.
Frequently Asked Questions
Yes. Once baked, the bread is safe to eat during pregnancy, and it also offers some fiber and a little protein.
Yes. The loaf is already vegan because it uses flour, water, salt, and starter.
I look for a golden-brown crust, I listen for a hollow sound when I tap the loaf, and I can check for an internal temperature around 200°F (93°C) if I want extra confirmation.
You can, but this recipe is written for a room-temperature rest and rise, so refrigeration will change the timing and the way the dough handles.
You may also like...