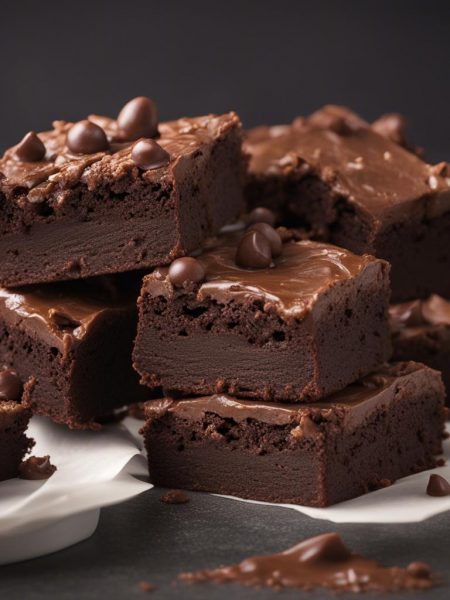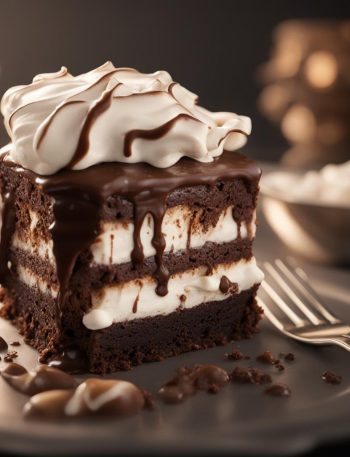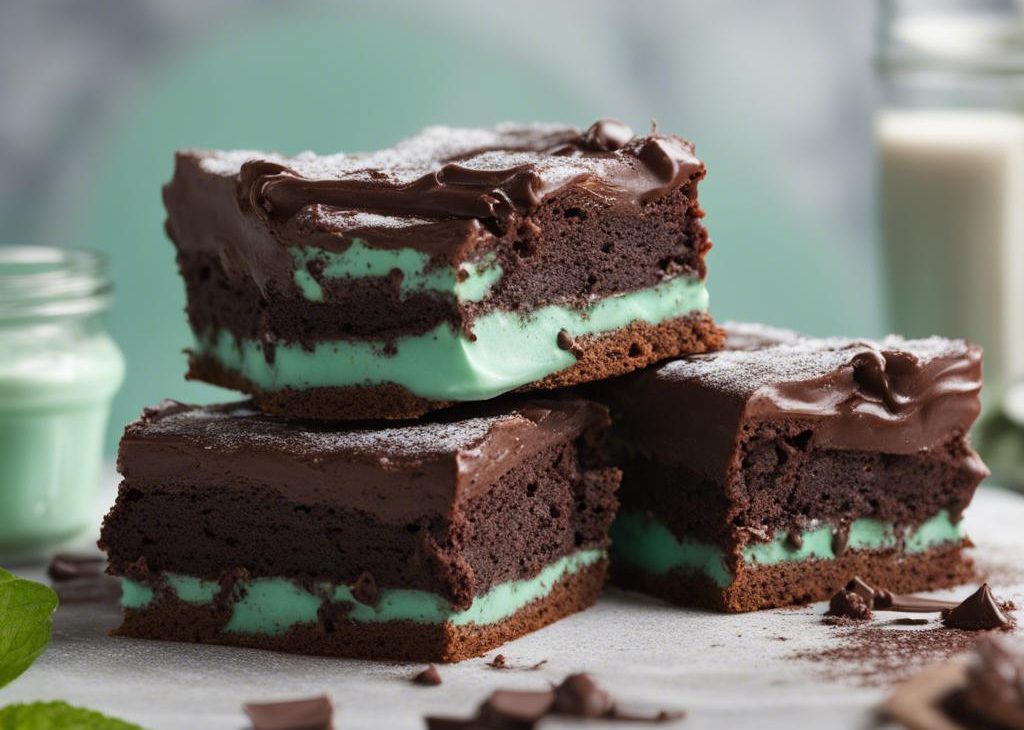

I make these Classic mint chocolate brownies when plain brownies do not feel dressed enough. The base is dense and fudgy, the peppermint layer is sweet and cool, and the chocolate topping sets into a clean slice after chilling.
The recipe has three parts, but I like that each one is simple. Melt, whisk, spread, chill. The only real patience required is waiting for the layers to set before cutting.
I have written the method with the exact temperatures, pan sizes, and timing cues I rely on. I would rather tell you where a recipe can get awkward than pretend every bowl behaves the same.
Why I keep coming back to this
- It gives me the main flavor I want from Classic mint chocolate brownies without adding unnecessary steps.
- The ingredient list is practical, and I can set everything out before I preheat or start the pan.
- The texture has clear doneness cues, which makes the recipe easier to repeat.
- Leftovers are useful instead of sad, especially when I store them the right way.
- The recipe takes well to small changes, but the base version is reliable.
- It feels homemade in a way that is specific, not fussy.
What you need (and what each one is doing)
- 1 cup unsalted butter. 16 Tbsp; 226g; for brownies. so the mixing goes smoothly.
- 8 ounces semi-sweet chocolate, coarsely chopped. so the mixing goes smoothly.
- 1 1/2 cups granulated sugar. 300g. so the mixing goes smoothly.
- 1/2 cup packed brown sugar. 100g. so the mixing goes smoothly.
- 4 large eggs, at room temperature. so the mixing goes smoothly. It binds the wet and dry ingredients and adds a slight richness.
- 2 teaspoons pure vanilla extract. so the mixing goes smoothly. It rounds out the sweetness so the recipe does not taste one-dimensional.
- 1/2 teaspoon salt. so the mixing goes smoothly. A small amount sharpens every other flavor in the recipe.
- 1/2 cup + 3 Tablespoons all-purpose flour. 86g. so the mixing goes smoothly. It gives the recipe its structure; I spoon it into the cup rather than scooping to avoid packing.
- 1/4 cup unsweetened cocoa powder. 21g. so the mixing goes smoothly.
- 1/2 cup unsalted butter, softened. 8 Tbsp; 113g; for mint layer. so the mixing goes smoothly.
- 2 cups confectioners’ sugar. 240g. so the mixing goes smoothly.
- 2 Tablespoons milk. 30ml. so the mixing goes smoothly. It adds moisture and a subtle richness that water cannot replace.
- 1 1/4 teaspoons peppermint extract. so the mixing goes smoothly. A few cracks at the end wake up the other flavors.
- 1 drop green food coloring. optional. so the mixing goes smoothly.
- 1/2 cup unsalted butter. 8 Tbsp; 113g; for topping. so the mixing goes smoothly.
- 1 heaping cup semi-sweet chocolate chips. around 200g. so the mixing goes smoothly.
How I make it
Step 1 — Melt the butter
I melt 1 cup butter and chopped chocolate together, stirring constantly, about 5 minutes. Transfer to a large bowl and cool slightly for 10 minutes.
Step 2 — Preheat the oven
I adjust an oven rack to the lower third and preheat to 350°F (177°C). Line a 9×13-inch pan with parchment paper, leaving overhang.
Step 3 — Whisk together
I whisk granulated sugar and brown sugar into the cooled chocolate mixture. Add eggs one at a time, whisking smooth after each, then whisk in vanilla.
Step 4 — Fold together
I fold in salt, flour, and cocoa powder. Spread in the pan and bake 35-36 minutes, until the edges pull away and a toothpick has moist crumbs.
Step 5 — Beat until smooth
I cool the brownies completely. Beat softened butter, confectioners’ sugar, and milk, then beat in peppermint extract and optional coloring. Spread over brownies.
Step 6 — Pour in the mint layer
I melt 1/2 cup butter with chocolate chips until smooth, pour over the mint layer, and spread gently.
Step 7 — Chill
I chill the pan for 1 hour and up to 4 hours or overnight, then lift out and cut into squares with a sharp wiped knife.
Timing and texture cues I watch for
I do not rely only on the timer. I watch the color, the smell, and the way the center responds because ovens and pans are never as identical as recipes pretend. If something looks done a few minutes early, I check it; if it still looks loose, I give it the extra time it needs.
Before I start, I read through the full method and pull out the pan, bowls, measuring cups, and cooling rack. That sounds basic, but it prevents the kind of scrambling that leads to missed salt, overheated chocolate, overworked batter, or noodles that sit too long. I would rather spend two quiet minutes setting up than fix a rushed mistake later.
I also try to respect the cooling or resting time even when the kitchen smells good. Warm food is tempting, but many recipes finish setting after the heat turns off. Slices cut cleaner, frosting stays put, crumbs settle, and broths taste rounder when I give them the pause written into the method.
If I am cooking for company, I make the recipe once exactly as written before changing it. After that, I know which parts can bend and which parts should stay alone. It is the easiest way I have found to keep a reliable base recipe while still making room for my own pantry and taste.
The other cue I trust is how the recipe behaves the next time I make it. If a batter feels thicker than usual, if a dough warms too fast, or if a pot reduces harder than expected, I slow down and adjust gently instead of forcing the clock. A familiar recipe still deserves attention, and that attention is what makes the repeat batches better.
I write those observations down when a recipe earns a repeat spot. A short note about pan color, chill time, or salt level saves me from relearning the same lesson months later.
Tips from my kitchen
- I cool the brownie base fully before adding mint frosting or the layer melts into streaks.
- Peppermint extract is strong; I taste before adding any extra drops.
- Parchment overhang makes neat bars much easier than cutting in the pan.
- For clean cuts, I use one firm motion and wipe the knife between slices.
Variations I have actually tried
- No color: leave the mint layer white for a quieter look.
- Dark topping: use bittersweet chips for the ganache layer.
- Holiday crunch: sprinkle crushed peppermint candies over the top before it sets.
- Thin mint style: add a little extra peppermint to the chocolate topping.
- Small batch: halve the recipe into an 8-inch pan and watch the bake time.
Storing and reheating
I keep the brownies tightly covered in the refrigerator for up to 5 days. For longer storage, I freeze cut squares with parchment between layers.
What I serve with it
I serve small squares because the layers are rich. They are good cold, but I like them after 10 minutes at room temperature when the mint layer softens slightly.
Frequently asked questions
Can I make these ahead?
Yes. I actually prefer them after a night in the refrigerator because the layers cut cleanly and the mint settles.
Do they need to stay refrigerated?
I keep them refrigerated for the neatest layers. They can sit at room temperature for a few hours for serving.
Can I skip the food coloring?
Definitely. The color is only visual. The peppermint extract gives the flavor either way.
Why did my topping crack?
It may have been very cold when cut. I let the pan sit 5-10 minutes, then slice with a sharp knife.
Can I use boxed brownies?
You can use the mint and topping layers on a 9×13 pan of baked brownies, but the homemade base here is rich enough to hold up well.
If you make this Classic mint chocolate brownies, I would love to hear what variation you tried and what you served with it.
Classic mint chocolate brownies
Description
Classic mint chocolate brownies is the way I make this recipe at home, with the source amounts preserved and the method rewritten in my own kitchen voice. I include the cues I watch for so the texture, timing, and storage are easy to manage.
Ingredients You’ll Need
Instructions
- Melt 1 cup butter and chopped chocolate together, stirring constantly, about 5 minutes. Transfer to a large bowl and cool slightly for 10 minutes.
- Adjust an oven rack to the lower third and preheat to 350°F (177°C). Line a 9x13-inch pan with parchment paper, leaving overhang.
- Whisk granulated sugar and brown sugar into the cooled chocolate mixture. Add eggs one at a time, whisking smooth after each, then whisk in vanilla.
- Fold in salt, flour, and cocoa powder. Spread in the pan and bake 35-36 minutes, until the edges pull away and a toothpick has moist crumbs.
- Cool the brownies completely. Beat softened butter, confectioners' sugar, and milk, then beat in peppermint extract and optional coloring. Spread over brownies.
- Melt 1/2 cup butter with chocolate chips until smooth, pour over the mint layer, and spread gently.
- Chill the pan for 1 hour and up to 4 hours or overnight, then lift out and cut into squares with a sharp wiped knife.
Nutrition Facts
Servings 24
- Amount Per Serving
- Calories 235kcal
- % Daily Value *
- Total Fat 12g19%
- Saturated Fat 7g35%
- Trans Fat 0.5g
- Cholesterol 31mg11%
- Sodium 42mg2%
- Potassium 20mg1%
- Total Carbohydrate 34g12%
- Sugars 33g
- Calcium 6 mg
- Iron 0.1 mg
* Percent Daily Values are based on a 2,000 calorie diet. Your daily value may be higher or lower depending on your calorie needs.
Note
I cool the brownie base fully before adding mint frosting or the layer melts into streaks..
Peppermint extract is strong; I taste before adding any extra drops..
Parchment overhang makes neat bars much easier than cutting in the pan..
For clean cuts, I use one firm motion and wipe the knife between slices..
Frequently Asked Questions
Yes. I actually prefer them after a night in the refrigerator because the layers cut cleanly and the mint settles.
I keep them refrigerated for the neatest layers. They can sit at room temperature for a few hours for serving.
Definitely. The color is only visual. The peppermint extract gives the flavor either way.
It may have been very cold when cut. I let the pan sit 5-10 minutes, then slice with a sharp knife.
You can use the mint and topping layers on a 9x13 pan of baked brownies, but the homemade base here is rich enough to hold up well.
You may also like...