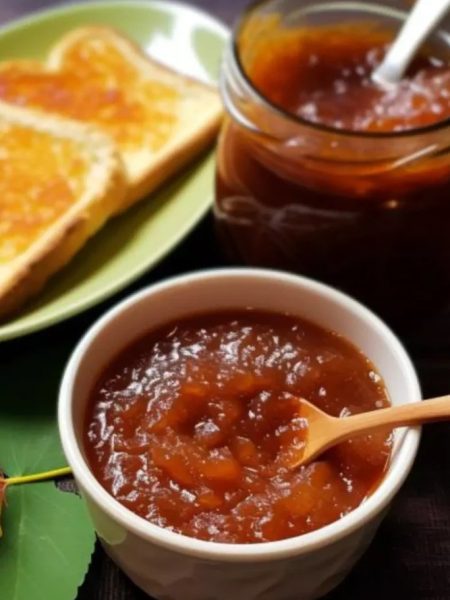

This grapelade is the kind of recipe I keep for days when I want familiar food without making the kitchen feel like a project. I like recipes with a few honest signals: a clear smell when they are close, a texture I can test with a spoon or fingertip, and leftovers that still taste good the next day.
The amounts here are a little specific, so I treat them with respect. I measure the filtered spring water, freshly picked and washed grapes, premium-grade granulated sugar carefully, then use my eyes and nose for the final call. That combination is usually what keeps a home recipe from tasting either timid or overworked.
There is not much drama in the method, which is exactly why I like it. I set everything out first, taste when tasting is safe, and make small adjustments instead of trying to rescue the whole dish at the end.
Why I keep coming back to this
- It uses familiar ingredients, but the finished grapelade tastes like I paid attention.
- The timing is forgiving as long as I check texture instead of blindly walking away.
- I can prep most of the small pieces before the stove or oven really needs me.
- Leftovers behave well, which matters more to me than a fussy presentation.
- The recipe scales down nicely for a small table and still feels worth the effort.
- There is no complicated cooking window; tasting and texture matter most.
What you need (and what each one is doing)
- 1 tablespoon filtered spring water.
- 1/2 quart premium-grade granulated sugar. This sweetens without taking over; I do not pack extra in the cup.
How I make it
Step 1 — Prepare the ingredients
I prepare the Grapes Start by washing the grapes thoroughly under running water. Remove the stems and discard any damaged or spoiled grapes.
Step 2 — Combine the base
I crush the Grapes Place the washed grapes in a large saucepan or pot. Use a potato masher, fork, or the hands to crush the grapes to release their juices. This step helps in extracting flavors.
Step 3 — Pour and combine
I add sugar Pour the premium-grade granulated sugar over the crushed grapes in the saucepan.
Step 4 — Mix the stir
I mix Well Stir the sugar and crushed grapes together until the sugar starts to dissolve. Ensure that the sugar is well combined with the grapes.
Step 5 — Let it rest
I do not rush this part: let it Rest Allow the mixture to sit for about 10-15 minutes. This time allows the sugar to further dissolve and mix with the grape juices. That short pause makes slicing or serving much neater.
Step 6 — Add the remaining ingredients
I add Water After the resting period, pour 1 tablespoon of filtered spring water into the mixture.
Step 7 — Cook the mixture
I cook the Mixture Place the saucepan or pot on the stove over medium heat. Stir the mixture occasionally to prevent it from sticking to the bottom of the pan.
Step 8 — Bring to a boil
I bring to a Boil Bring the grape and sugar mixture to a boil. Once it reaches a boil, reduce the heat to low to maintain a gentle simmer.
Step 9 — Simmer
I simmer and Stir Let the mixture simmer uncovered, stirring occasionally. Skim off any foam that forms on the surface.
Step 10 — Cook the mixture
I cook Until Thickened Continue simmering and stirring the mixture for approximately 45 minutes to 1 hour, or until it thickens to a jam-like consistency. The mixture will reduce and become thicker as it cooks.
Step 11 — Cool completely
I check for Setting Point: To test if the Grapelade has reached the desired consistency, place a small amount on a chilled plate. Let it cool for a moment, then push the finger through it. If it wrinkles and holds its shape, it has reached the setting point.
Step 12 — Transfer
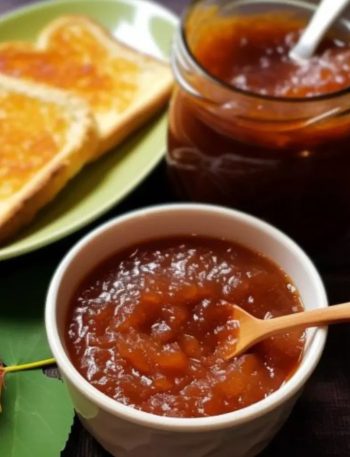
I cool and Store Once the Grapelade reaches the desired consistency, remove it from the heat and allow it to cool for a few minutes. Transfer the Grapelade into clean, sterilized jars, and seal them properly.
Step 13 — Store leftovers
I storage Store the sealed jars of Grapelade in a cool, dry place. It can be stored in the refrigerator for shorter-term use or processed for longer shelf life following proper canning procedures I taste at the end and adjust only in tiny pinches so the original balance stays intact.
How I keep the texture honest
I make grapelade stronger than I think I need when it will be poured over ice. Cold dulls sweetness and aroma, and melting ice waters everything down, so I taste it chilled before deciding it needs anything else.
I also strain or stir more carefully than the recipe makes it sound. A smooth drink feels intentional, while a gritty or uneven one feels rushed. If I am serving it later, I chill the base and add ice only at the last minute.
Tips from my kitchen
- Measure the odd amounts. Some of these amounts look quirky, but I keep them because the texture depends on the ratio.
- Pause before serving. Even a short rest lets juices, crumbs, or sauce settle instead of running everywhere.
- Taste where it makes sense. For raw batters I taste the add-ins only; for sauces and dressings I season at the end.
- Use the visual cue. Time gets me close, but color, smell, and firmness tell me when the dish is actually done.
- Chill briefly if possible. Ten to thirty minutes in the fridge makes sharp edges round out.
Variations I have actually tried
- Sparkling: I top the glass with plain seltzer for a lighter finish.
- Less sweet: I cut the sweetener slightly and serve it over lots of ice.
- Spicy: I add a small pinch of cayenne or red pepper flakes when the dish can handle heat.
- Herb-forward: I finish with fresh herbs so the flavor tastes fresher without changing the base recipe.
- Make-ahead: I prep the dry ingredients or chopped pieces the night before and cook as written.
Storing and reheating
I keep grapelade covered in the refrigerator and stir before serving because the texture can separate a little as it sits. If it tastes muted after chilling, I add a tiny pinch of salt or a fresh squeeze of citrus rather than changing the whole batch.
What I serve with it
I pour grapelade over plenty of ice and keep snacks salty or simple beside it. A cold glass and a small garnish make it feel finished without adding work.
My final check is simple: I take one small bite the way I plan to serve it. Warm food should taste rounded, cold food should taste a little brighter, and anything sliced should hold together without being stiff. That bite tells me whether I need a pinch of salt, a squeeze of citrus, or just a few more minutes of patience.
My make-ahead rhythm
I do not always cook grapelade from start to finish in one stretch. If the recipe has chopped ingredients, I handle those first and keep them covered. If it has dry ingredients, I measure them into one bowl. If it has a sauce or topping, I make that early so the last few minutes feel calm instead of crowded.
Right before serving, I look for the one thing that makes it taste freshly made: a warm slice, a quick stir, a crisp edge, a cold glass, or a small spoonful of sauce. That little reset is often enough to make leftovers or prepped pieces feel intentional.
Frequently asked questions
Can I make grapelade ahead?
Yes. I usually prep the measured ingredients first and finish the recipe close to serving time. If it is a baked or simmered dish, I cool it completely before covering so condensation does not make the top soggy.
Can I make it less sweet?
Yes. I start with less sweetener and add more only after the drink is cold, because chilled drinks taste less sweet than warm ones.
Can I double the recipe?
Usually, yes, but I use two pans or a wider pot instead of making one extra-deep batch. A deeper dish changes the cooking time and can leave the center underdone.
Can I change the salt or sweetness?
I adjust in small steps. A little extra salt can wake up a savory dish, and a small reduction in sugar is usually fine, but large changes can affect browning and texture.
How do I know it is done?
I trust the visual cue more than the clock. The recipe should smell finished, look set or glossy in the right places, and hold its shape when I test a small portion.
If you make this grapelade, I would love to hear what little adjustment made it yours.
Grapelade
Description
This grapelade is written the way I make it at home: clear steps, honest texture cues, and practical notes for serving it well. I keep the listed amounts and timing intact while explaining what I watch for in the kitchen.
Ingredients You’ll Need
Instructions
- I prepare the Grapes Start by washing the grapes thoroughly under running water. Remove the stems and discard any damaged or spoiled grapes.
- I crush the Grapes Place the washed grapes in a large saucepan or pot. Use a potato masher, fork, or the hands to crush the grapes to release their juices. This step helps in extracting flavors.
- I add sugar Pour the premium-grade granulated sugar over the crushed grapes in the saucepan.
- I mix Well Stir the sugar and crushed grapes together until the sugar starts to dissolve. Ensure that the sugar is well combined with the grapes.
- I do not rush this part: let it Rest Allow the mixture to sit for about 10-15 minutes. This time allows the sugar to further dissolve and mix with the grape juices. That short pause makes slicing or serving much neater.
- I add Water After the resting period, pour 1 tablespoon of filtered spring water into the mixture.
- I cook the Mixture Place the saucepan or pot on the stove over medium heat. Stir the mixture occasionally to prevent it from sticking to the bottom of the pan.
- I bring to a Boil Bring the grape and sugar mixture to a boil. Once it reaches a boil, reduce the heat to low to maintain a gentle simmer.
- I simmer and Stir Let the mixture simmer uncovered, stirring occasionally. Skim off any foam that forms on the surface.
- I cook Until Thickened Continue simmering and stirring the mixture for approximately 45 minutes to 1 hour, or until it thickens to a jam-like consistency. The mixture will reduce and become thicker as it cooks.
- I check for Setting Point: To test if the Grapelade has reached the desired consistency, place a small amount on a chilled plate. Let it cool for a moment, then push the finger through it. If it wrinkles and holds its shape, it has reached the setting point.
- I cool and Store Once the Grapelade reaches the desired consistency, remove it from the heat and allow it to cool for a few minutes. Transfer the Grapelade into clean, sterilized jars, and seal them properly.
- I storage Store the sealed jars of Grapelade in a cool, dry place.
Note
Measure the odd amounts. Some of these amounts look quirky, but I keep them because the texture depends on the ratio.
Pause before serving. Even a short rest lets juices, crumbs, or sauce settle instead of running everywhere.
Taste where it makes sense. For raw batters I taste the add-ins only; for sauces and dressings I season at the end.
Use the visual cue. Time gets me close, but color, smell, and firmness tell me when the dish is actually done.
Frequently Asked Questions
Yes. I usually prep the measured ingredients first and finish the recipe close to serving time. If it is a baked or simmered dish, I cool it completely before covering so condensation does not make the top soggy.
Yes. I start with less sweetener and add more only after the drink is cold, because chilled drinks taste less sweet than warm ones.
Usually, yes, but I use two pans or a wider pot instead of making one extra-deep batch. A deeper dish changes the cooking time and can leave the center underdone.
I adjust in small steps. A little extra salt can wake up a savory dish, and a small reduction in sugar is usually fine, but large changes can affect browning and texture.
I trust the visual cue more than the clock. The recipe should smell finished, look set or glossy in the right places, and hold its shape when I test a small portion.
You may also like...