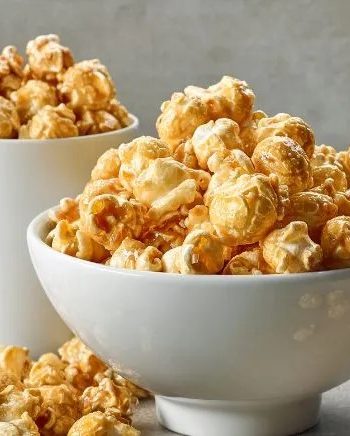
Homemade Caramel Corn is the version I make when I want the idea of the original recipe, but with enough real kitchen detail that I can repeat it without second-guessing myself.
I have learned to slow down at the small moments: scraping the blender jar, letting dough puff, waiting for caramel to cool, or tasting a sauce after it sits for a minute. Those details are not fussy. They are the difference between a recipe I make once and a recipe I keep in my notes.
This recipe serves 10 and takes 20 min prep, 1 min cook. I wrote the method the way I talk myself through it at the counter: what I look for, where I adjust, and what I avoid when I am tired or in a hurry.
Why I keep coming back to this
- The sugar cues are clear if I pay attention.
- It keeps well once fully cool.
- The sweet-salty balance makes a small serving satisfying.
- I can package it ahead instead of rushing later.
- A heavy pan and a calm counter make the process manageable.
- It feels homemade in a way store-bought sweets do not.
What you need and what each ingredient is doing
- 10 cups popped popcorn (10-11 cups; about 70-75g). I measure it carefully because a heavy scoop changes the texture.
- 1 cup granulated sugar (200g).
- 1/4 cup light corn syrup (80g).
- 1/2 cup unsalted butter (113g). I use it for richness and tenderness, then watch heat so it does not taste scorched.
- 1/2 teaspoon salt. I measure the small amount because it is what keeps the flavor from tasting flat.
- 1/8 teaspoon cream of tartar. I use it to control body, and I add a splash more only when the mixture looks too stiff.
- 1/2 teaspoon baking soda.
How I make it
Step 1 — Preheat the oven
I preheat the oven to 200°F (93°C). Line 1 or 2 12×17-inch baking sheets with silicone baking mats or parchment paper. I pour the popcorn into the largest bowl I have, or spread it onto the prepared baking sheets. (Either way is fine.) I pause here long enough to look at the texture instead of racing into the next step.
Step 2 — Combine the ingredients
I combine the sugar, corn syrup, butter, salt, and cream of tartar in a medium saucepan over medium heat. Stir constantly as the butter melts and mixture comes to a simmer. Once simmering around the edges, allow to bubble, without stirring, for 4 minutes. (If I have a candy thermometer, the caramel should reach 234-235°F (112-113°C).) I remove caramel from heat and immediately stir in the baking soda. The mixture will bubble up, almost double in volume, and appear frothy on the surface as I stir; this is normal and expected. Be careful, it’s very hot.
Step 3 — Pour and combine
I pour the caramel over the popcorn and, with a large spoon or spatula, stir gently until all of the popcorn has been coated. Go slowly here and have patience; it requires quite a few turns of the spatula/spoon as the caramel begins to harden. If it’s not already, spread the popcorn evenly onto prepared baking sheet(s). I bake for 1 hour, gently stirring every 20 minutes.
Step 4 — Cool completely
I allow to cool on the pan for at least 30 minutes. The caramel hardens as it cools. Once cool enough to handle, I can break apart any large clusters. I cover the popcorn tightly once cooled. This caramel corn stays fresh for up to 2 weeks in an airtight container, so it’s a great recipe to make ahead of time.
Tips from my kitchen
- Measure first. I set out every small amount before I start so I do not lose my place.
- Watch texture. I treat the timer as a guide and the mixture as the real answer.
- Change one thing at a time. I make a note before adjusting sweetness, liquid, or heat.
- Use a heavy pan. Thin pans scorch sugar quickly.
- Clear the counter. Hot sugar waits for no one.
Variations I have actually tried
- Nutty: I add pecans, almonds, or peanuts where the coating can hold them.
- Chocolate finish: I drizzle melted chocolate after cooling.
- Warm spice: I add cinnamon or ginger to the sugar mixture.
- Salted: I finish with flaky salt while the coating is tacky.
- Gift bags: I portion the cooled batch before it disappears from the bowl.
How I serve and store it
I let Homemade Caramel Corn cool completely before packing it. Warm sugar traps steam, and steam is the enemy of crunch.
For leftovers, I use an airtight container once everything is fully cool. If the recipe is tender, glazed, or frosted, I separate layers with parchment so the top stays neat.
Frequently asked questions
Do I need a candy thermometer?
I strongly prefer one because sugar changes quickly and visual cues can be tricky.
Why is my caramel grainy?
Sugar crystals may have formed on the pan sides or the mixture may have been stirred at the wrong time.
Can I make it ahead?
Yes. It holds well once fully cooled and stored airtight.
How do I keep it from sticking?
I use parchment, silicone, or a lightly greased surface and cool it before packing.
Can I add chocolate?
Yes. I drizzle it after cooling so it sets on the surface.
If you make this Homemade Caramel Corn, I would love to hear what small adjustment made it work best in your kitchen.
Homemade Caramel Corn
Description
Homemade Caramel Corn is my practical first-person rewrite with the source amounts preserved and the kitchen cues made clear. I explain the texture, timing, serving, and storage details that help the recipe repeat well.
Ingredients You’ll Need
Instructions
- I preheat the oven to 200°F (93°C). Line 1 or 2 12x17-inch baking sheets with silicone baking mats or parchment paper.
- I pour the popcorn into the largest bowl I have, or spread it onto the prepared baking sheets. (Either way is fine.).
- I combine the sugar, corn syrup, butter, salt, and cream of tartar in a medium saucepan over medium heat. Stir constantly as the butter melts and mixture comes to a simmer. Once simmering around the edges, allow to bubble, without stirring, for 4 minutes. (If I have a candy thermometer, the caramel should reach 234-235°F (112-113°C).).
- I remove caramel from heat and immediately stir in the baking soda. The mixture will bubble up, almost double in volume, and appear frothy on the surface as I stir; this is normal and expected. Be careful, it's very hot.
- I pour the caramel over the popcorn and, with a large spoon or spatula, stir gently until all of the popcorn has been coated. Go slowly here and have patience; it requires quite a few turns of the spatula/spoon as the caramel begins to harden. If it's not already, spread the popcorn evenly onto prepared baking sheet(s).
- I bake for 1 hour, gently stirring every 20 minutes.
- I allow to cool on the pan for at least 30 minutes. The caramel hardens as it cools. Once cool enough to handle, I can break apart any large clusters.
- I cover the popcorn tightly once cooled. This caramel corn stays fresh for up to 2 weeks in an airtight container, so it's a great recipe to make ahead of time.
Nutrition Facts
Servings 10
- Amount Per Serving
- Calories 182kcal
- % Daily Value *
- Total Fat 9g14%
- Saturated Fat 6g30%
- Trans Fat 0.4g
- Cholesterol 24mg8%
- Sodium 170mg8%
- Potassium 13mg1%
- Total Carbohydrate 26g9%
- Sugars 23g
- Calcium 4 mg
- Iron 0.0 mg
* Percent Daily Values are based on a 2,000 calorie diet. Your daily value may be higher or lower depending on your calorie needs.
Note
Measure first. I set out every small amount before I start so I do not lose my place.
Watch texture. I treat the timer as a guide and the mixture as the real answer.
Change one thing at a time. I make a note before adjusting sweetness, liquid, or heat.
Use a heavy pan. Thin pans scorch sugar quickly.
Frequently Asked Questions
I strongly prefer one because sugar changes quickly and visual cues can be tricky.
Sugar crystals may have formed on the pan sides or the mixture may have been stirred at the wrong time.
Yes. It holds well once fully cooled and stored airtight.
I use parchment, silicone, or a lightly greased surface and cool it before packing.
Yes. I drizzle it after cooling so it sets on the surface.
You may also like...