
I first saved Miso salmon Cheesecake Factory because it sounded like the kind of dinner that depends on timing more than fuss. I watch the protein, the sauce, and the pan heat closely so the finished plate tastes balanced instead of rushed.
This is my working version of Miso salmon Cheesecake Factory.
The biggest thing I watch for is doneness. A clock gets me close, but color, aroma, and texture decide the last few minutes. I would rather check twice than serve something dry or under-seasoned.
Why I keep coming back to this
- The ingredient list is direct, so the finished dish tastes like itself.
- Most of the work happens before the pan gets busy.
- I get clear visual cues instead of guessing by the clock alone.
- It is flexible enough for a weeknight but still feels considered.
- Leftovers reheat cleanly when I store them with a little care.
What you need and what each ingredient is doing
- 2 tablespoon red miso paste. It sharpens the flavor.
- 2 tablespoon soy sauce. It sharpens the flavor.
- 2 tablespoon brown sugar. It sweetens and browns.
- 1 teaspoon white rice vinegar. It keeps the flavor balanced.
- 1 cup fresh snow peas. It keeps the flavor balanced.
- 2 4 oz deboned, skinned salmon fillets. I watch doneness closely.
- 1 pc minced shallot. It keeps the flavor balanced.
- 1/2 cup dry sake. It keeps the flavor balanced.
- 1 stick softened butter. It carries flavor.
- chopped chives. It keeps the flavor balanced.
- 2 cups cooked white rice. It keeps the flavor balanced.
- olive oil. It carries flavor.
How I make it
Step 1 — Combine the ingredients
In a small mixing dish, combine the miso paste, brown sugar, rice vinegar, and soy sauce for the miso marinade and glaze. If it’s too thick, add a tablespoon or two of hot water to thin it out.
Step 2 — Chill
Place the salmon fillets in the miso marinade bowl and coat them with it. Cover them with plastic wrap and refrigerate them for at least 30 minutes.
Step 3 — Cool, serve, and store
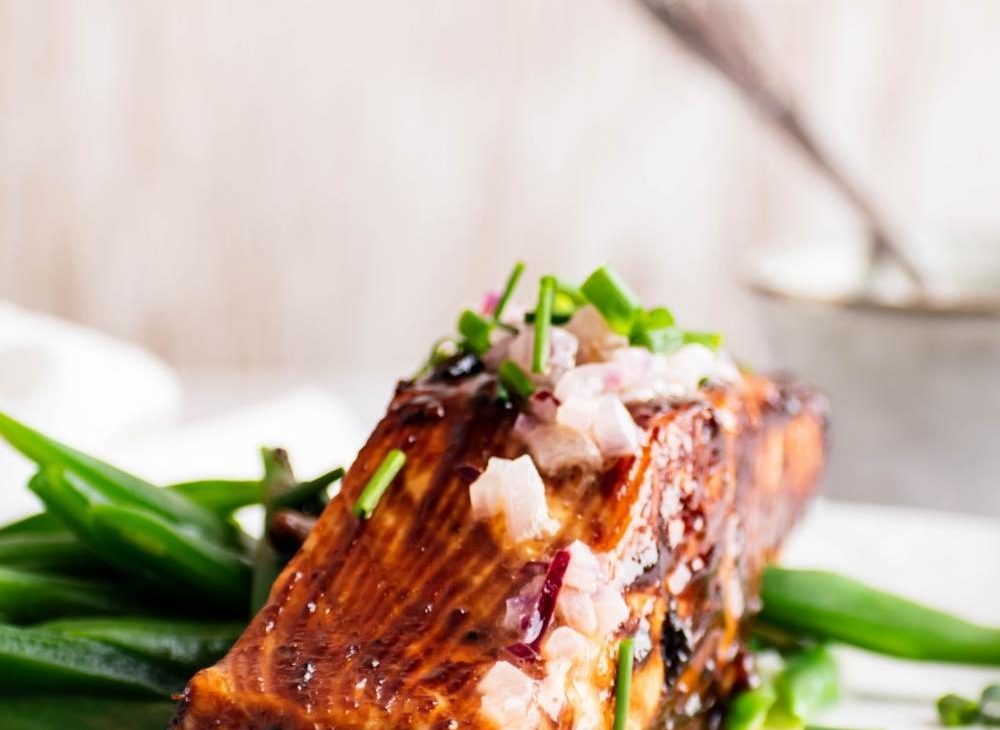
Prepare the snow peas by boiling 2-3 cups of saltwater and blanching the snow peas for 8-10 minutes. Allow them to cool in an ice bath. Dry off and sauteé with 1 teaspoon of olive oil, frequently stirring (2-3 minutes). Set aside.
Step 4 — Prep the pan and oven
Preheat the oven to 375°F. Line a metal baking sheet with aluminum foil and apply some olive oil to it.
Step 5 — Cook to the right cue
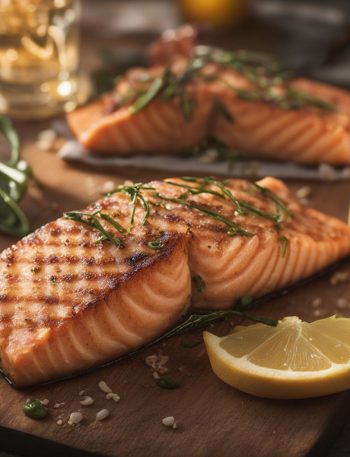
Now, place the salmon fillets on the baking sheet and bake for about 12 minutes or until flaky but still pink inside.
Step 6 — Add the butter allow
In a small saucepan, combine the minced shallot and sake over medium-low heat until you have about two tablespoons, then remove from the heat and add the butter. Allow the butter to melt on its own and keep it warm near the stovetop with its melted combination.
Step 7 — Dip and coat
Serve the salmon with a side of steamy white rice and snow peas or use as a dip for salmon pieces.; then enjoy them over a few spoonfuls of sake butter sauce.
What I watch for while it cooks
I look for the first real aroma before I move forward: garlic softening, miso caramelizing, meat browning, or butter turning glossy. Those signs tell me the flavor is building instead of just heating.
If the pan seems dry, I lower the heat before adding more fat. If the sauce tastes flat, I adjust salt or acid at the end, when the main ingredient is already cooked and resting.
Tips from my kitchen
- I prep first. Once the heat is on, I do not want to stop and mince garlic or measure sauce.
- I taste before serving. Salt, acid, and heat are easiest to adjust at the end.
- I watch the pan. A recipe clock is useful, but color, aroma, and texture tell me more.
- I rest when needed. A few quiet minutes can keep meat juicy, sauces smooth, and vegetables from steaming out.
Variations I have actually tried
- Brighter finish: I add lemon, lime, vinegar, or fresh herbs right before serving.
- More heat: I use a small pinch of chile or extra black pepper rather than overwhelming the base.
- Richer version: I finish with butter, cheese, cream, or olive oil when the dish can handle it.
- Lighter plate: I serve it with greens, rice, or roasted vegetables instead of adding more sauce.
- Meal-prep style: I keep the components separate and combine them after reheating.
How I store and reheat it
I cool leftovers quickly, cover them well, and refrigerate them. When reheating, I use gentle heat and add a splash of water, broth, milk, or sauce if the dish looks tight.
I label leftovers when I freeze them because future me never remembers what is in the foil packet. For anything crisp, I reheat uncovered for the last few minutes so steam can escape.
What I serve with it
I serve it with something simple on the side so the main flavor stays clear. Rice, greens, tortillas, bread, or a crisp salad usually does the job without crowding the plate.
Small things that make a difference
I keep one clean towel nearby, clear a landing spot before the pan comes out, and read the next step before I start the current one. Those habits sound small, but they keep me from overcooking something while I hunt for a rack, bowl, or serving spoon.
I also taste or check texture before I call the recipe finished. A pinch of salt, a little more acid, a few extra minutes of cooling, or a short rest can be the difference between food that is fine and food I want to make again.
When a recipe is simple, I pay more attention rather than less. There are fewer places to hide a scorched edge, watery sauce, under-seasoned bite, or gummy center. I set out the serving dish early, keep the heat moderate, and give myself room to adjust.
I write these little notes because they are the parts I forget when I am tired. The ingredient list tells me what to buy, but the rhythm tells me how to cook without feeling chased by the timer.
Frequently asked questions
Can I make Miso salmon Cheesecake Factory ahead?
Yes, but I separate any crisp, fresh, or saucy parts when possible. That keeps the texture closer to fresh when I reheat or assemble.
Can I double the recipe?
Usually yes. I use a wider pan or cook in batches so the food browns instead of steaming, and I season gradually near the end.
What if I do not have every ingredient?
I swap within the same family: another herb for an herb, another acid for vinegar or citrus, and a similar dairy or oil for richness. I avoid changing the main ingredient.
How do I know it is done?
I look for the cue in the instructions first: bubbling sauce, tender vegetables, flaky fish, or cooked-through chicken. The clock gets me close, but the cue finishes the job.
How should I reheat leftovers?
I reheat gently. A covered skillet, low oven, or short microwave bursts keep the dish from drying out, and I add a spoonful of water or sauce if it needs moisture.
If you make Miso salmon Cheesecake Factory, I would love to hear what you changed, what you served with it, and whether the timing cues matched your kitchen.
Miso salmon Cheesecake Factory
Description
Miso salmon Cheesecake Factory with first-person notes, clear timing cues, practical ingredient guidance, and storage advice from my kitchen. I kept the source quantities intact and rewrote the method so it feels usable at the counter.
Ingredients You’ll Need
Instructions
- In a small mixing dish, combine the miso paste, brown sugar, rice vinegar, and soy sauce for the miso marinade and glaze. If it's too thick, add a tablespoon or two of hot water to thin it out.
- Place the salmon fillets in the miso marinade bowl and coat them with it. Cover them with plastic wrap and refrigerate them for at least 30 minutes.
- Prepare the snow peas by boiling 2-3 cups of saltwater and blanching the snow peas for 8-10 minutes. Allow them to cool in an ice bath. Dry off and sauteé with 1 teaspoon of olive oil, frequently stirring (2-3 minutes). Set aside.
- Preheat the oven to 375°F. Line a metal baking sheet with aluminum foil and apply some olive oil to it.
- Now, place the salmon fillets on the baking sheet and bake for about 12 minutes or until flaky but still pink inside.
- In a small saucepan, combine the minced shallot and sake over medium-low heat until you have about two tablespoons, then remove from the heat and add the butter. Allow the butter to melt on its own and keep it warm near the stovetop with its melted combination.
- Serve the salmon with a side of steamy white rice and snow peas or use as a dip for salmon pieces.; then enjoy them over a few spoonfuls of sake butter sauce.
Note
I prep first. Once the heat is on, I do not want to stop and mince garlic or measure sauce.
I taste before serving. Salt, acid, and heat are easiest to adjust at the end.
I watch the pan. A recipe clock is useful, but color, aroma, and texture tell me more.
I rest when needed. A few quiet minutes can keep meat juicy, sauces smooth, and vegetables from steaming out.
Frequently Asked Questions
Yes, but I separate any crisp, fresh, or saucy parts when possible. That keeps the texture closer to fresh when I reheat or assemble.
Usually yes. I use a wider pan or cook in batches so the food browns instead of steaming, and I season gradually near the end.
I swap within the same family: another herb for an herb, another acid for vinegar or citrus, and a similar dairy or oil for richness. I avoid changing the main ingredient.
I look for the cue in the instructions first: bubbling sauce, tender vegetables, flaky fish, or cooked-through chicken. The clock gets me close, but the cue finishes the job.
I reheat gently. A covered skillet, low oven, or short microwave bursts keep the dish from drying out, and I add a spoonful of water or sauce if it needs moisture.