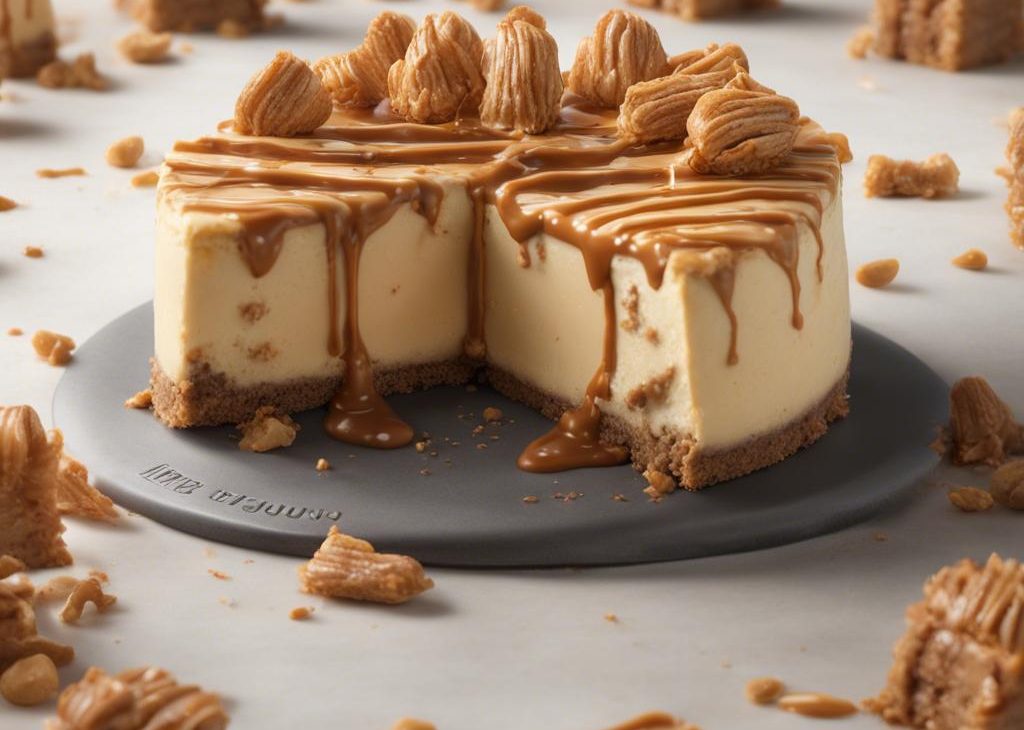

I make Peanut Butter Butterfinger Cheesecake when I want something familiar but not careless. The ingredient list is straightforward, yet the small details matter: the pan heat, the order things go into the bowl, and whether I stop cooking before the texture gets tired.
This version keeps the original timing in view: 30 min prep, 1 hr cook time. I like that because I can decide before I start whether it fits a weeknight, a slow Saturday, or the kind of afternoon when dessert has to chill before dinner.
The flavor leans on Oreo cookies, cream cheese, granulated sugar. I do not dress it up with extra fuss; I focus on getting the texture right and seasoning in layers so every bite tastes intentional.
Why I keep coming back to this
- It uses ingredients I can find easily, and I do not need a specialty pan unless the recipe already calls for one.
- The steps are forgiving as long as I pay attention to heat and texture.
- It works for leftovers; I include exactly how I store it because that matters after the first serving.
- The flavor is clear enough for family dinner but interesting enough that I do not get bored making it.
- I can prep the ingredients before I start and move through the recipe without hunting for a missing measuring spoon.
- It gives me a reliable result without pretending every kitchen or oven behaves the same way.
What I check before I start
Before I touch the Oreo cookies, I read the directions once and clear the counter. That sounds basic, but it prevents the mistake I used to make: starting the hot step and then realizing the next ingredient was still cold, unopened, or across the room.
If the recipe uses an oven temperature, I give the oven a real preheat and use the middle rack unless the directions say otherwise. If it is stovetop, I keep the heat a little lower than my impatient side wants; sauces and batters both behave better when I do not bully them.
What you need and what each ingredient does
- 22 regular Oreo cookies (not Double-Stuf).
- 5 Tablespoons unsalted butter, melted (71g). keeps the sweet and savory notes from tasting flat.
- 24 ounces cream cheese, softened (678g).
- 1 cup granulated sugar (200g). sweetens and helps with browning.
- 3/4 cup sour cream (180g).
- 1/2 cup creamy peanut butter (125g).
- 2 teaspoons pure vanilla extract. rounds out the flavor so it does not taste one-note.
- 3 large eggs, at room temperature. binds the mixture and gives it structure.
- 12 fun-size Butterfinger candy bars, chopped (or 5 regular-size).
- 1/4 cup melted peanut butter for drizzling, optional.
How I make it
Step 1 — Heat the oven and set up
I adjust oven rack to the lower third position and preheat the oven to 350°F (177°C). Lightly grease a 9-inch springform pan with nonstick cooking spray. Set aside. I do this first so the rest of the recipe has somewhere to go as soon as it is mixed or cooked.
Step 2 — Combine the ingredients
In a food processor or blender, pulse the whole Oreos (cream filling and cookie) into a fine crumb. You should have about 2 cups (packed) crumbs, or 250g.
Step 3 — Bake
I bake crust for 10 minutes. Allow to slightly cool as you prepare the filling. Leave oven on.
Step 4 — Beat until smooth
Using a handheld or stand mixer fitted with a paddle attachment, beat the cream cheese and granulated sugar together on medium speed in a large bowl—about 3 full minutes until.
Step 5 — Bring to a boil
If needed for extra visuals, see my How to Make a Cheesecake Water Bath; the visual guide will assist you in this step. Boil a pot of water. You need.
Step 6 — Bake
I bake for 50-60 minutes or until the center is almost set.* Turn the oven off and open the door slightly. Let the cheesecake sit in the oven for 1 hour.
Step 7 — Let it rest
I loosen the cheesecake from the rim of the pan and remove the rim. Top with additional chopped Butterfingers and drizzle with melted peanut butter. Cut into slices and serve chilled.Cover. I give it the final rest or finish here, because cutting or serving too soon is where texture often suffers.
Tips from my kitchen
- Measure the flour lightly. I spoon it into the cup and level it off so the crumb does not turn heavy.
- Room-temperature ingredients help. Butter, eggs, dairy, and cream cheese blend more evenly when they are not icy cold.
- Check early. I start checking a few minutes before the low end of the bake time because my oven runs hot in the back corner.
- Cool before slicing or frosting. Warm centers are fragile, and frosting melts fast when I rush.
Variations I have actually tried
- Crunchy peanut butter: I use it when I want a little texture without adding another topping.
- Chocolate swap: Dark chocolate chips make the sweetness feel more balanced.
- Salted finish: A tiny pinch of flaky salt on top helps the peanut flavor stand out.
- Nut-free direction: Sunflower seed butter works, though the flavor is earthier and the color can be darker.
- Extra vanilla: I add another 1/4 teaspoon when the recipe leans dessert-heavy.
Storing and reheating
I cool Peanut Butter Butterfinger Cheesecake completely before covering it.
For reheating, I use short microwave bursts or a low oven rather than high heat. If there is icing, frosting, or glaze, I usually let the piece come closer to room temperature instead of trying to warm it.
What I serve with it
I usually serve Peanut Butter Butterfinger Cheesecake with something simple: coffee, cold milk, unsweetened tea, or fresh fruit. If the recipe is rich, I keep the sides plain so the main flavor still has room to be noticed.
Frequently asked questions
Can I make Peanut Butter Butterfinger Cheesecake ahead?
Yes. I usually make it earlier in the day or the night before if chilling helps the texture. I wait on delicate toppings when I can.
How do I know it is done?
I look for the visual cue in the directions first, then use a toothpick, gentle press, or center wobble test depending on the recipe.
Can I reduce the sugar?
I am careful with sugar because it affects moisture and browning. If I reduce anything, I start with the topping or drizzle rather than the batter.
Can I freeze it?
Most unfrosted baked portions freeze well when wrapped tightly. Creamy or custardy desserts can change texture, so I freeze a small test piece first.
Why did mine turn dense?
The usual causes are overmixing, too much flour, cold ingredients, or baking a little too long. I mix only until the batter comes together.
If you make Peanut Butter Butterfinger Cheesecake, tell me what small tweak you tried — I always like hearing which detail mattered most in another kitchen.
Peanut Butter Butterfinger Cheesecake
Description
I make Peanut Butter Butterfinger Cheesecake with Oreo cookies, cream cheese, granulated sugar and a practical, tested order of steps. The recipe keeps the original timing, gives clear texture cues, and includes my storage notes so leftovers stay useful.
Ingredients You’ll Need
Instructions
- Adjust oven rack to the lower third position and preheat the oven to 350°F (177°C). Lightly grease a 9-inch springform pan with nonstick cooking spray. Set aside.
- In a food processor or blender, pulse the whole Oreos (cream filling and cookie) into a fine crumb. You should have about 2 cups (packed) crumbs, or 250g. Combine the Oreo crumbs and melted butter together in a medium bowl. Press tightly into the bottom and up the sides of prepared pan. Wrap aluminum foil on the bottom and tightly around the outside walls of the springform pan. This helps prevent leakage.
- Bake crust for 10 minutes. Allow to slightly cool as you prepare the filling. Leave oven on.
- Using a handheld or stand mixer fitted with a paddle attachment, beat the cream cheese and granulated sugar together on medium speed in a large bowl—about 3 full minutes until the mixture is smooth and creamy. Add the sour cream, peanut butter, and vanilla, beat until combined. On low speed, add the eggs one at a time, beating after each addition until just blended. Do not overmix the filling after you have added the eggs. Using a rubber spatula or large wooden spoon, fold in 3/4 of your chopped Butterfingers. The rest will be for decorating the top of the finished cheesecake.
- If needed for extra visuals, see my How to Make a Cheesecake Water Bath; the visual guide will assist you in this step. Boil a pot of water. You need 1 inch of water in your roasting pan for the water bath, so make sure you boil enough. I use an entire kettle of hot water. As the water is heating up, wrap the aluminum foil around the springform pan. Place the pan inside of a large roasting pan. Pour the cheesecake batter on top of the crust. Use a rubber spatula or spoon to smooth it into an even layer. Carefully pour the hot water inside of the pan and place in the oven. (Or you can place the roasting pan in the oven first, then pour the hot water in. Whichever is easier for you.).
- Bake for 50-60 minutes or until the center is almost set.* Turn the oven off and open the door slightly. Let the cheesecake sit in the oven for 1 hour. Remove from the oven and allow to cool completely at room temperature. Refrigerate for at least 6 hours or overnight (preferred).
- Loosen the cheesecake from the rim of the pan and remove the rim. Top with additional chopped Butterfingers and drizzle with melted peanut butter. Cut into slices and serve chilled.Cover leftover cheesecake and store in the refrigerator for up to 4 days.
Nutrition Facts
Servings 12
- Amount Per Serving
- Calories 393kcal
- % Daily Value *
- Total Fat 32g50%
- Saturated Fat 17g85%
- Trans Fat 0.8g
- Cholesterol 83mg28%
- Sodium 196mg9%
- Potassium 169mg5%
- Total Carbohydrate 22g8%
- Dietary Fiber 1g4%
- Sugars 20g
- Protein 6g12%
- Calcium 76 mg
- Iron 0.8 mg
* Percent Daily Values are based on a 2,000 calorie diet. Your daily value may be higher or lower depending on your calorie needs.
Note
Prep first. I measure the ingredients before heat is involved so I can move without scrambling.
Watch texture. I use the times as a guide, but the visual cue tells me when to stop.
Season gently. I taste near the end and adjust in small amounts.
Store smart. I cool leftovers before covering so steam does not make the texture soggy.
Frequently Asked Questions
Yes. I usually make it earlier in the day or the night before if chilling helps the texture. I wait on delicate toppings when I can.
I look for the visual cue in the directions first, then use a toothpick, gentle press, or center wobble test depending on the recipe.
I am careful with sugar because it affects moisture and browning. If I reduce anything, I start with the topping or drizzle rather than the batter.
Most unfrosted baked portions freeze well when wrapped tightly. Creamy or custardy desserts can change texture, so I freeze a small test piece first.
The usual causes are overmixing, too much flour, cold ingredients, or baking a little too long. I mix only until the batter comes together.
You may also like...