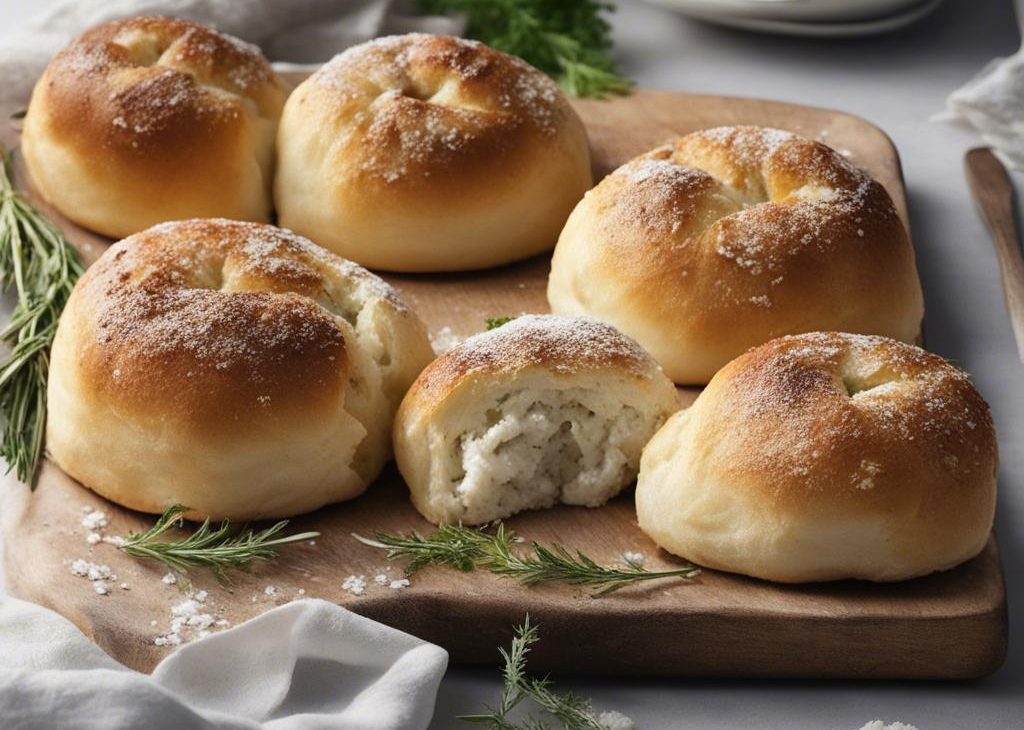

I treat Sea Salt and Herb Skillet Rolls as a small bread project with a big payoff. The dough needs time, but most of that time is hands-off, and the kitchen smells better every hour it sits.
Bread has taught me not to panic when dough looks shaggy at first. I give it the full rest, keep my hands lightly floured, and let the oven do the final work.
This rewrite keeps the original rise and bake cues while spelling out the small checks I use at home: tacky dough, a confident rise, and a crust that sounds hollow when tapped.
Why I keep coming back to this
- It gives me a clear result without needing restaurant equipment; the biggest tool is attention.
- The ingredient list is straightforward enough that I can shop once and cook without hunting for specialty items.
- The timing is flexible in the right places, but I keep the listed heat and bake or cook windows intact.
- I can taste and adjust near the end, which is especially useful when salt, sweetness, or spice varies by brand.
- Leftovers hold up well when I cool and store them properly instead of leaving everything uncovered on the counter.
- It works for a regular weeknight, but it still feels like I put real care into the meal.
What I use and why it matters
- 1 cup warm whole milk (240ml).This brings richness and moisture, and I keep it at the temperature the method asks for.
- 2 and 2 1/4 teaspoons active dry yeast (1 standard packet).it. I check the expiration date; old yeast will not rise no matter what else you do right.
- 2 Tablespoons granulated sugar, divided.so I do not casually cut it in half.
- 1 large egg, at room temperature.it. It binds the wet and dry ingredients and adds a slight richness.
- 1/4 cup unsalted butter, softened (4 Tablespoons; 56g).wildly. I melt it gently so it blends into the batter without leaving greasy pockets.
- 1 teaspoon salt.wildly.
- 2 teaspoons each: dried rosemary, dried basil, & dried parsley*.it.
- 1 teaspoon garlic powder (or 2 teaspoons minced garlic).wildly. I mince it fine so it distributes evenly through the dish.
- 3 cups all-purpose flour (390g).This sets the body of the recipe; too much handling can make the texture heavy.
- flaky sea salt or coarse sea salt, for topping.wildly.
How I make it
Step 1-2 — Work steadily
I whisk the warm milk, yeast, and 1 Tablespoon sugar together in the bowl of your stand mixer. Cover and allow to sit for 5 minutes. *If you do not own a stand mixer, you can do this in a large mixing bowl and in the next step, mix the dough together with a large wooden spoon/silicone spatula. It will take a bit of arm muscle. A hand mixer works, but the sticky dough repeatedly gets stuck in the beaters. Mixing by hand with a wooden spoon or silicone spatula is a better choice.* Add the remaining sugar, egg, 2 Tablespoons butter, salt, rosemary, basil, parsley, garlic powder, and 1 cup flour. With a dough hook or paddle attachment, mix/beat on low speed for 30 seconds, scrape down the sides of the bowl with a silicone spatula, then add the remaining flour. Beat on medium speed until the dough comes together and pulls away from the sides of the bowl, about 2 minutes. If the dough seems too wet to a point where kneading (next step) would be impossible, beat in more flour 1 Tablespoon at a time until you have a workable dough. Dough should be soft and a little sticky, but still manageable to knead with lightly floured hands.
Step 3-4 — Work steadily
I keep the dough in the mixer and beat for an additional 5 full minutes, or knead by hand on a lightly floured surface for 5 full minutes..) If the dough becomes too sticky during the kneading process, sprinkle 1 teaspoon of flour at a time on the dough or on the work surface/in the bowl to make a soft, slightly tacky dough. Do not add more flour than you need because you do not want a dry dough. After kneading, the dough should still feel a little soft. Poke it with your finger—if it slowly bounces back, your dough is ready to rise. You can also do a “windowpane test” to see if your dough has been kneaded long enough: tear off a small (roughly golfball-size) piece of dough and gently stretch it out until it’s thin enough for light to pass through it. Hold it up to a window or light. Does light pass through the stretched dough without the dough tearing first? If so, your dough has been kneaded long enough and is ready to rise. If not, keep kneading until it passes the windowpane test. Lightly grease a large bowl with oil or nonstick spray. Place the dough in the bowl, turning it to coat all sides in the oil. Cover the bowl with aluminum foil, plastic wrap, or a clean kitchen towel. Allow the dough to rise in a relatively warm environment for 1-2 hours or until double in size.
Step 5-6 — Work steadily
I grease a 10-12 inch oven-safe skillet or 9×13-inch baking pan. If using cast iron skillet and it’s already seasoned, no need to grease it. You can also bake the rolls on a lined baking sheet. When the dough is ready, punch it down to release the air. Divide the dough into 12 equal pieces. (Just eyeball it—doesn’t need to be perfect!) Shape each piece into a smooth ball. Arrange in prepared skillet/baking pan or a couple inches apart on a lined baking sheet.
Step 7-8 — Work steadily
I cover shaped rolls with aluminum foil, plastic wrap, or a clean kitchen towel. Allow to rise until puffy, about 45-60 minutes. Adjust oven rack to a lower position and preheat oven to 350°F (177°C). (It’s best to bake the rolls towards the bottom of the oven so the tops don’t burn.)
Step 9-10 — Work steadily
I bake for 23-27 minutes or until golden brown on top, rotating the pan halfway through. If you notice the tops browning too quickly, loosely tent the pan with aluminum foil. Remove from the oven, brush warm rolls with remaining melted butter and sprinkle tops with sea salt. Cool for a few minutes before serving. Cover leftover rolls tightly and store at room temperature for 2-3 days or in the refrigerator for up to 1 week.
The cues I watch for
For Sea Salt and Herb Skillet Rolls, I pay attention to smell, color, and resistance. A timer gets me close, but I still check the surface, the edges, and the thickest part before I move on. If a pan looks crowded, I would rather use a second pan than trap steam and lose browning.
Tips from my kitchen
- Measure first.I set out the ingredients before heat is involved; it keeps me from overcooking while I search for one small item.
- Respect the rest.If the recipe calls for cooling, chilling, or standing time, I treat it as part of the cooking, not an optional pause.
- Use visual checks/li>
- Season in layers.I add salt where the method asks and taste at the end, because a final pinch can make the whole batch clearer.
- Write down changes.If I swap a pan or ingredient, I note it so the next batch is not a guessing game.
Variations I have actually tried
- A little more heat:I add crushed red pepper, chili garlic sauce, cayenne, or a pinch of hot seasoning when the dish can handle it.
- Fresh finish:I use parsley, basil, cilantro, lemon zest, or scallions at the end when the main flavors need brightness.
- Pan swap:I use the closest pan size I own, then start checking early if the food is spread thinner or add a few minutes if it is deeper.
- Make-ahead version:I prep the dry mix, sauce, filling, or chopped vegetables earlier in the day and keep wet ingredients separate until cooking.
- Richer version:I
For reheating, I use gentle heat first: a low oven for baked items and crisp foods, a covered skillet for saucy mains, or short microwave bursts for single portionsI like a slow refrigerator rest because it improves flavor and makes the schedule easier. I keep the dough covered so the surface does not dry out.
Why is my dough sticky?
Sticky dough is normal in many bread recipes. I flour my hands lightly, but I avoid adding handfuls of flour because that can make the finished bread tough or dry.
How do I know it is baked through?
I look for a browned crust and a hollow sound when tapped. If I am unsure, I give it a few more minutes rather than cutting into a gummy center.
Can I freeze the bread?
Yes. I cool it fully, wrap it well, and freeze. For rolls, I freeze them individually; for a loaf, I slice first so I can toast only what I need.
What should I serve with it?
I serve it with soups, stews, eggs, roasted vegetables, or a simple spread of butter. Fresh bread does not need much help.
If you make Sea Salt and Herb Skillet Rolls, I would love to hear what you changed and what you kept exactly the same.

Sea Salt and Herb Skillet Rolls
Description
Sea Salt and Herb Skillet Rolls written from my kitchen notes with practical timing cues, storage notes, and the original ingredient framework. I use warm whole milk, 2 1/4 teaspoons active dry yeast, granulated sugar, egg and keep the method clear from prep to serving.
Ingredients You’ll Need
Instructions
- Whisk the warm milk, yeast, and 1 Tablespoon sugar together in the bowl of your stand mixer. Cover and allow to sit for 5 minutes. *If you do not own a stand mixer, you can do this in a large mixing bowl and in the next step, mix the dough together with a large wooden spoon/silicone spatula. It will take a bit of arm muscle. A hand mixer works, but the sticky dough repeatedly gets stuck in the beaters. Mixing by hand with a wooden spoon or silicone spatula is a better choice.*.
- Add the remaining sugar, egg, 2 Tablespoons butter, salt, rosemary, basil, parsley, garlic powder, and 1 cup flour. With a dough hook or paddle attachment, mix/beat on low speed for 30 seconds, scrape down the sides of the bowl with a silicone spatula, then add the remaining flour. Beat on medium speed until the dough comes together and pulls away from the sides of the bowl, about 2 minutes. If the dough seems too wet to a point where kneading (next step) would be impossible, beat in more flour 1 Tablespoon at a time until you have a workable dough. Dough should be soft and a little sticky, but still manageable to knead with lightly floured hands.
- Keep the dough in the mixer and beat for an additional 5 full minutes, or knead by hand on a lightly floured surface for 5 full minutes..) If the dough becomes too sticky during the kneading process, sprinkle 1 teaspoon of flour at a time on the dough or on the work surface/in the bowl to make a soft, slightly tacky dough. Do not add more flour than you need because you do not want a dry dough. After kneading, the dough should still feel a little soft. Poke it with your finger—if it slowly bounces back, the dough is ready to rise. You can also do a "windowpane test" to see if the dough has been kneaded long enough: tear off a small (roughly golfball-size) piece of dough and gently stretch it out until it's thin enough for light to pass through it. Hold it up to a window or light. Does light pass through the stretched dough without the dough tearing first? If so, the dough has been kneaded long enough and is ready to rise. If not, keep kneading until it passes the windowpane test.
- Lightly grease a large bowl with oil or nonstick spray. Place the dough in the bowl, turning it to coat all sides in the oil. Cover the bowl with aluminum foil, plastic wrap, or a clean kitchen towel. Allow the dough to rise in a relatively warm environment for 1-2 hours or until double in size.
- Grease a 10-12 inch oven-safe skillet or 9×13-inch baking pan. If using cast iron skillet and it's already seasoned, no need to grease it. You can also bake the rolls on a lined baking sheet.
- When the dough is ready, punch it down to release the air. Divide the dough into 12 equal pieces. (Just eyeball it—doesn't need to be perfect!) Shape each piece into a smooth ball. Arrange in prepared skillet/baking pan or a couple inches apart on a lined baking sheet.
- Cover shaped rolls with aluminum foil, plastic wrap, or a clean kitchen towel. Allow to rise until puffy, about 45-60 minutes.
- Adjust oven rack to a lower position and preheat oven to 350°F (177°C). (It's best to bake the rolls towards the bottom of the oven so the tops don't burn.).
- Bake for 23-27 minutes or until golden brown on top, rotating the pan halfway through. If you notice the tops browning too quickly, loosely tent the pan with aluminum foil. Remove from the oven, brush warm rolls with remaining melted butter and sprinkle tops with sea salt. Cool for a few minutes before serving.
- Cover leftover rolls tightly and store at room temperature for 2-3 days or in the refrigerator for up to 1 week.
Nutrition Facts
Servings 12
- Amount Per Serving
- Calories 157kcal
- % Daily Value *
- Total Fat 4g7%
- Saturated Fat 2g10%
- Trans Fat 0.2g
- Cholesterol 10mg4%
- Sodium 161mg7%
- Potassium 40mg2%
- Total Carbohydrate 26g9%
- Dietary Fiber 1g4%
- Sugars 2g
- Protein 3g6%
- Calcium 6 mg
- Iron 1.5 mg
* Percent Daily Values are based on a 2,000 calorie diet. Your daily value may be higher or lower depending on your calorie needs.
Note
Prep before heat. I measure everything for Sea Salt and Herb Skillet Rolls before I turn on the stove or oven.
Watch the texture. The clock is a guide; color, thickness, and aroma tell me when to move on.
Rest when directed. Cooling or chilling time makes slicing, serving, and storing much easier.
Taste at the end. A small pinch of salt, splash of acid, or fresh garnish can make the flavors clearer.
sea salt and herb skillet rolls, homemade recipe, warm whole milk, teaspoons active dry yeast, granulated sugar divided, egg at room temperature, unsalted butter softened, make ahead tips, easy method
Frequently Asked Questions
Yes. I like a slow refrigerator rest because it improves flavor and makes the schedule easier. I keep the dough covered so the surface does not dry out.
Sticky dough is normal in many bread recipes. I flour my hands lightly, but I avoid adding handfuls of flour because that can make the finished bread tough or dry.
I look for a browned crust and a hollow sound when tapped. If I am unsure, I give it a few more minutes rather than cutting into a gummy center.
Yes. I cool it fully, wrap it well, and freeze. For rolls, I freeze them individually; for a loaf, I slice first so I can toast only what I need.
I serve it with soups, stews, eggs, roasted vegetables, or a simple spread of butter. Fresh bread does not need much help.
You may also like...