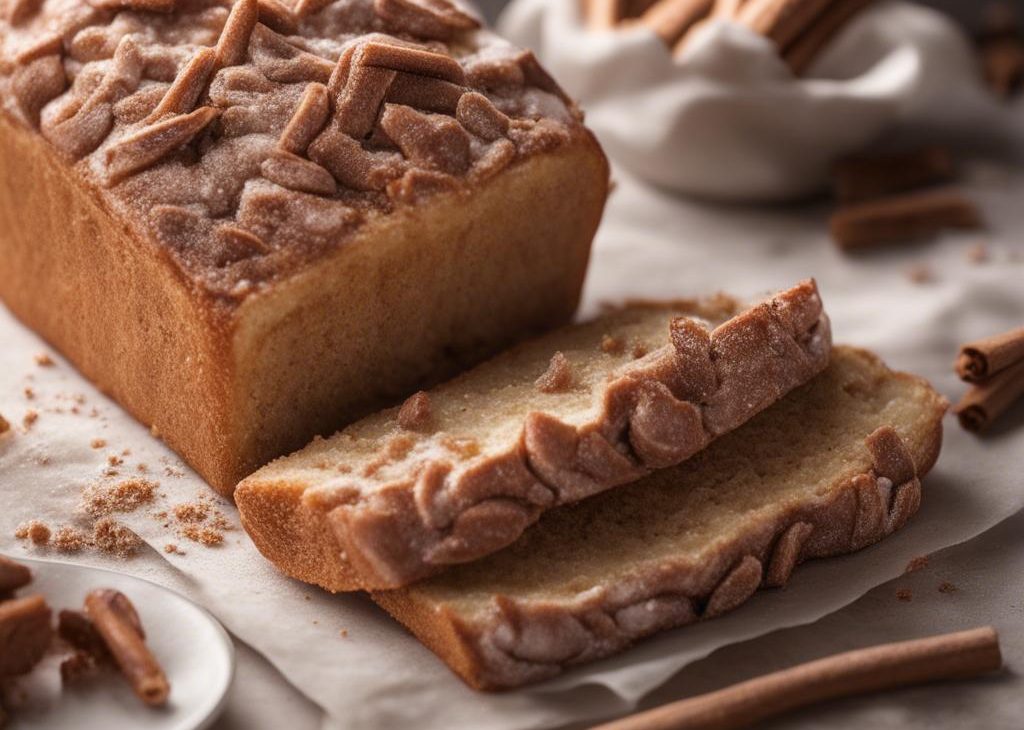

Rolled and twisted, this simple 8 ingredient bread dough transforms into an absolutely irresistible cinnamon crunch bread. Roll the dough up with a butter, cinnamon, and brown sugar filling, then create a crunch topping made from the same ingredients. Each bite is buttery, soft, and flaky with an unbelievable cinnamon sugar crunch crust on top.
Well well well…
Readers asked if they can use the same dough to make a sweet version, so I tweaked the recipe and swapped cheese for cinnamon. Then I topped the whole thing with a cinnamon crunch topping. (Ever have a Panera Bread cinnamon crunch bagel? Like that!)
And then I wondered why I’d been making it with cheese for so long. TALK ABOUT AN UPGRADE!
Tell Me About This Cinnamon Crunch Bread
- Flavor: The bread crumb is wonderfully buttery and sweet—definitely a breakfast or dessert bread. This is a lot like homemade cinnamon swirl bread, but we’re using brown sugar and there’s extra twisting so you get more pockets of cinnamon swirl in each slice.
- Texture: Because we have fat in the dough the bread is extra soft and flaky, almost like croissant bread. And using bread flour promises extra chew. These textures are the perfect contrast to the crunchy cinnamon crumbles on top. Each bite has something different—I know you’ll love that. It looks just like babka, but it’s not nearly as rich as, say, our apple cinnamon babka.
- Ease: There’s no arguing that homemade bread takes a little effort. But consider this a fun weekend or afternoon baking project. The dough is pretty straightforward and you use the same ingredients in both the cinnamon swirl filling AND cinnamon crunch topping. If you’re new to baking with yeast, review my Baking with Yeast Guide. Lots of helpful information there!
- Time: This dough requires 1 long rise, then a shorter 2nd rise. Once you understand the assembly process, the recipe moves pretty quickly. Set aside at least 4 hours from start to finish, but keep in mind most of that time is hands off as the dough rises.
If you are craving twisty cinnamon goodness, but don’t have time to let the dough rise, try these no yeast cinnamon rolls.
Overview: How to Make Cinnamon Crunch Bread
The following is an overview to help you understand the process before you get started. You’ll find the full printable recipe below.
Make and knead the dough, referencing my How to Knead Dough tutorial as needed. Then let it rise:
Punch down the risen dough, then roll out into rectangle. Spread extra soft butter on top, then sprinkle with your brown sugar and cinnamon mixture. Tightly roll it up cinnamon roll style. Place the log on its seam, then cut the log in half lengthwise using a sharp knife.
Criss-cross one half on top of the other half forming an X. Tightly twist the two together. Pinch the outer edges to seal as best you can, then place into a greased 9×5-inch loaf pan.
Let the dough rest and prepare the cinnamon crunch topping:
Can I Use This Cinnamon Crunch Topping on Bagels?
Yes yes and yes! This cinnamon crunch topping would be awesome on homemade bagels or cinnamon raisin bagels. Double the cinnamon crunch topping to ensure you have enough for an entire batch of bagels. After brushing the bagels with the egg wash in step 9 in that recipe, spoon cinnamon crunch topping on each before baking.
Testing the limit on “how much cinnamon swirl is too much cinnamon swirl?” Don’t pass up trying this because it’s even more ridiculously good than it looks!! And try this Cinnamon Swirl Cheesecake next!
Cinnamon Crunch Bread Recipe
Description
This is a basic soft bread dough that's rolled, twisted, filled, and topped with butter, cinnamon, and brown sugar. It looks like a lot of ingredients but the filling and topping ingredients are mostly the same. Read the recipe before starting so you're prepared for the rolling and twisting step.
Ingredients You’ll Need
Instructions
- Whisk the warm buttermilk, warm water, yeast, and 2 Tablespoons sugar together in the bowl of your stand mixer fitted with a dough hook or paddle attachment. Cover and allow to sit for 5 minutes or until foamy on top.
- Add the remaining sugar, the butter, egg, salt, and 1 cup flour. Beat on low speed for 30 seconds, scrape down the sides of the bowl with a silicone spatula, then add the remaining flour. Beat on low speed until the dough comes together and pulls away from the sides of the bowl, about 2 minutes. *If you do not own a mixer, you can mix this dough with a large wooden spoon or silicone spatula. It will take a bit of arm muscle.*
- Keep the dough in the mixer (and switch to the dough hook if using the paddle) and beat for an additional 5 full minutes, or knead by hand on a lightly floured surface for 5 full minutes..) If the dough becomes too sticky during the kneading process, sprinkle 1 teaspoon of flour at a time on the dough or on the work surface/in the bowl to make a soft, slightly tacky dough. Do not add more flour than you need because you do not want a dry dough. After kneading, the dough should still feel a little soft. Poke it with your finger—if it slowly bounces back, your dough is ready to rise. You can also do a “windowpane test” to see if your dough has been kneaded long enough: tear off a small (roughly golfball-size) piece of dough and gently stretch it out until it’s thin enough for light to pass through it. Hold it up to a window or light. Does light pass through the stretched dough without the dough tearing first? If so, your dough has been kneaded long enough and is ready to rise. If not, keep kneading until it passes the windowpane test.
- Lightly grease a large bowl with oil or nonstick spray. Place the dough in the bowl, turning it to coat all sides in the oil. Cover the bowl with aluminum foil, plastic wrap, or a clean kitchen towel. Allow the dough to rise in a relatively warm environment for 1.5-2 hours or until double in size. (I always let it rise on the counter. Takes about 2 hours. For a tiny reduction in rise time, see my answer to Where Should Dough Rise? in my Baking with Yeast Guide.)
- Grease a 9×5-inch loaf pan.
- Punch down the dough to release the air. Place dough on a lightly floured work surface and with a floured rolling pin, roll the dough out into a 9×15 inch rectangle (approximately).
- Spread softened butter all over the top of the dough, leaving a 1/2 inch border uncovered. The softer the butter is, the easier it is to spread in this step. (Microwave it for a few seconds to soften if needed.) Mix the brown sugar and cinnamon together, then sprinkle evenly all over the butter.
- . Tightly roll the dough into a 15-inch log. Place the log on its seam. Using a sharp knife, cut the log in half lengthwise. I find a serrated knife works best. Criss-cross one half on top of the other half—forming an X. Tightly twist the two together. Pinch the outer edges to seal as best you can. Place in prepared loaf pan and cover with aluminum foil, plastic wrap, or a clean kitchen towel. (This step can get a little messy!) Allow the covered loaf to rest for 30 minutes. It will slightly rise during this time.
- Adjust the oven rack to the lower third position. Place a baking sheet on the lower rack to catch any cinnamon/sugar that may drip down. Preheat the oven to 350°F (177°C).
- Whisk the melted butter, brown sugar, cinnamon, and flour together. Spoon over loaf right before baking.
- Bake until golden brown and, when gently tapped, the top of the loaf sounds hollow, about 45-55 minutes. The top browns quickly as it bakes, so tent the entire loaf with aluminum foil. (I usually place foil on top after about 20 minutes.) Remove finished bread the oven and place on a wire rack. Cool for 10 minutes in the pan, then remove from the pan and cool loaf on the wire rack.
- Slice and serve warm or at room temperature. Cover and store leftovers at room temperature for 2 days or in the refrigerator for up to 1 week. Leftover slices taste delicious when warmed in the microwave for 10 seconds. Topping tends to lose its crunch after a day or 2.
You may also like...