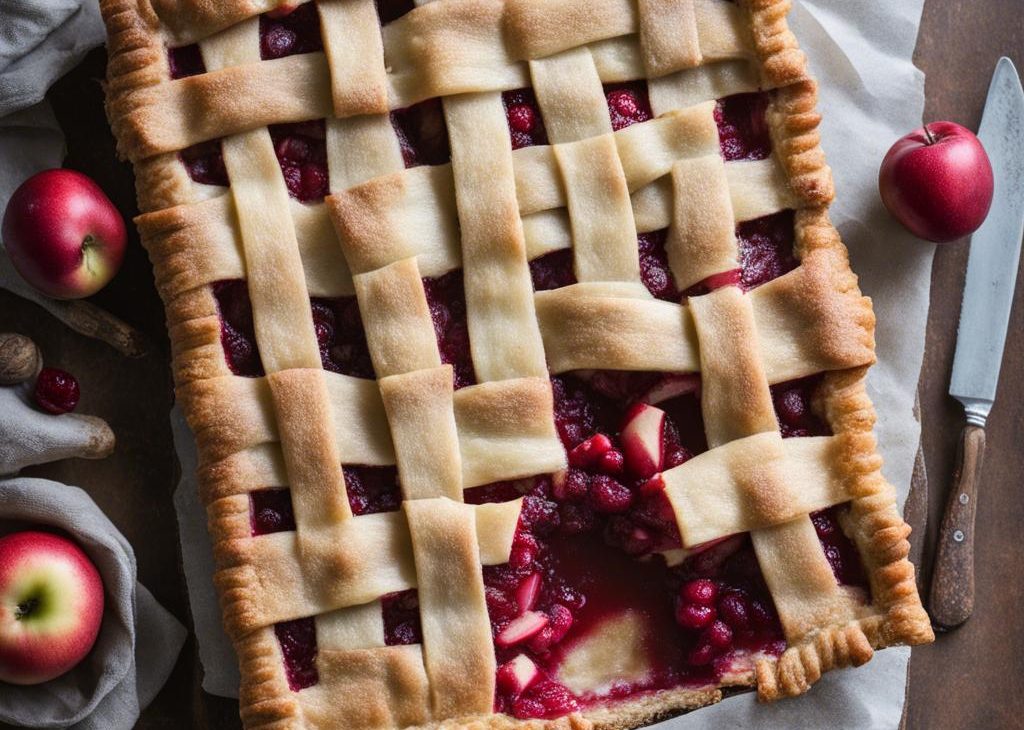

This cranberry apple slab pie is a smaller version of traditional slab pie. Baked free-form style on a baking sheet, this flatter pie barely has to cool before digging in! Juicy sweet cinnamon apples and tart cranberries taste fantastic with a buttery flaky golden pie crust. You need 2 crusts and you can use your favorite or store-bought version, but I encourage you to try my beloved pie crust recipe.
I don’t say this a lot but here goes nothing: sometimes it’s ok to break the baking rules!! And we’re definitely doing that today with this pie. This is a free-form style pie with no boundaries. 😉 Just make sure the top and bottom crusts are rolled thin enough and secured/pinched together to prevent excess leaking.
We’re basically making a giant pop-tart that’s welcome alongside your Thanksgiving pies. Might I add, it’s much easier to make than traditional apple pie, too.
Why You Will Love This Cranberry Apple Slab Pie
- Smaller version of a traditionally large slab pie—serves 8.
- Slab pie is cut into bars/rectangles so it’s an easy dessert to slice, serve, and freeze.
- It’s shallow, so there’s no need to fully cool before slicing and serving.
- No par-baking the bottom crust.
- Altogether flaky, buttery, sweet, tart, fruity, and spiced! If a scoop of sweet and tart cranberry sauce is a must on your Thanksgiving plate, you’ll love the pop of flavor that cranberries add in this slab pie.
- Or you can swap cranberries for more apples or another fruit.
I suppose you could say this is like my apple galette, only a bit thicker and with a top crust. And it’s a smaller version of this apple slab pie and includes cranberries. It’s really just… its own special thing!
Pie Dough
You can use your favorite pie crust recipe, but I encourage you to try mine. You need the full pie crust recipe, which makes 2 crusts. (1 for bottom of pie, 1 for top of pie.) I use a mix of shortening and butter because they work together to make the BEST crust. Butter adds flavor and flakiness, while shortening helps the dough stay pliable which is helpful when you’re rolling and shaping it. Plus, its high melting point is advantageous because it helps the crust stay tender while still maintaining shape. It’s the same crust I use for my pumpkin pie and pecan pie, too.
If you don’t want to use shortening, try my all butter pie crust recipe instead—it also yields 2 crusts.
3 Success Tips
Can I Bake This in a 9×13 Inch Pan?
You can, but the best option is a quarter sheet pan like this quarter sheet pan. The pie will take up the entire size of the pan, much like the full size apple slab pie takes up an entire half sheet pan. The lower sides help make sealing the pie dough edges a little easier. If you have and want to use a regular metal or glass 9×13-inch dish, you absolutely can! Avoid ceramic because the bottom crust will not cook through completely.
Tested Variations You Can Try
What Are the Best Apples to Use for Baking?
Firmer apples are ideal for baking so avoid soft, mealy, and mushy apples. And when a recipe calls for more than 1 or 2 apples, like today’s slab pie, apple crisp, or this apple crumble pie, it’s best to use a mix of tart apples and sweet apples.
- Tart apples for baking: Granny Smith (my absolute favorite apple for baking), Braeburn, Jonathan, and Pacific Rose
- Sweet apples for baking: Jazz, Honeycrisp, Pink Lady, and Fuji
For a detailed list of my favorite apple varieties, and when to use each, you can visit my post The Best Apples for Baking.
See Your Cranberry Apple Slab Pies!
Let Me Show You a Few Steps
For the filling, I recommend cutting the apples into chunks instead of slices. Since slab pie is thinner than regular pie, you can’t really layer the slices together to get enough apple in each bite. 1-inch chunks that are between 1/4- and 1/2-inch thick are ideal for this pie.
Set filling aside as you work on the bottom crust.
Tightly pile the filling on top leaving a 1.5-inch border around the edges. Dot with small pieces of butter..)
Full Top Crust:
Don’t forget to cut slits in the top for air vents.
Lattice Top Crust:
. I like folding excess dough back onto the edges of the pie so there’s more dough to work with when crimping or fluting the pie crust..
Cranberry Apple Slab Pie Recipe
Description
Baked free-form style on a baking sheet, this juicy, sweet, and tart cranberry apple slab pie barely has to cool before digging in! You need 2 crusts and you can use your favorite or store-bought version, but I encourage you to try either linked pie crust recipe below..
Ingredients You’ll Need
Instructions
- Prepare either pie crust recipe through step 5.
- In a large mixing bowl, stir the apples, cranberries, sugar, cornstarch, orange zest, cinnamon, allspice, and nutmeg together until combined. Set aside as you roll out the bottom pie crust. (Butter is used in step 5.)
- Line a half sheet pan with parchment paper or a silicone baking mat. Set aside. Make sure you have enough room in your refrigerator for the pan because the assembled pie must chill for at least 15 minutes before baking.
- Remove 1 disc of pie dough from the refrigerator. Keep the other in the refrigerator until you’re ready for the top crust. On a lightly floured work surface using a lightly floured rolling pin, begin rolling the dough out into a rectangle. Make sure to turn the dough about a quarter turn after every few rolls and to really ensure the dough isn’t sticking to the work surface, flip it over a few times during this process. Keep everything lightly floured. I find anywhere around a 10×14 inch rectangle is great. Dough should be about 1/8-inch thick. Tip: Your hands are your best tool in this step. Use your hands and fingers to smooth cracking edges and keep the sides straight.. Carefully transfer the rolled out dough to the lined pan.
- Using a spoon or your hands, tightly pile the filling onto the rolled out pie dough leaving a 1.5 inch border around the edges. Keep filling tight and compact to minimize air pockets. Discard any leftover juices in the filling bowl. Dot the pieces of butter on top of the filling. Fold dough edges over filling and pinch edges.
- . (Exact dimension doesn’t matter, but thickness does). Using a sharp knife or pizza cutter, cut 6 2-inch strips of dough.. Use a longer strip in the center of the pie and shorter strips on the ends. Fold center strip back. Place 4th strip diagonally in opposite direction over the end strips and under the center strip. Fold center strip back over 4th strip. Fold end strips back. Lay 5th strip in opposite direction on top. Unfold the 2 strips back so they lay over the 5th strip. Fold bottom center strip back. Place last strip in opposite direction over end strips and under center strip. Fold center strip back on top.. Drape over filling.
- If you have excess top crust dough that lays over the bottom dough edges, no need to trim it. Instead, fold the excess dough back to make a thicker edge and pinch together with the bottom pie dough to seal. Flute the edges with your fingers or crimp with a fork. If edges aren’t sealing well and fluting or crimping is too difficult, the dough may be too warm at this point. Stop what you are doing and refrigerate the pie for 10-15 minutes then try again. (Review my how to crimp and flute pie crust tutorial if you need extra help with this step.)
- Brush the pie dough with egg wash. If you used a full top crust (not lattice), use a sharp knife to cut 3-5 slits in the top crust for air vents. Refrigerate pie uncovered for 15 minutes as oven preheats. (Or refrigerate up to 1 day. Cover lightly if refrigerating longer than 15 minutes.)
- Preheat oven to 375°F (190°C).
- Bake pie for 45-55 minutes or until the top crust is golden brown and the filling’s juices have been bubbling up through the lattice/vents for at least 5 minutes.
- Remove pie from the oven and cool for 5 minutes before slicing and serving.
- Cover leftovers tightly and store in the refrigerator for up to 5 days.
You may also like...