
I make Ina Garten Flounder when I want a dish that earns its space on the table without requiring restaurant nerves. It is the kind of cooking where the small choices matter: heat level, when to salt, how long to rest, and whether the sauce or filling has enough body.
The first time I rush a recipe like this, I can usually taste it. Onions stay sharp, cheese breaks, meat gives up its juices, or the top browns before the middle is ready. Slowing down by five minutes saves more dinners than any special tool I own.
Why I keep this recipe in my notes
- The recipe has a clear backbone. I can tell what is meant to be eaty, creamy, crisp, or tender before I start.
- Seasoning happens in layers. I would rather add salt twice than try to fix a flat dish at the table.
- It can be prepped in pieces. Chopping, grating, whisking, and measuring ahead make the cooking part calmer.
- The leftovers have a plan. I include storage notes because that is how food actually gets eaten in my kitchen.
- It leaves room for taste. I give swaps that I have used without changing the source measurements.
What I use and why it matters
- fresh lemon juice. This is where the fresh flavor comes from. I cut it evenly so the pieces cook or season at the same pace.
- 6-8 cubes unsalted butter.
- 12 ounces arugula. It earns its place in the bowl. I add it in the order listed so the texture stays even and the seasoning is easier to control.
- Parmesan cheese (for serving). This brings richness. I add it evenly so every bite gets the same creamy or eaty finish.
- 4 tablespoons olive oil. This carries flavor and helps with browning. I watch the heat so the fat smells warm, not scorched.
- 2 1/2 cups bread crumbs. This is the structure.
- black pepper (to taste).
- 2 cups all-purpose flour. This is the structure.
- 4-6 eggs (beaten). Eggs bind the mixture and help it set. I bring them closer to room temperature when the recipe is baked.
- kosher salt (to taste).
- 12 flounder fillets. This is the main protein. I pay attention to size and doneness because that is where the dish succeeds or dries out.
How I make it
Step 1 — Preheat the oven
I preheat oven to 400°F (204°C). Place a sheet pan on the middle rack of the oven and let it heat up. I take a large bowl and combine flour, bread crumbs, salt, and pepper in it. Stir them until everything is evenly mixed together. Make sure that the breadcrumbs are evenly distributed.
Step 2 — Whisk together
I take a medium-sized bowl and whisk 2 to 3 large eggs in it until smooth and creamy. Beat the eggs properly until they become completely homogenous. Place the flounder on the sheet pan and bake for 12 minutes (until lightly golden brown). Turn them over halfway through baking. I heat butter and olive oil in a sauté pan on medium heat. Dip each side of the flounder in the egg mixture (using tongs) and then coat it with the flour-breadcrumbs mix. Keep doing this until all 6 fillets are coated properly with the flour-breadcrumb.
Step 3 — Fry until golden
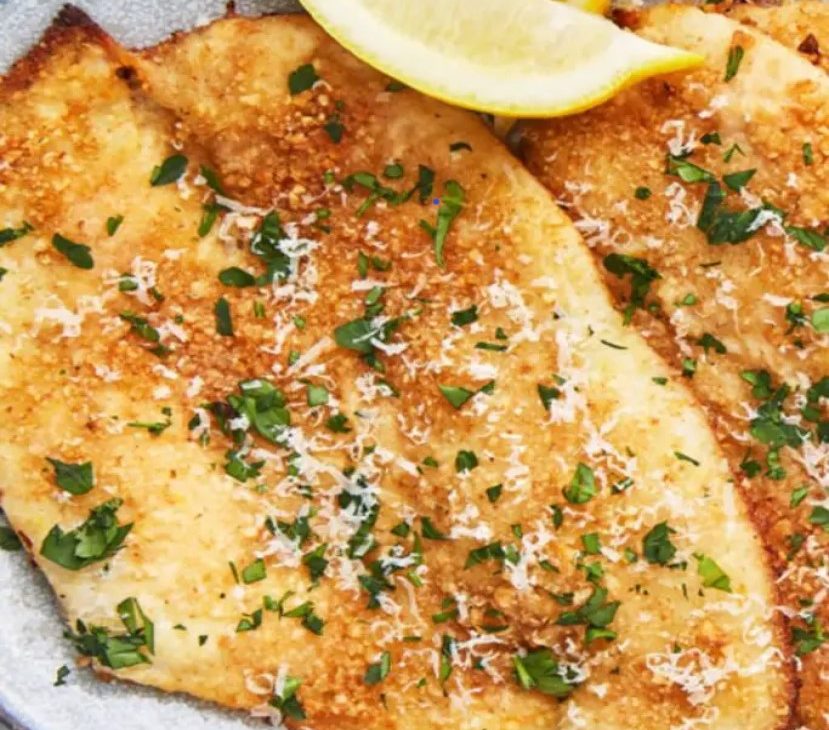
I place the flounder on the sauté pan and fry for 3 to 4 minutes (each side). Make sure that each side is golden brown before you flip them over. Remove the flounder from the sauté pan and place them on a plate lined with paper towels to absorb any excess oil. I arrange the flounders on a plate and sprinkle some lemon juice over them for added flavor. Serve with arugula salad and Parmesan cheese shavings, along with a side of freshly made Lemon Vinaigrette.
The cues I watch for
I watch the pan instead of turning the heat up and hoping. Medium heat gives me time to smell when garlic, onions, butter, or spices are ready.
I taste near the end, after the main ingredients have had time together. That is when salt, acid, and pepper make sense.
Tips from my kitchen
- Measure before heat. I line up the ingredients first so I am not hunting for salt while something is already browning.
- Trust the texture. If the mixture looks too loose, too dry, or uneven, I fix that before moving to the next step.
- Season in small moves. I add a little, taste when safe, and adjust. Big last-minute fixes rarely taste as clean.
- Use the pan size called for. Changing depth changes cook time, browning, and how the center sets.
- Keep heat moderate. A calmer pan gives me better browning and fewer bitter bits.
Variations I have actually tried
- Herb-forward: I finish with parsley, basil, cilantro, chives, or thyme if the dish already uses green herbs.
- A little heat: Red pepper flakes, jalapeno, or black pepper wake up rich dishes quickly.
- More vegetables: I add quick-cooking vegetables in small pieces so the original timing still works.
- Creamier finish: A spoon of sour cream, extra cheese, or a small splash of cream can soften sharper flavors.
- Leftover version: I fold leftovers into eggs, greens, pasta, or toast depending on the dish.
Storing and reheating
I cool leftovers until they stop steaming, then pack them in a shallow airtight container. Shallow storage cools faster and reheats more evenly.
For reheating, I use gentle heat. The microwave works for single portions, but the oven or stovetop keeps crisp or saucy textures in better shape when I have time.
What I serve with it
I like a simple side that does not fight the main dish: greens, rice, potatoes, bread, or a sharp salad. Rich food needs something fresh nearby, and lighter food likes a little starch.
Frequently asked questions
Can I make Ina Garten Flounder ahead?
Yes. I prep what I can early and store it covered, then finish the step that protects texture right before serving.
Can I change the main ingredient?
I keep the same quantity and choose a similar ingredient in size and moisture. Big swaps can change timing, so I watch the pan or oven closely.
How do I know it is done?
I look for the visual cue first, then use the timing as backup.
How should I store leftovers?
I cool leftovers first, then refrigerate them in an airtight container. For crisp foods, I reheat uncovered so steam does not soften the surface.
What if the flavor tastes flat?
I add a small pinch of salt or a little acid, then taste again. Rich dishes often need acid; sweet bakes often need salt.
If you make Ina Garten Flounder, tell me what you changed or what cue helped most; I read those notes before I make the next batch.
Ina Garten Flounder
Description
I make Ina Garten Flounder with the source quantities kept intact and the method rewritten around the cues I use in my own kitchen. The source timing is 15 min prep, 42 min cook, and I keep those numbers while watching the food instead of the clock alone. Expect practical steps, storage notes, and swaps that stay close to the original dish.
Ingredients You’ll Need
Instructions
- I preheat oven to 400°F (204°C). Place a sheet pan on the middle rack of the oven and let it heat up.
- I take a large bowl and combine flour, bread crumbs, salt, and pepper in it. Stir them until everything is evenly mixed together. Make sure that the breadcrumbs are evenly distributed.
- I take a medium-sized bowl and whisk 2 to 3 large eggs in it until smooth and creamy. Beat the eggs properly until they become completely homogenous. Place the flounder on the sheet pan and bake for 12 minutes (until lightly golden brown). Turn them over halfway through baking.
- I heat butter and olive oil in a sauté pan on medium heat. Dip each side of the flounder in the egg mixture (using tongs) and then coat it with the flour-breadcrumbs mix. Keep doing this until all 6 fillets are coated properly with the flour-breadcrumb mix.
- I place the flounder on the sauté pan and fry for 3 to 4 minutes (each side). Make sure that each side is golden brown before you flip them over. Remove the flounder from the sauté pan and place them on a plate lined with paper towels to absorb any excess oil.
- I arrange the flounders on a plate and sprinkle some lemon juice over them for added flavor. Serve with arugula salad and Parmesan cheese shavings, along with a side of freshly made Lemon Vinaigrette.
Nutrition Facts
Servings 10
- Amount Per Serving
- Calories 138kcal
- % Daily Value *
- Total Fat 6g10%
- Saturated Fat 1g5%
- Trans Fat 0.0g
- Sodium 1mg1%
- Potassium 27mg1%
- Total Carbohydrate 19g7%
- Dietary Fiber 1g4%
- Protein 3g6%
- Calcium 4 mg
- Iron 1.2 mg
* Percent Daily Values are based on a 2,000 calorie diet. Your daily value may be higher or lower depending on your calorie needs.
Note
Measure first. I set out every ingredient before heat or mixing starts so I can move calmly.
Watch texture. The source timing matters, but I trust color, set, sizzle, and tenderness too.
Season late if needed. I taste near the end and adjust salt, pepper, acid, or sweetness in small amounts.
Rest when the recipe allows. A short pause keeps slices cleaner, sauces smoother, and juices in place.
Frequently Asked Questions
Yes. I prep what I can early and store it covered, then finish the step that protects texture right before serving.
I keep the same quantity and choose a similar ingredient in size and moisture. Big swaps can change timing, so I watch the pan or oven closely.
I look for the visual cue first, then use the timing as backup.
I cool leftovers first, then refrigerate them in an airtight container. For crisp foods, I reheat uncovered so steam does not soften the surface.
I add a small pinch of salt or a little acid, then taste again. Rich dishes often need acid; sweet bakes often need salt.