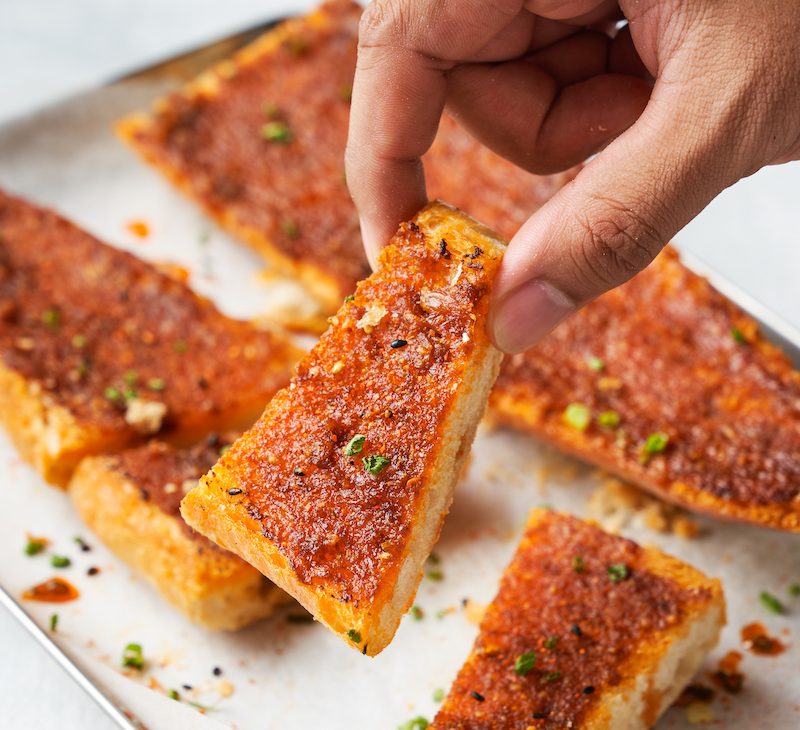

Gochujang Garlic Bread is the kind of savory recipe I make when I want dinner to feel a little more fun without making the evening complicated.
I care about texture first: crisp edges, a filling or topping that stays in place, and seasoning that reaches all the way through instead of sitting on top.
Why I keep coming back to this
- I can prep the ingredients before I start, which keeps Gochujang Garlic Bread from feeling chaotic.
- The recipe has clear visual cues, so I am not relying only on a timer.
- It is flexible enough for small swaps without losing the main character of the dish.
- The leftovers hold up better when I cool and store them the right way.
- The ingredient list is familiar, but the finished flavor still feels worth the effort.
- I can tell when something is off early, which makes the recipe easier to rescue.
What you need (and what each one is doing)
- 2 whole garlic heads. I mince it fine so it distributes evenly through the dish.
- 2 small baguettes.
- Salt and pepper (to taste). A small amount makes the sweet and savory notes clearer.
- Mozzarella (shredded or whole, as needed).
- Olive oil (as needed).
- Foil (as needed).
- 180 g room temperature butter.
- 1 tbsp. dried parsley (or 2 tbsp. if using fresh Italian parsley).
- 1 tbsp. gochujang (Korean red pepper paste).
- 2 tbsp. Extra virgin olive oil.
- 2 tbsp. parmesan powder.
How I make it
Step 1 — Preheat the oven
Preheat the Oven: Preheat ythe oven to 375°F (190°C). Prepare Garlic Heads: Cut the tops off the garlic heads to expose the cloves. Drizzle with olive oil, sprinkle with salt and pepper, and wrap them in foil. Place in the oven and roast for about 30-40 minutes until the. I pause here and look at the mixture instead of rushing to the next bowl.
Step 2 — Combine the ingredients
Make Gochujang Butter: In a bowl, combine room-temperature butter, dried parsley, gochujang, olive oil, and parmesan powder. Mix until well combined. Adjust seasoning to taste. Prepare Baguettes: Cut the baguettes in half lengthwise. If desired, scoop out some of the bread to create a slight hollow for the toppings.
Step 3 — Build the flavor
Spread Gochujang Butter: Spread the Gochujang Butter generously over the cut sides of the baguettes. Squeeze Roasted Garlic: Once the roasted garlic heads are done, squeeze the softened cloves out of their skins and spread them over the buttered baguettes.
Step 4 — Bake
Add Mozzarella: Sprinkle or place mozzarella on top of the garlic and butter mixture, ensuring even coverage. Bake: Place the prepared baguettes on a baking sheet. Bake in the preheated oven for about 15-20 minutes or until the cheese is melted and bubbly, and the edges of the bread are golden brown.
Step 5 — Cool completely
Broil (Optional): If you prefer a more golden top, you can briefly broil the garlic bread under the broiler for 1-2 minutes, watching closely to prevent burning. Serve: Remove from the oven, let it cool slightly, and slice into portions. Serve warm and enjoy ythe good Gochujang Garlic Bread!
My timing notes
I set out every bowl, pan, and measuring spoon before I begin. That sounds fussy, but it keeps me from discovering a missing whisk or cold ingredient halfway through.
When a recipe gives a range, I start checking at the early end. My oven runs a little hot on the back left corner, so I rotate pans when browning looks uneven.
I also build in cooling time even when the source rest time is blank. Hot food is still cooking from carryover heat, and a short pause usually gives cleaner slices, steadier frosting, or a better first bite.
Tips from my kitchen
- Read the recipe once before starting. I catch most mistakes before they happen when I know which steps move quickly.
- Use the pan size listed. Changing the pan changes timing, browning, and the way the center sets.
- Stop mixing as soon as the texture looks even. Overmixing is the fastest way I know to make baked goods tough or sauces loose.
- Start checking early. I set the timer for the low end of the range and let color, aroma, and texture make the final call.
- Let it rest before serving. A few quiet minutes make slices cleaner and flavors calmer.
Variations I have actually tried
- More heat: I add jalapeño, chili flakes, or a little extra gochujang when I want a sharper bite.
- Extra herbs: Parsley, chives, or basil freshen up rich cheese and butter.
- Different cheese: I swap in what melts well, keeping the total amount close to the source.
- Vegetable boost: Sliced onions, tomatoes, greens, or peppers make the dish feel more balanced.
- Crispier finish: A minute under the broiler works, but I do not walk away from it.
Storing and reheating
I refrigerate leftovers tightly covered and reheat them in a 350°F (177°C) oven or toaster oven until the edges crisp again. The microwave works, but the bread softens.
Frequently asked questions
Can I make Gochujang Garlic Bread ahead?
Yes, but I choose the make-ahead point based on texture. For baked recipes I often prep components ahead, then bake or finish the day I serve. For drinks and sauces, I keep the base cold and stir or blend again before serving.
How do I know when it is done?
The recipe should look finished before I pull it.
Can I change the sweetness?
I make small changes first. I adjust glaze, toppings, honey, or serving sauce before changing the main batter or dough, because sugar often affects browning and moisture.
What should I do if the texture looks wrong?
I stop and fix the smallest thing. A splash of liquid helps a stiff batter or blender jar; a spoonful of flour or a few extra minutes of chilling helps a sticky dough.
Can I freeze it?
Many baked versions freeze well once completely cool. I wrap individual portions tightly, label them, and thaw in the refrigerator or at room temperature before reheating gently.
If you make Gochujang Garlic Bread, I would love to hear what you changed and what you kept exactly the same.
Gochujang Garlic Bread
Description
Gochujang Garlic Bread is written the way I make it in my own kitchen: exact source amounts, clear timing, and the texture cues I check before serving. I included practical swaps, storage notes, and the small fixes that help the recipe behave.
Ingredients You’ll Need
Instructions
- Preheat the Oven: Preheat ythe oven to 375°F (190°C).
- Prepare Garlic Heads: Cut the tops off the garlic heads to expose the cloves. Drizzle with olive oil, sprinkle with salt and pepper, and wrap them in foil. Place in the oven and roast for about 30-40 minutes until the garlic is soft and caramelized.
- Make Gochujang Butter: In a bowl, combine room-temperature butter, dried parsley, gochujang, olive oil, and parmesan powder. Mix until well combined. Adjust seasoning to taste.
- Prepare Baguettes: Cut the baguettes in half lengthwise. If desired, scoop out some of the bread to create a slight hollow for the toppings.
- Spread Gochujang Butter: Spread the Gochujang Butter generously over the cut sides of the baguettes.
- Squeeze Roasted Garlic: Once the roasted garlic heads are done, squeeze the softened cloves out of their skins and spread them over the buttered baguettes.
- Add Mozzarella: Sprinkle or place mozzarella on top of the garlic and butter mixture, ensuring even coverage.
- Bake: Place the prepared baguettes on a baking sheet. Bake in the preheated oven for about 15-20 minutes or until the cheese is melted and bubbly, and the edges of the bread are golden brown.
- Broil (Optional): If you prefer a more golden top, you can briefly broil the garlic bread under the broiler for 1-2 minutes, watching closely to prevent burning.
- Serve: Remove from the oven, let it cool slightly, and slice into portions. Serve warm and enjoy ythe good Gochujang Garlic Bread!
Note
Read the recipe once before starting. I catch most mistakes before they happen when I know which steps move quickly.
Use the pan size listed. Changing the pan changes timing, browning, and the way the center sets.
Stop mixing as soon as the texture looks even. Overmixing is the fastest way I know to make baked goods tough or sauces loose.
Start checking early. I set the timer for the low end of the range and let color, aroma, and texture make the final call.
Frequently Asked Questions
Yes, but I choose the make-ahead point based on texture. For baked recipes I often prep components ahead, then bake or finish the day I serve. For drinks and sauces, I keep the base cold and stir or blend again before serving.
The recipe should look finished before I pull it.
I make small changes first. I adjust glaze, toppings, honey, or serving sauce before changing the main batter or dough, because sugar often affects browning and moisture.
I stop and fix the smallest thing. A splash of liquid helps a stiff batter or blender jar; a spoonful of flour or a few extra minutes of chilling helps a sticky dough.
Many baked versions freeze well once completely cool. I wrap individual portions tightly, label them, and thaw in the refrigerator or at room temperature before reheating gently.
You may also like...